Copy link to clipboard
Copied
Hey.
How do i make a circle like thin in photoshop?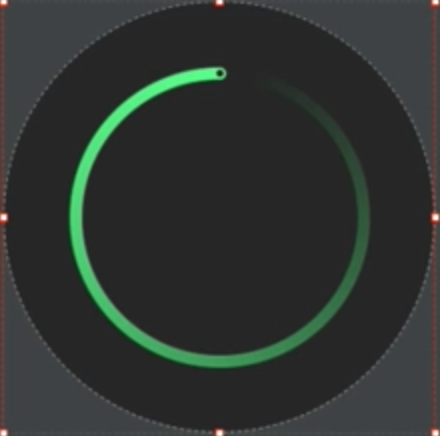
 1 Correct answer
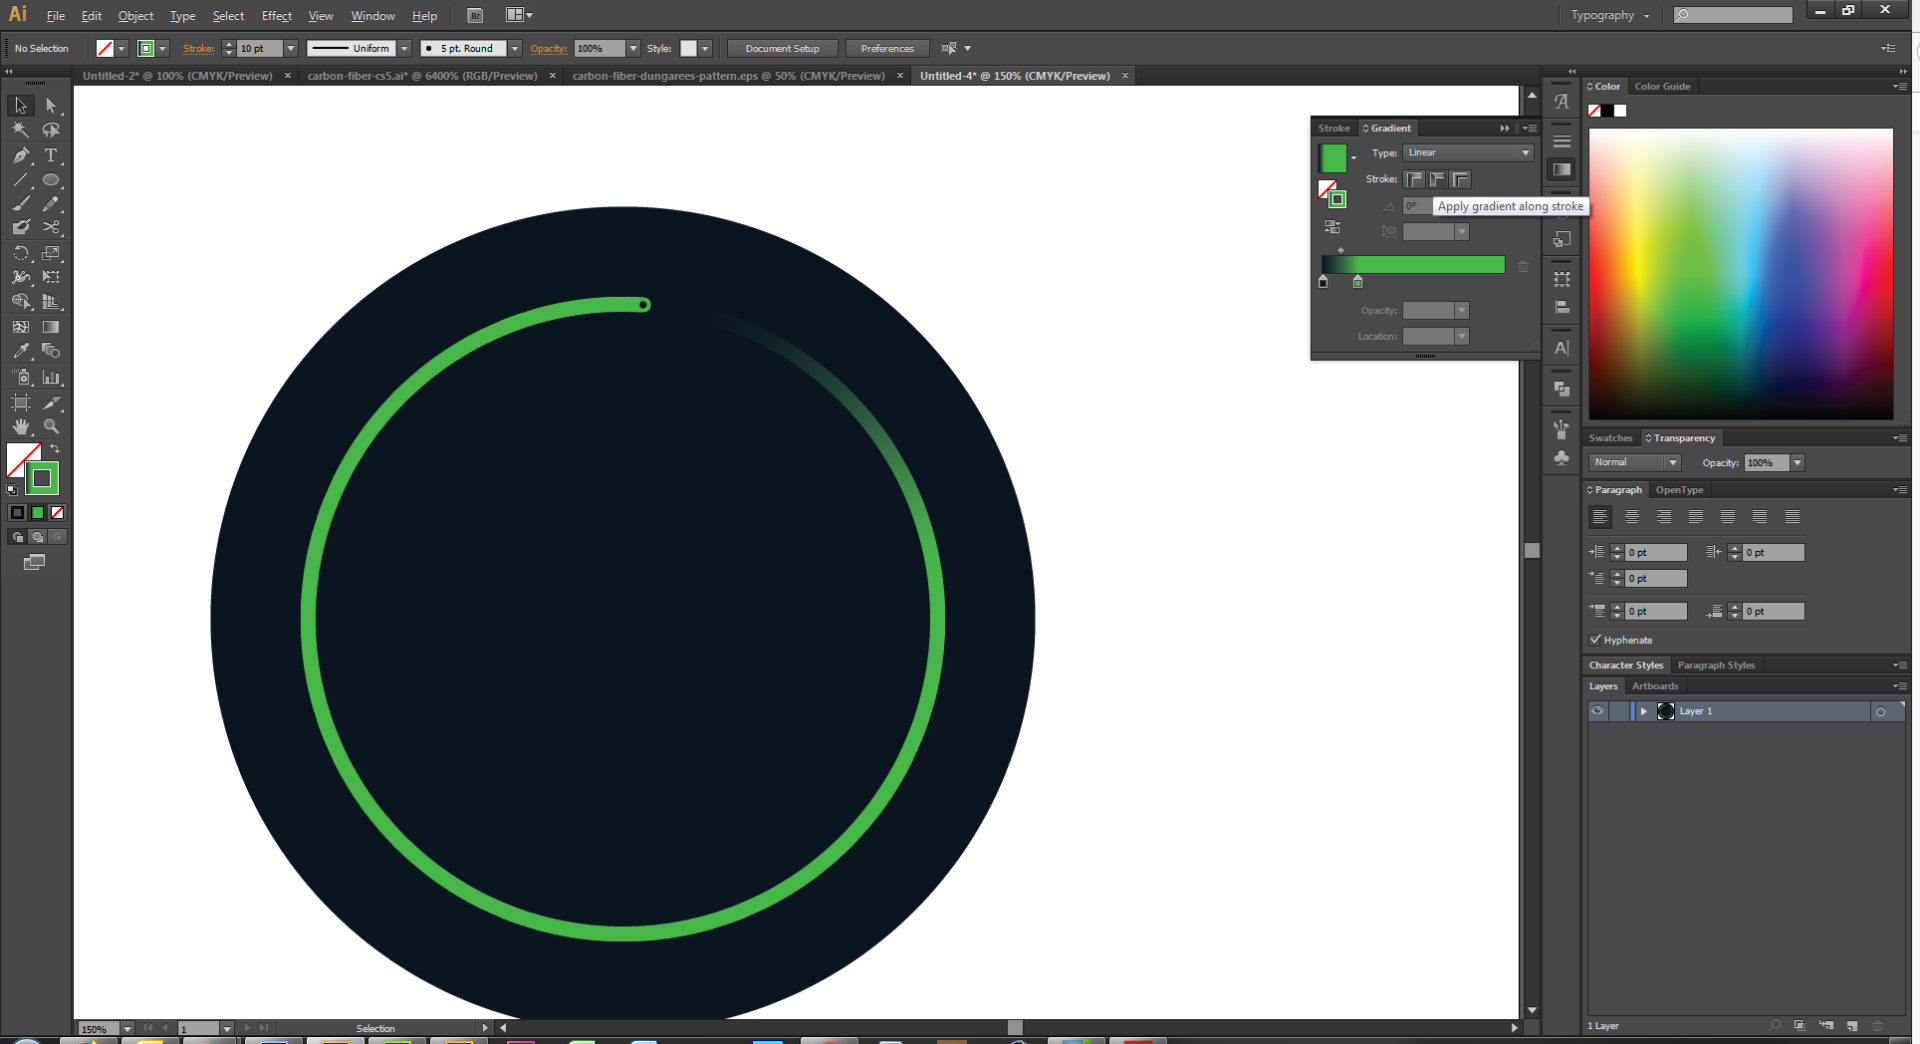
I would do this in Illustrator. add a gradient to the stroke with the stroke applied along the stroke
Explore related tutorials & articles
Copy link to clipboard
Copied
In photoshop there are always so many ways to do something.
It seems like you want a circle with a thin stroke around it?
You can try creating a circle using the Elliptical Marquee Tool in the Tool Palette.
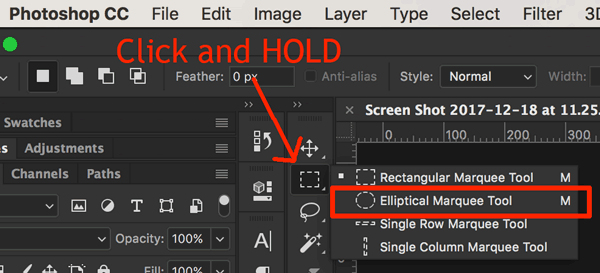
Then click and drag to draw a circle on a new layer (Press and hold the SHIFT key to constrain the circle)
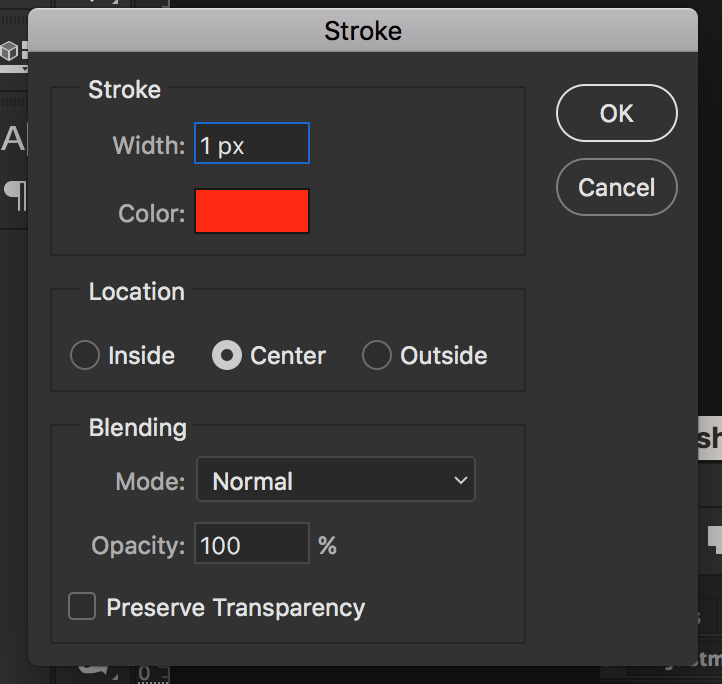
now you should have a circle selection, and you can add a FILL color(inside color) or a STROKE color(outline color) to the circle, by using the Edit Menu. Edit>Fill.. or Edit>Stroke...
For the outline of the stroke you can put 1px in the width input field for a thin stroke around your circle.
Another way to create a circle with a thin stroke is by using the Ellipse Tool
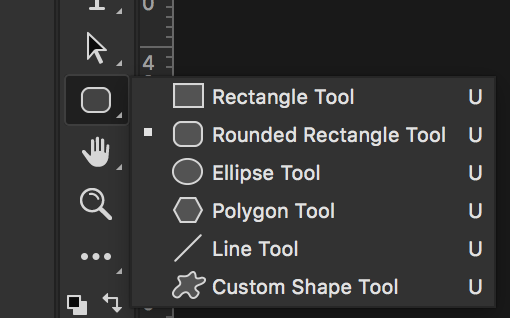
and then changing the color and size of the stroke using the Properties Panel
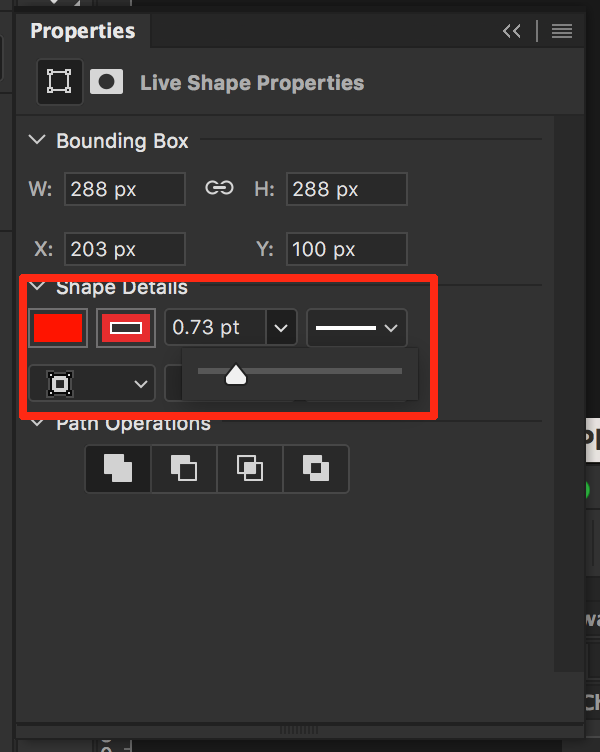
hope that helps!
cheers!
Mark
Copy link to clipboard
Copied
@headtrix Thanks ![]() Now i can make a circle without the fill inside, thanks. But i also wants the fade (i dont know what to call it, the opacity). Do you know how to make that?
Now i can make a circle without the fill inside, thanks. But i also wants the fade (i dont know what to call it, the opacity). Do you know how to make that?
Copy link to clipboard
Copied
for the fade... might be a bit complex to teach you that here in written form only.
You can lower the opacity of a layer in the Layers Panel, but that reduces opacity of the entire layer.
or you can use the Eraser Tool, and and enable to airbrush in the options menu, lower its Opacity, and slowly erase and fade away what you no longer need.
or lastly, probably the best way but most difficult is to use a layer mask, and then use a black to white gradient overlay to fade out the circle.
This forum is for help though, not exactly to actually TEACH you photoshop.... I am an Adobe Certified Instructor and I do teach Photoshop, but we usually don't get to masking until our Level 2 class, since you have to know about the Photoshop user interface, its tools, layers, selections, color, brushes, opacity, airbrush, gradients, etc
Hope this helps!
cheers!
mark
Copy link to clipboard
Copied
Sorry Mark - I just realised you mentioned using a mask in your reply
Dave
Copy link to clipboard
Copied
The OP has started something here 🙂

Copy link to clipboard
Copied
Hi
Make the circle shape with a green stroke and no fill, as others have described. Add a Mask and use an angle gradient in the mask


Dave
Copy link to clipboard
Copied
You can try this,
Strat with vector Elipse (U - and select elipse) - draw circle (with shift key pressed) on your page
Add Stroke (green) and no Fill - control panel on top of your screen
Add Layer Mask to this layer and use large soft brush with opacity about 50%. Use black to hide (mask) some part of your circle
This way you can easily add this Gap on top.
finally choose hard brush with opacity 100% and mask little circle on your design
it works
pawel
Copy link to clipboard
Copied
How do i find the hard/soft
Copy link to clipboard
Copied
I would do this in Illustrator. add a gradient to the stroke with the stroke applied along the stroke

Copy link to clipboard
Copied
Make a circular path
Select the Elliptical Shape tool, and set to Path in the Options bar
Drag out your circle while holding down the Shift key (to force a perfect circle)
Select the brush tool, and a hard round preset and size to suite.
In Brush Settings > Transfer > Opacity Jitter set the Control to Fade
The value depends on, size of the circle in pixels, brush size, and spacing. My canvas was 1000 pixels square, and spacing 10%
In the Paths panel right click the path, and choose Stroke path.
If not already selected (the default is Pencil) use the drop-down and select Brush tool.
Simulate Pressure should be unchecked.

You can do the same thing with brush size.
Note, once Stroke is set to Brush, you just need click on the icon at the bottom of the paths panel. This is useful as it generally takes a bit of trial and error when setting a value for Fade.
Warning if you hit the delete key to empty a layer, and the path is selected, it will delete the path. Ctrl z will get it back.

[EDIT] Goodness, so many ways to do this. I think you'd need to use Fade if you wanted to taper brush size though, but I would not be surprised if Dave works out another way. ![]()
Copy link to clipboard
Copied
Trevor.Dennis wrote................................
[EDIT] Goodness, so many ways to do this. I think you'd need to use Fade if you wanted to taper brush size though, but I would not be surprised if Dave works out another way.
Hi Trevor
No I couldn't come up with a way to taper the stroke on the live shape. Whilst thinking though I did think of a better way to add the fading gradient without using a mask.
That was to use the angle gradient on the stroke of the live shape.
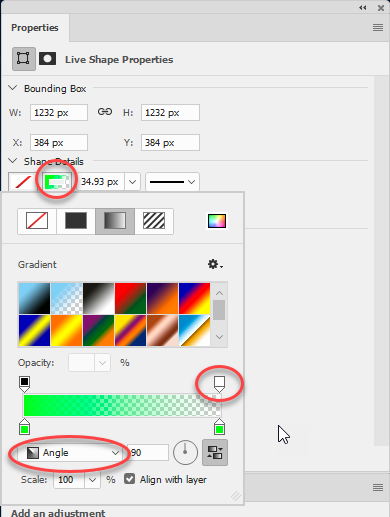
That way no mask is required.
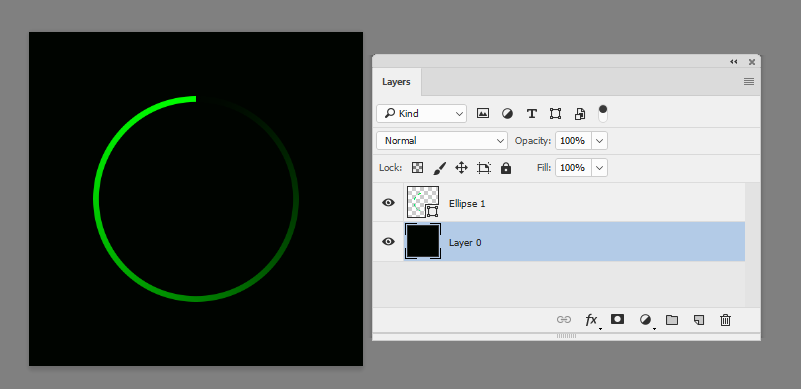
Dave
Copy link to clipboard
Copied
davescm wrote
Trevor.Dennis wrote................................
[EDIT] Goodness, so many ways to do this. I think you'd need to use Fade if you wanted to taper brush size though, but I would not be surprised if Dave works out another way.
Hi Trevor
No I couldn't come up with a way to taper the stroke on the live shape. Whilst thinking though I did think of a better way to add the fading gradient without using a mask.
Dave
Impressive when you consider the time that you posted that. Are you sure you can afford to skimp on your beauty sleep? ![]()
I must admit that I don't tend to use those options, but I guess we tend to focus on what we know best. I shall get up to speed with them now though,
Copy link to clipboard
Copied
Trevor.Dennis wrote................ Are you sure you can afford to skimp on your beauty sleep?
I think it'll take more than a nights sleep to restore that ... ![]() . Time though for me to drop out 'til tomorrow.
. Time though for me to drop out 'til tomorrow.
Dave
Copy link to clipboard
Copied
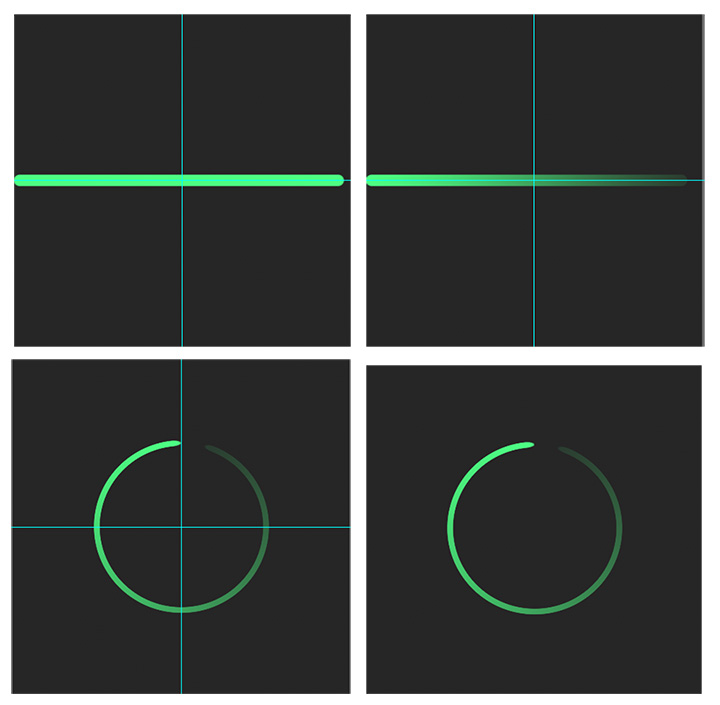
1. Draw a centered horizontal bar on a blank layer above the black background layer. Note that it extends from one side to almost the other side of the square. Then, lock the transparent area of the layer
2. Gradient Tool. White to black mask.
3. Unlock. Select > All. Filter >Distort > Polar Coordinates…Rectangular to Polar
Edit: Sorry for the edits. Tried to make instructions clearer.Copy link to clipboard
Copied
I like to do this in Illustrator. Capture creative vision with shapes, color, effects, and typography and add a gradient to the stroke with the stroke applied along the stroke. you can do this and many more with adobe illustrator.


