 Adobe Community
- Home
- Photoshop ecosystem
- Discussions
- How do you reduce file size of bulk images, while ...
- How do you reduce file size of bulk images, while ...

Copy link to clipboard
Copied
My company has a website with over 1500 images of various file types and sizes. I've been asked to reduce their file size so that the website can run much more smoothly (many of the images are much larger than they need to be). I figured that making a batch process of some kind in Photoshop might be the best way to go about it, with so many files.
However, the more I delve into the process, the more it seems it wants to change the file names, or convert all of the various image types to a single file type.
How would I/should I build a batch process that takes the images from folder A, optimizes their file size for web, then saves them to folder B with the exact same naming conventions, folder structure, and file type?


 1 Correct answer

Ravingdork, you're going about this the wrong way. This is for a website, right? For web (screen viewing) the ppi number is irrelevant, it doesn't apply. Ppi is a print parameter. For web use, the ppi metadata are normally stripped from the file altogether.
You need to look at pixel sizes. That's the only thing that matters here. Unless you're actually reducing pixel dimensions, the file remains the same.
For jpegs there is also the compression rate. This doesn't touch the pixel sizes, but is a da
...Explore related tutorials & articles
 11
Replies
11
11
Replies
11

Copy link to clipboard
Copied
Hi,
1:- Go to file
2:- Select Script
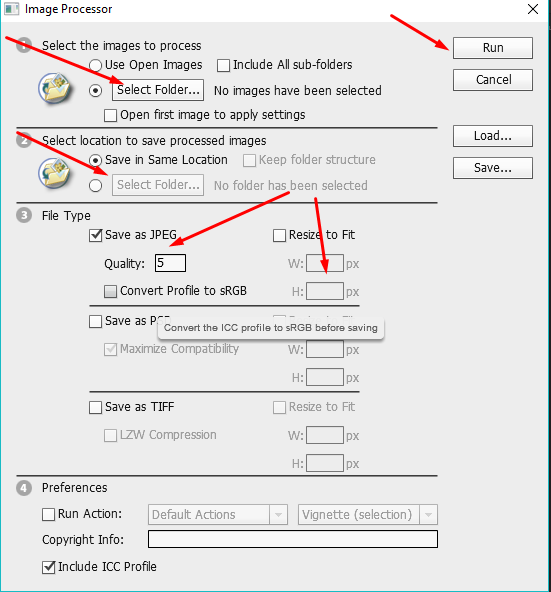
3:- Then Select Image Processor
4:- then choose your folder which images you want to resize for web
5:- then choose your required setting for web image size and then run it.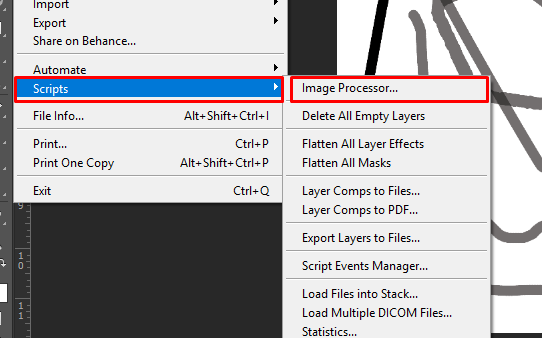
Copy link to clipboard
Copied
Thank you for the clean and easy breakdown, but I've tried that already. It converts all of the images to a single file type. I need to be able to maintain their original file types.
Copy link to clipboard
Copied
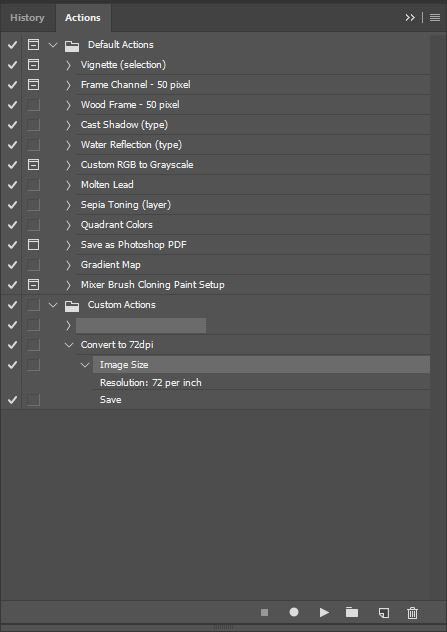
Then Bring one of that image into photoshop and then go to window and open Action and make a folder name for resizing then hit the action icon and name it with your desire size.
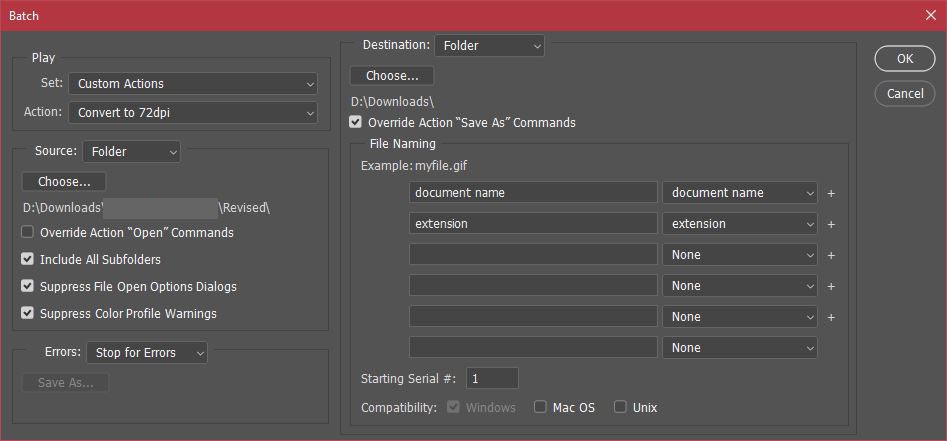
Then go to file and select automate and select Batch.
After this choose your folder that you created in actions. by clicking on set and then choose your action that you created earlier.
Then choose your source and make your settings.
Hope So It will help you.
Thanks.
Regards:
Muqqarib
Copy link to clipboard
Copied
Thank you so much for your help guys! We're almost there I think.
I cloned the image files and set it up to open, modify, and save over the cloned files. Doing that with the settings shown below, I've managed to get it to maintain the file name, file structure, and file type. However, a setting prompt comes up for animated GIF files then, rather than overwriting them like it does other image files, it makes a copy in which the animation is broken. Slows the process a bit, but not a huge deal since there aren't many GIFs. PDFs and PSD files also present minor hiccups, but those don't necessarily need to be downsized anyways.
The big problem is that by converting all the images to 72dpi while maintaining their original size actually makes the sum of the images 25% larger in file size, largely defeating the whole point.
Since my initial tests showed that large files were getting smaller, I suspect that this is happening because there are so many more small files (under 72ppi) than there are large files (over 72ppi). The small files actually get bigger while the large ones get smaller, so the overall sum of all files is roughly 25% larger.
Does anyone have any suggestions on how I could fix this and end with smaller files? I'm beginning to think the only way is to manually target the largest images. Is there a better way that I've overlooking?
Copy link to clipboard
Copied
Yes. You can fix the manually those target largest images.
Copy link to clipboard
Copied
Ugh. Still looks to be about 400 of them over 100 kb in size.
Copy link to clipboard
Copied
opps. I knows these two methods that i told you.
Best of luck!
Copy link to clipboard
Copied
HOW ARE THEY LARGER!? I processed only those that were over 100 kb and the majority of them increased in size. There must be something wrong with my action settings. How is setting them to 72dpi making the file sizes larger?
Copy link to clipboard
Copied
Hi, Yes. Make sure your action setting is correct. It must be there mistake that you are making.
Copy link to clipboard
Copied
Ravingdork, you're going about this the wrong way. This is for a website, right? For web (screen viewing) the ppi number is irrelevant, it doesn't apply. Ppi is a print parameter. For web use, the ppi metadata are normally stripped from the file altogether.
You need to look at pixel sizes. That's the only thing that matters here. Unless you're actually reducing pixel dimensions, the file remains the same.
For jpegs there is also the compression rate. This doesn't touch the pixel sizes, but is a data compression algorithm.
You should be aware that resaving a jpeg at the same compression level will usually increase file size slightly. Jpeg compression is much more effective on flat areas than fine detail. But the compression introduces artifacts that are for all practical purposes added detail. Hence, larger file.

Copy link to clipboard
Copied
The bulk of data in all image file type is Pixel data. How well the image encoder compress the pixel data the smaller the file will be. Image with great fine details will not compress as was as a picture of a white wall. So the biggest factors contributing to file size are.
The Number of Pixels you have for an image.
The Number of Channels of Pixel data image mode - bitmap, Grayscale, RGB, CMYK
The number of bits per pixels per channel 1bit 8bit, 16bit 32bit
Image Content details.
Encoding and data compression methods.
Some File type encoding sacrifices Image quality to produce smaller files.
The easiest way to produce smaller file is to resample you image down in size reduce the number of pixels you have for an image. Give up some image quality.
Web sites image are Normally resample way down in So they do not need to be scale done in size to fit in a web page via html and also have their metadata striped so small file will be saved so the will transfer quickly over the network. So the First to do is make sure you web image have been sized to fit into web pages and their meta data has been stripped, With Jpeg images you can give up more image quality by reducing the image quality setting used when you save for web. The are some third Party Plug-in available for saving PNG files that claim to save smaller file them Adobe does. For Animated Gif you can reduce the number of frames. Sane PNG ins 8bit color the is no need for 16bit color on the web. Jpeg only supports 8bit color.

 AdChoices