sofias787809
Known Participant
March 21, 2018
Answered

How to make scans of Kodak color slides less blurry?

  • March 21, 2018
  • 3 replies
  • 7762 views

    Hi. I'm brand-new to Photoshop. I've never used it in my life. I have to scan quite a few Kodak color slides. I'm using an Epson 12000XL scanner to do this. They're being scanned as TIFFs, 3000dpi, 24-bit color. When I open them up in Photoshop, they could be a lot sharper. How can I make the images sharper in Photoshop? I've attached one sample slide below (as JPG, 3000dpi, 24-bit color). Notice that the edges of everything are kind of blurry. I'm using Photoshop CC 2017, and I'm on a PC. The images will not be printed out; they will be used on a PowerPoint presentation. The person in charge of the project wants them to be at 3000dpi.

Please be kind. I am brand new to this. Many thanks!

Correct answer Norman Sanders

Interesting! But I don't see the "Save for Web" option in my Save options. I only have Save and Save As. By the way, there's a new challenge: the eyedropper. My professor would like me to lift the color of the bone to the far right in the pic below

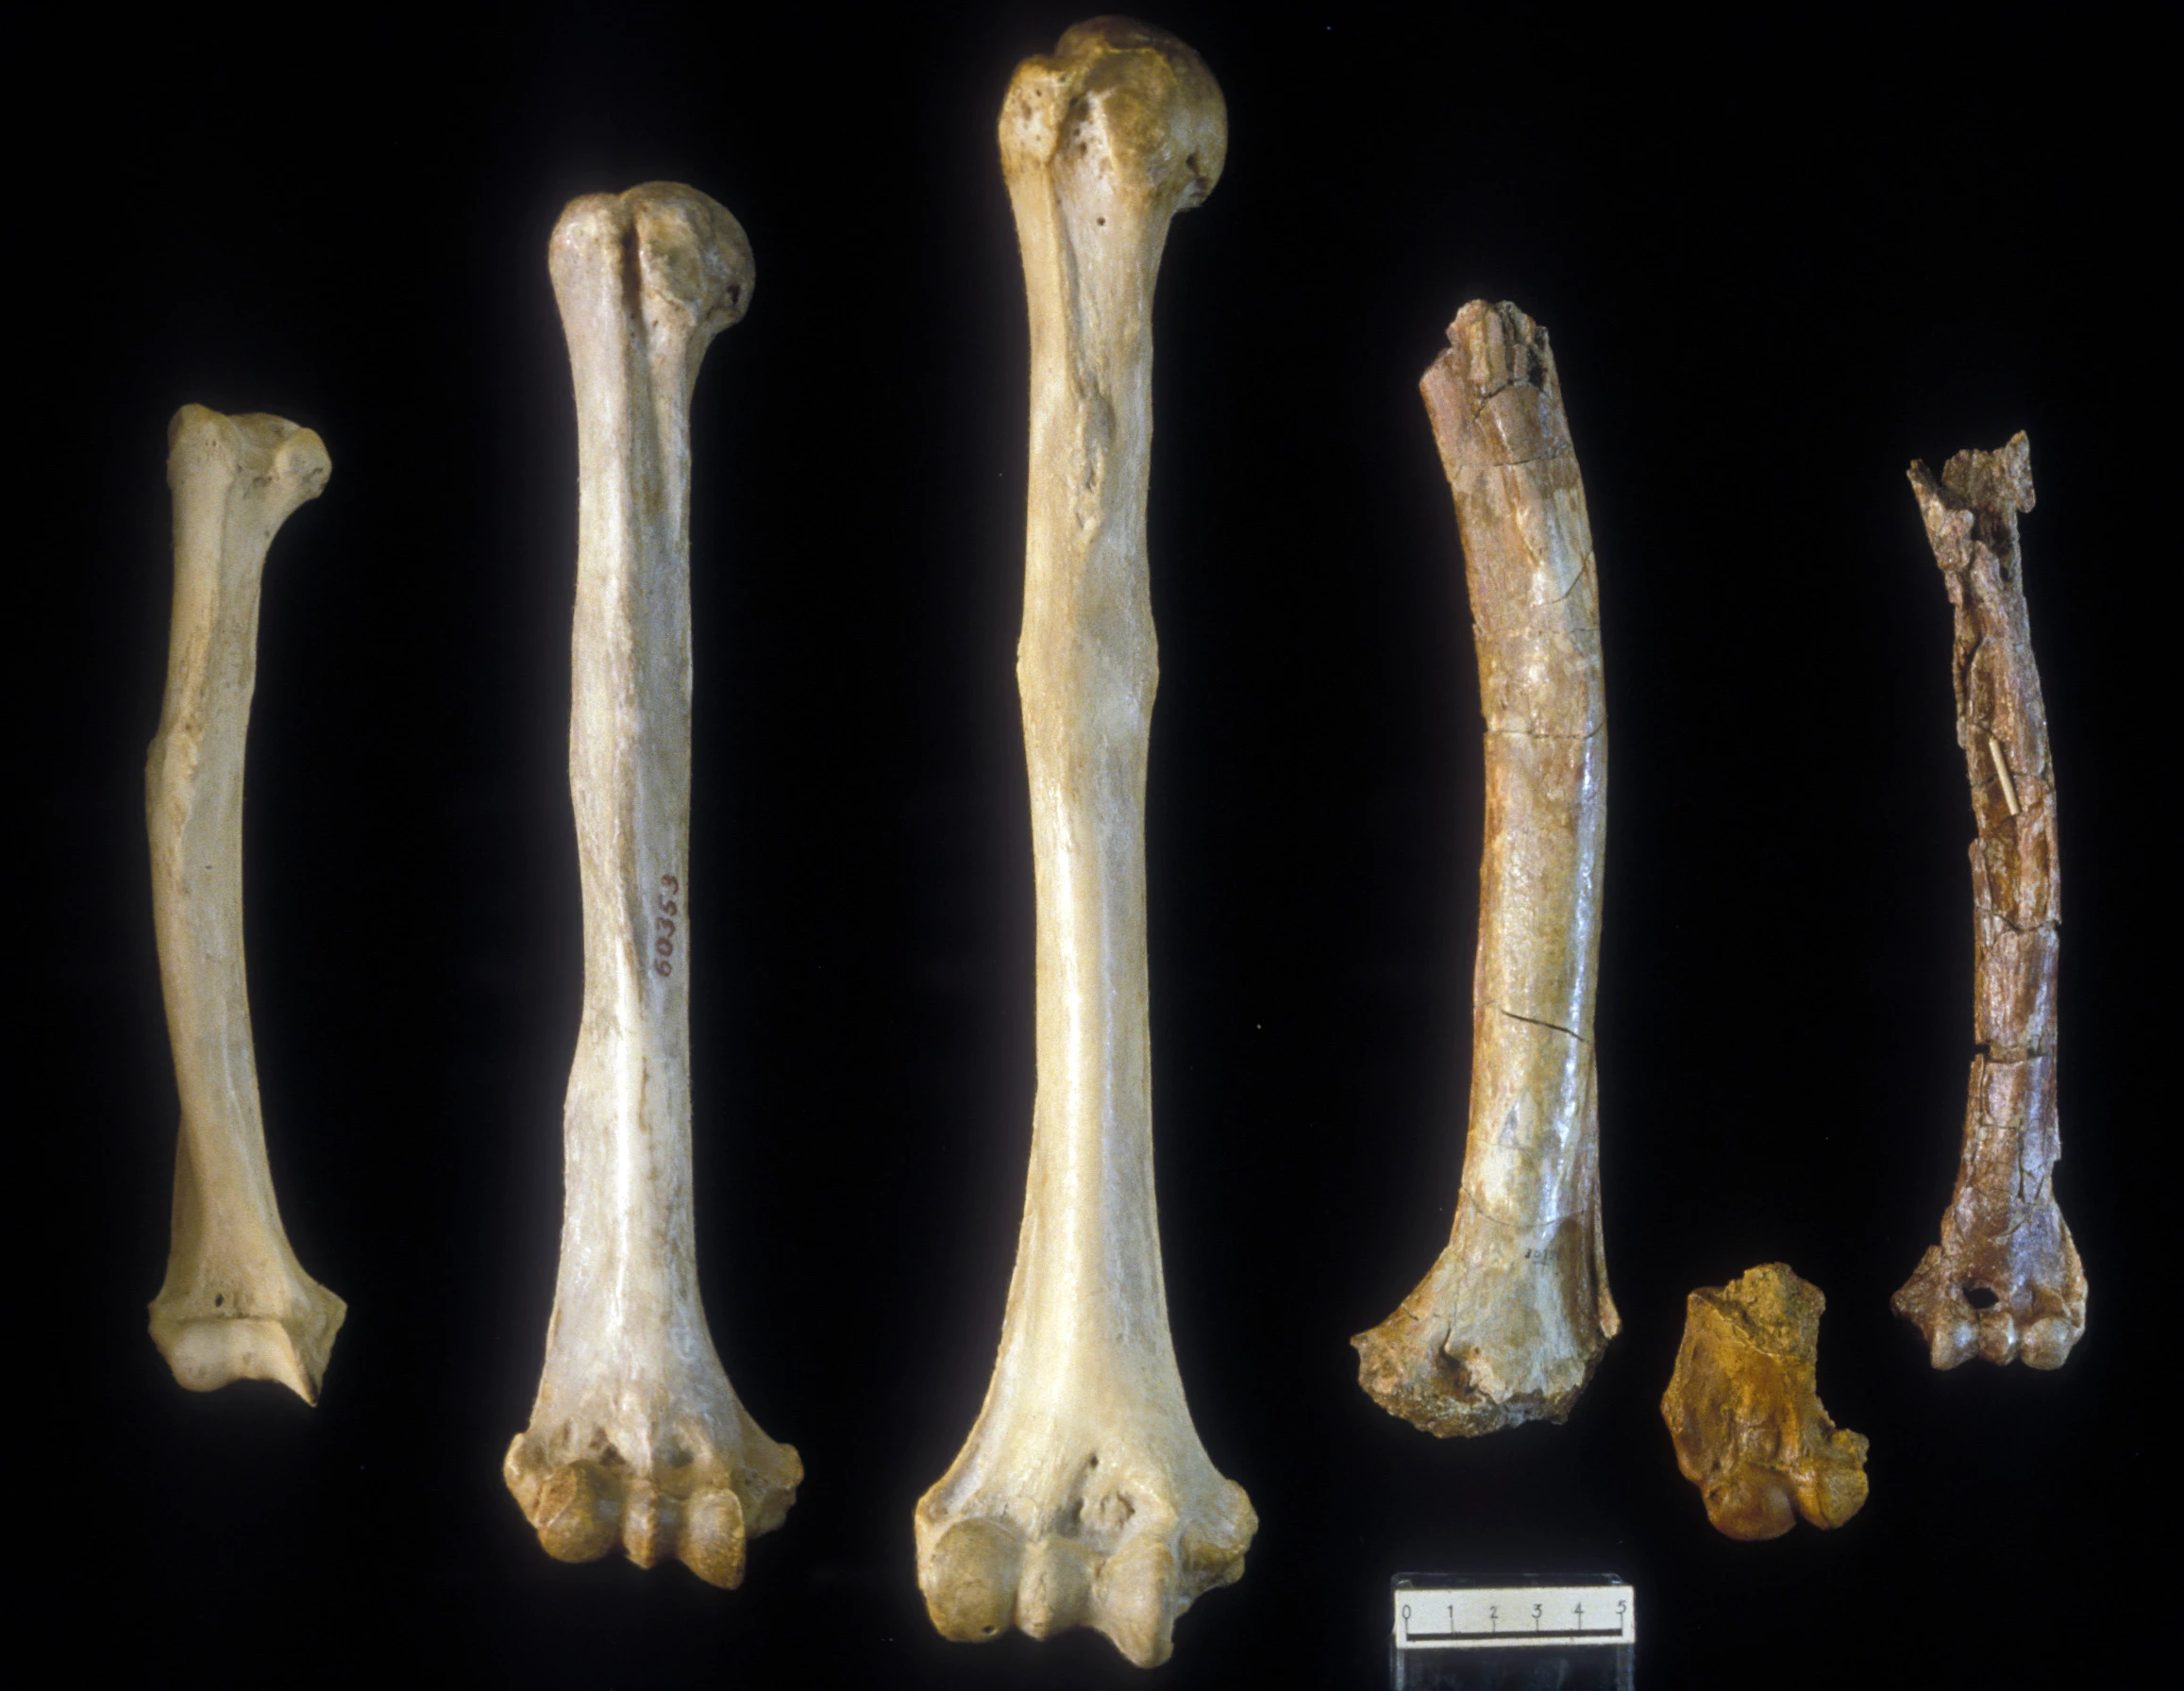
and apply it to the bone in this pic:

It's the same bone by the way; it just so happens that the second picture is extremely faded, and the first picture shows the true color of the bone when it was found. Now, I know that this does not involve only just one color, but a full gradient of colors. I started by using the magic wand and outlining both bones as best I could. THEN, I used the eyedropper tool to sample some color from the bone in good condition.....but now I don't know how to "insert" that color into the second bone. I went to Lynda Campus, but the videos for doing this are at the intermediate/advanced level, where they talk about 3x3 pixels, hexa-something. Any "simple" recommendations would be appreciated.

I will continue to look for Save for Web feature in the meantime. And again, as always, many thanks.


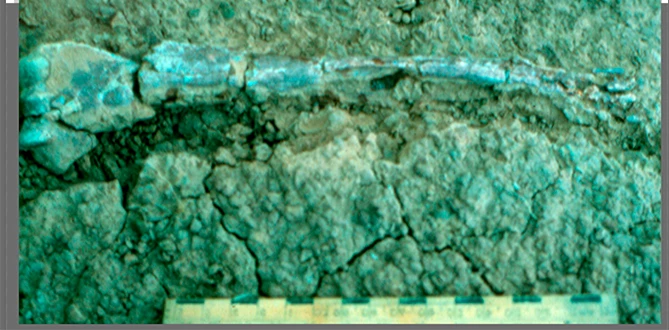
The differences between the two images, differences in local contrast (modeling), tonal range, image sharpness and variety of colors makes the matching the images impossible. For the image above, the reference sample was enlarged and silhouetted and added as a layer above the green image. it is at the bottom of the image and has not been modified. This eliminated the distraction of the surround.

Using Curves and Channel Mixer the color was altered to put it in the ballpark. At this point some of the browns are a tad too red, others a tad lacking in red. Contrast adjustment could be made in Lab (L channel) without a color shift and may be needed because all these changes reduced the difference in color of the object from the setting. There have been no local corrections. The setting could be modified on a separate layer, if desired. These notes provide a good start for you on this project. Good luck 

3 replies

sofias787809
Known Participant
March 27, 2018

I want to thank everyone here, --Silkrooster, Abambo, and Per--for answering my questions. I was away from my office with whooping cough right after I posted this questions, which is why I'm so late in responding now. I didn't want anyone to think that I had posted a question and forgotten about it, which would have been so rude!!!

I want to ask each of you a question:

Per-- You said that "you probably want to downsize it (use a copy) to maybe around 1900 pixels wide (depending on the resolution of the monitor), and it will look much better at that size." How do I downsize to 1900 pixels wide? Like, where do I input the number "1900"? Or did did you mean 19,000 by any chance?

Silkrooster-- I think you're absolutely right about the quality of the camera with which these pics were taken. Following your math instructions here:

"OK the average size of a print is 4" x 6" (or there about). So to see what the actual quality is you take the inch of one side and multiply by the ppi to get your pixel dimension of that side, then repeat.

4 x 3000 = 12000 px

6 x 3000 = 18000 px"

Where would the 1900 or 19,000 fit in?

Abambo-- Thank you for the wonderful article on Digitizing Slides

Again, thank you to everyone for taking time out of your schedules to explain super basic things to a beginner. I really appreciate it.

Sofía

Per Berntsen
Community Expert
Community Expert
March 27, 2018

Per-- You said that "you probably want to downsize it (use a copy) to maybe around 1900 pixels wide (depending on the resolution of the monitor), and it will look much better at that size." How do I downsize to 1900 pixels wide? Like, where do I input the number "1900"? Or did did you mean 19,000 by any chance?

Since you will be using these images for a Power Point presentation on screen, consider the width of the monitor in pixels. 1920 is a common width, which is why I suggested 1900. I would guess that Power Point scales images down to fit in window (don't know, I never used it), but if you do the scaling beforehand, the file size will be reduced. (the image you posted is 3881 pixels wide)

You probably want jpgs for the presentation, so I suggest that you use Save for web, which will create a  new version of the image, optimized for screen use. Go to File > Export > Save for Web, and try the settings in the screenshot below. Pay particular attentions to the items marked in red. You could also File > Export > Export As - personally I prefer Save for Web.

If you have a monitor with very high resolution, you might want to use a larger width than 1900 pixels.

Working in Photoshop will be a lot easier if you have a fundamental understanding of how digital images work.

I've written a couple of articles that you may find helpful - What is a digital image? and File formats

Silkrooster-- I think you're absolutely right about the quality of the camera with which these pics were taken. Following your math instructions here:

"OK the average size of a print is 4" x 6" (or there about). So to see what the actual quality is you take the inch of one side and multiply by the ppi to get your pixel dimension of that side, then repeat.

4 x 3000 = 12000 px

6 x 3000 = 18000 px"

Where would the 1900 or 19,000 fit in?

The 3000 number is the ppi, which controls how large an image is printed on paper. For screen use, the ppi is irrelevant.

But if you were to print a 4 x 6" image at 300 ppi, you would need at least 1200 x 1800 pixels, because 4 x 300 = 1200 and 6 x 300 = 1800.

To check the pixel dimensions (as well as printed dimensions at any ppi) in Photoshop, go to Image > Image size.

You could also resize the image here, but in your case I suggest using Save for web.

sofias787809
Known Participant
March 27, 2018

Great. Someone told me that I should be using TIFFs for the powerpoint because they would give the sharpest image. But I quickly found out that makes the file SO BIG it's unmanageable. I'm posting there a screenshot of my scanner settings. I'm going to save these as JPGs, for starters. Should I lower the dpi to 1900 then? And set the Scanning Quality to low?

Abambo
Community Expert
Community Expert
March 21, 2018
  • 3000 dpi makes no sense, as the physical resolution is only 2400x4800.
  • do not use sharpening when scanning, except if you know what to do.
  • use dust removel only, when done in hardware.
  • mechanically clean your slides before scanning.
  • colour depth should be probably 16bits per channel.
  • make sure the slides are plane on the scanner, when scanning. Not all scanners allow for that easily.

I scanned my slides with a special slide scanner.

The slides may be blurry, because of the camera used, the film used, the film grain, the processing and they may be further detoriated due to aging.

I do not see your test picture exceptional blurry. Infact we tend to look at the picture at a 100% of the pixel size. You should downsample to the projection size and mount into a powerpoint and project that to see how this works out.

A different thought: At the time, pictures where not as sharp and colour pinched as today. We really fast adopted the special digital style.

ABAMBO | Hard- and Software Engineer | Photographer
michelew83603738
Community Expert
Community Expert
March 22, 2018

Here is a great article about digitizing slides that might be helpful.

Digitizing Your Slides by Photography

Abambo
Community Expert
Community Expert
March 23, 2018

Thanks for pointing to this great article. As the nominal resolution of the scanner is higher than a standard camera, I doubt that the result will be better.

Only for the records: Film grain adds to the visual quality of the pictures. Especially if you know that the source are old film slides or negatives.

Digital noise, yes but not grain. However, scanning software can deal with this.
ABAMBO | Hard- and Software Engineer | Photographer
Silkrooster
Legend
March 21, 2018

OK the average size of a print is 4" x 6" (or there about). So to see what the actual quality is you take the inch of one side and multiply by the ppi to get your pixel dimension of that side, then repeat.

4 x 3000 = 12000 px

6 x 3000 = 18000 px

An 12000 x 18000 pixel image is more than enough for a print.

So if it is blurry I would say it was due to the camera and more than likely because it was not on a tripod and the camera set to the proper settings for the scene.

It could also be from a low quality lens, especially if the camera was a point and shoot style.

The film it self could also be an issue.

But from what I am seeing, I don't think the issue is the setting from scanning.

Just my opinion. I have been known to be wrong before, so...

sofias787809
Known Participant
March 23, 2018

Wow, I didn't know that was how you calculated pixels. Many thanks!!!

Yeah, these photos were taken in the 1970s and early 1980s....and I suspect not the sharpest cameras were used.