Exit
  • Global community
    • Language:
      • Deutsch
      • English
      • Español
      • Français
      • Português
  • 日本語コミュニティ
  • 한국 커뮤니티
0

How to offset using marquee

New Here ,
Oct 15, 2017 Oct 15, 2017

I am trying to create a seamless tileset for a videogame, and I don't want to have to make a new file for every tile.

Is there a way to use "offset-Wrap around," but only wrap around inside the marqueed area? If I have to code, I'm ok with that.

Screen Shot 2017-10-15 at 4.59.01 PM.png

1.5K
Translate
Report
Community guidelines
Be kind and respectful, give credit to the original source of content, and search for duplicates before posting. Learn more
community guidelines
Adobe
LEGEND ,
Oct 15, 2017 Oct 15, 2017

OK, I just learned something. I always assumed offset was document only. It is selection based as shown below.

Just make sure your selection is a square by holding the shift key as you drag.

Translate
Report
Community guidelines
Be kind and respectful, give credit to the original source of content, and search for duplicates before posting. Learn more
community guidelines
New Here ,
Oct 15, 2017 Oct 15, 2017

Thanks, but I only want it to wrap around INSIDE of the selected area.

From what I can tell, you're wrapping the entire canvas.

Translate
Report
Community guidelines
Be kind and respectful, give credit to the original source of content, and search for duplicates before posting. Learn more
community guidelines
LEGEND ,
Oct 16, 2017 Oct 16, 2017
LATEST

yitzil37711700  wrote

Thanks, but I only want it to wrap around INSIDE of the selected area.

From what I can tell, you're wrapping the entire canvas.

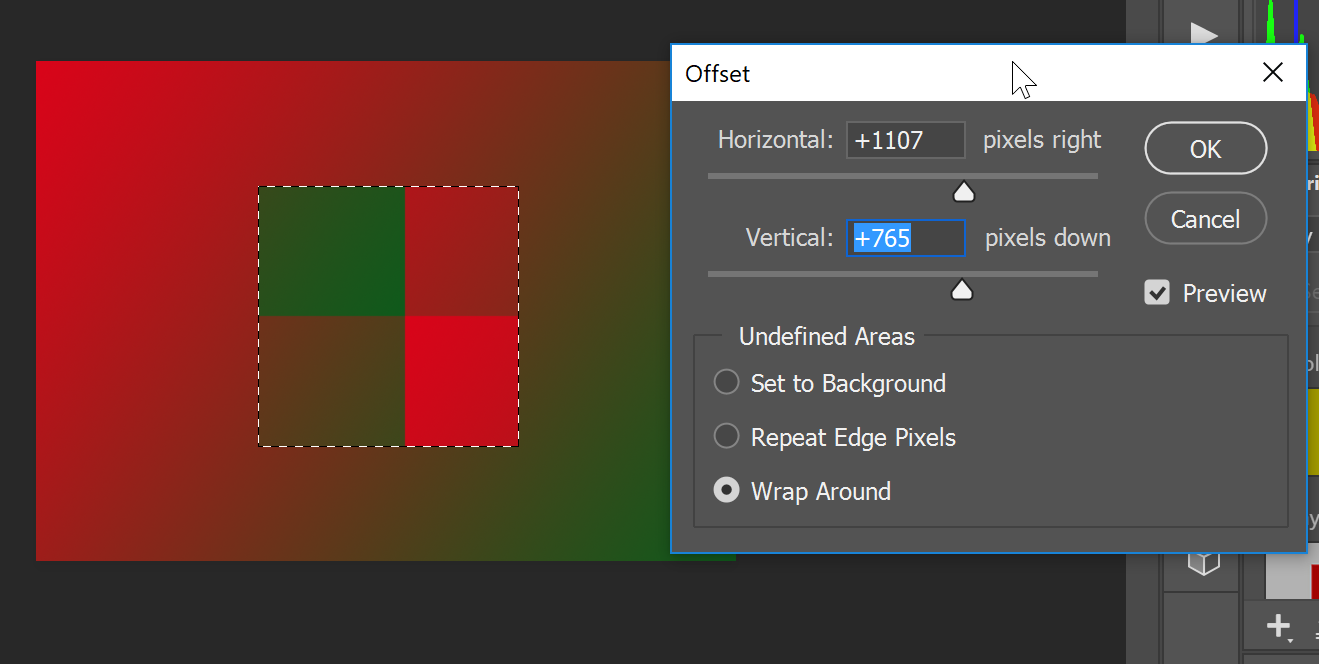
No, I create a new document, filled it with a gradient, then dragged out a selection in the middle and applied the offset to the selection. As you can see the canvas did not offset.

The resulting selection can then be copied or moved to a new layer. That new layer can then be exported.

I assume what you are trying to do is create a storyboard or sprite sheet. If so, contact sheet II can help combine the resulting images into a strip.

Translate
Report
Community guidelines
Be kind and respectful, give credit to the original source of content, and search for duplicates before posting. Learn more
community guidelines
Community Expert ,
Oct 15, 2017 Oct 15, 2017

I am not sure that I am understanding what you want to get as an end result exactly, and Select > Modify > Contract seems too obvious to be the answer.  Can you elaborate on where you are trying to get to — what your end result needs to be?  Are you trying to make a gap between the tiles for a grout effect, for instance?

[BTW]  I like Silkrooster's post, and agree that is worth having a closer look at.

Translate
Report
Community guidelines
Be kind and respectful, give credit to the original source of content, and search for duplicates before posting. Learn more
community guidelines
New Here ,
Oct 15, 2017 Oct 15, 2017

I want to achieve this efect:

Screen Shot 2017-10-15 at 7.06.40 PM.png

But within a larger canvas (only having selected area do the "pacman" effect).

Translate
Report
Community guidelines
Be kind and respectful, give credit to the original source of content, and search for duplicates before posting. Learn more
community guidelines