- Home
- Photoshop ecosystem
- Discussions
- How to wrap an image on to 3D object (say a back c...
- How to wrap an image on to 3D object (say a back c...
How to wrap an image on to 3D object (say a back cover on a phone)
Copy link to clipboard
Copied
Hi there,
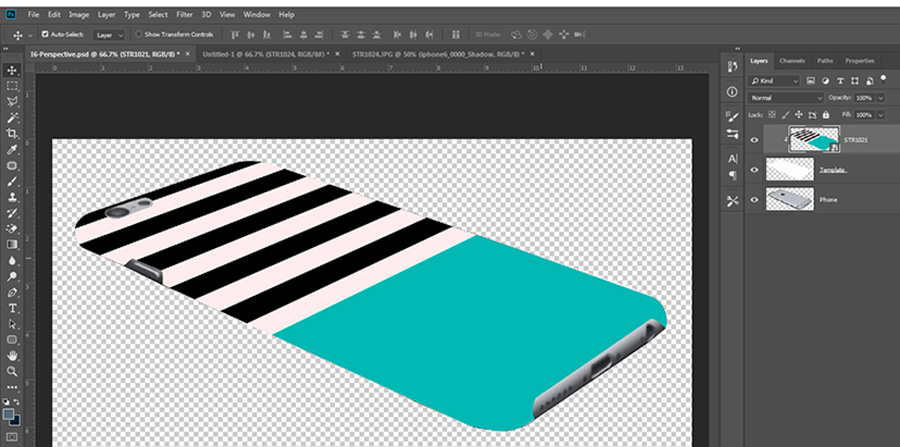
I am trying to wrap an image on a phone back.
First of all i make selection with Pen tool of phone's back and make kinda template of it.
Then i place an image on template.
Going to Edit>Transform>Distort tool, i adjust the image's positions to match the edges of phone/template.
After that i create clipping mask of image to the template.
here is the screenshot for what i did.

Its a bit tedious to work with every image. I know there is a better way to do this but could not be able to figure it out.
Also it doesn't look good in the result. I want the stripes of image should also bend with edge of phone to look realistic. I tried using warp tool and vanishing point filter but it doesn't seem to work with rounded or curved edges. Please help me.
Thanks in advance.
Explore related tutorials & articles
Copy link to clipboard
Copied
The "better way" is to find a 3D model of the phone and render it with your image as a texture.
Mylenium
Copy link to clipboard
Copied
I have a lots of phone models so its very difficult to find each and every 3d model. Moreover, I don't have dedicated graphic card so 3D options won't work in my PC.
Copy link to clipboard
Copied
Hi
I am with Mylenium on this one. I would definitely do this in 3D which would take care of the curving round the edges as well as shadows (which are missing from your example).
Changing the phone would simply be changing the model and wrapping the same texture onto the new model.
However, if you cannot use 3D you could try the following.
1. Puppet warp (although I am not sure if that will be available without a GPU)
2. A displacement map to bend the edge pixels
If you can get the distortion right - you can paint in shadows on a separate layer set to multiply blend mode
The above though would need a lot of careful positioning and be unique to each phone, so would need to be built each time - hence the advice to use 3D.
If you cannot use Photoshop 3D due to lack of GPU try Blender which will run on a CPU (abeit very slowly). You could then bring the render back to Photoshop for finishing.
Dave
Copy link to clipboard
Copied
hi, thanks for your time and explanation. I don't have any experience working with blender. however i installed the older version of it and it is running quite nice. but where to start from to achieve my goal could you plz guide me...
thanks
Copy link to clipboard
Copied
Hi
There should be no reason to install an older version. The current version should run.
A full guide on Blender is beyond the scope of a Photoshop forum answer but I can give you some pointers and then a link to some tutorials.
1. Step on is to create a model of the phone , or probably easier initially for you, just import a pre-made model (there are lots on line)
2. In Edit mode unwrap the UV. This is like unwrapping a real life model onto a flat piece of paper. This step may already have been done if your model comes with textures.
3. Turn on Cycles (rather then Blender) rendering
4. Either click on the material (for a premade model) or add a material (for a new model) and apply to the back of the model
5. Check "use nodes" in the material properties
6. Go to the nodes editor and add an image texture node and plug that into the diffuse colour node of the default shader.
7 Open your image texture in the node. If you need to make it fit you may need to add a mapping node to allow you to scale and rotate the texture
8. If you want a glossy finish - add a glossy shader and mix shader

9. Add and position the lights and camera
10 Render (F12) then export the render as an image (F3) and bring it back to Photoshop
There are some good basic tutorials here : Blender Guru
One other thought, whilst Blender is very powerful in terms of its modelling ability, for just adding basic textures to a pre-made model Adobe Dimension might work better for you, but like 3D in Photoshop Photoshop you would need to meet the minimum system requirements for the GPU.
Dimension CC system requirements
Buy Adobe Dimension CC | Photo-real 3D images for product and package design
Dave
Find more inspiration, events, and resources on the new Adobe Community
Explore Now