• Global community
    • Language:
      • Deutsch
      • English
      • Español
      • Français
      • Português
  • 日本語コミュニティ
    Dedicated community for Japanese speakers
  • 한국 커뮤니티
    Dedicated community for Korean speakers
Exit
0

making "lined paper" (evenly spaced lines)

New Here ,
Jul 20, 2019 Jul 20, 2019

Copy link to clipboard

Copied

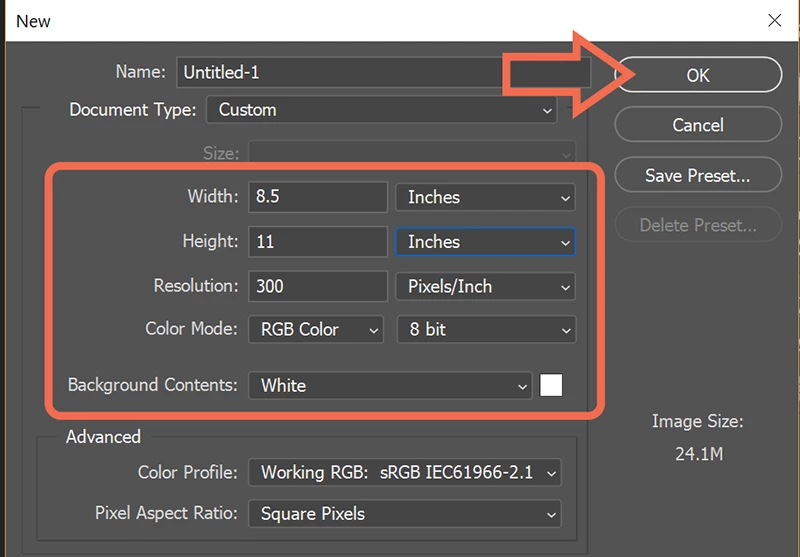
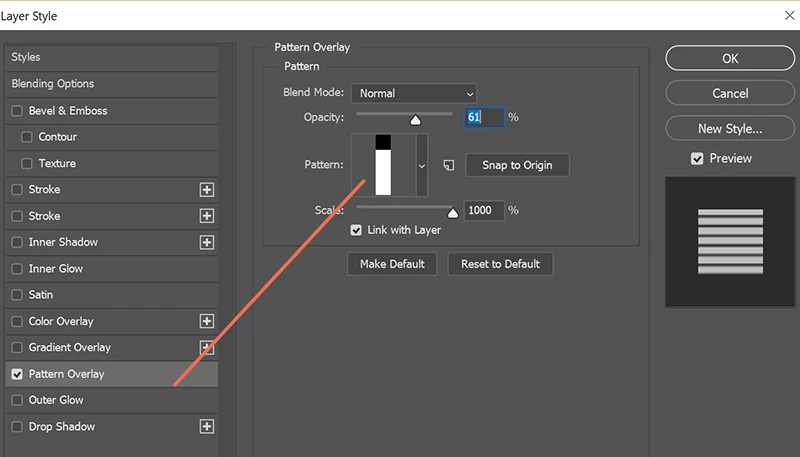
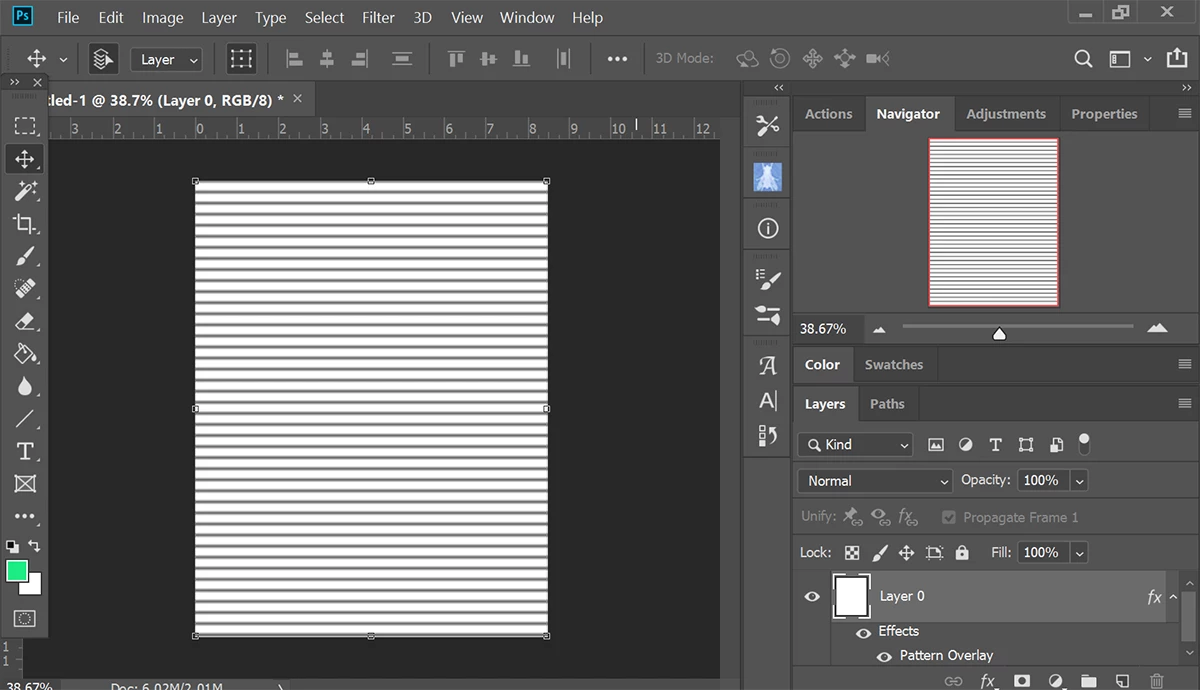
I am new to photoshop and want to make lined paper. (evenly spaced lines) I open a new doc- then make a new layer. First I make an even line with the line tool. Then I Control J to make several copies. I select the last layer and control T to transform. When I left click to drag on line to bring it down to the bottom so I can redistribute lines after- it just makes a huge filled in rectangle shape. Even when I skip the copies and  just try to free transform the line to make an exact copy it makes a filled in rectangle shape. I hope this question makes sense.Thanks for any help.

Views

19.3K

Translate

Translate

Report

Report
Community guidelines
Be kind and respectful, give credit to the original source of content, and search for duplicates before posting. Learn more
community guidelines
Adobe
Community Expert ,
Jul 20, 2019 Jul 20, 2019

Copy link to clipboard

Copied

This simple tutorial should make this easy: How to make lined note paper DIY planner insert refills in Photoshop - quick and easy tutorial - You...

It also shows how to change the line spacing without having to start over.

Votes

Translate

Translate

Report

Report
Community guidelines
Be kind and respectful, give credit to the original source of content, and search for duplicates before posting. Learn more
community guidelines
Community Expert ,
Jul 20, 2019 Jul 20, 2019

Copy link to clipboard

Copied

  1. Go to File > New
  2. Document type: Custom
  3. See screenshot  for values and hit OK. 
  4. Unlock the background layer by double-clicking & hit OK
  5. Double click on Layer 0 and add a Pattern Overlay. 
  6. In this example, I used a horizontal line pattern and adjusted the  scale to fit my page.

Nancy O'Shea— Product User, Community Expert & Moderator
Alt-Web Design & Publishing ~ Web : Print : Graphics : Media

Votes

Translate

Translate

Report

Report
Community guidelines
Be kind and respectful, give credit to the original source of content, and search for duplicates before posting. Learn more
community guidelines
Community Expert ,
Jul 20, 2019 Jul 20, 2019

Copy link to clipboard

Copied

I like Nancy's solution best. I would not have thought to use the single Dot pattern to make lines, but it obviously works.

There is not a horizontal line pattern among the default sets, so I quickly made one.  Note, that if you have the background layer turned on when defining the pattern, it will make black lines on white on the same layer.

Something I have just learned is that if you adjust the pattern scale in Layer Styles, it will retain that scale if you then use the Paint Bucket tool set to Pattern to apply the pattern, but it does so as a Layer Style.  It's not a tool I tend top use, but it's interesting all the same.

Votes

Translate

Translate

Report

Report
Community guidelines
Be kind and respectful, give credit to the original source of content, and search for duplicates before posting. Learn more
community guidelines
New Here ,
Jan 31, 2024 Jan 31, 2024

Copy link to clipboard

Copied

i can't find horizontal line pattern, how am i supposed to do?


Votes

Translate

Translate

Report

Report
Community guidelines
Be kind and respectful, give credit to the original source of content, and search for duplicates before posting. Learn more
community guidelines
Community Expert ,
Jan 31, 2024 Jan 31, 2024

Copy link to clipboard

Copied

You need to make one yourself. Create a new document one pixel wide by something taller, like ten or twenty pixels. Use the Pencil tool to make one black pixel, and Edit > Define Pattern.


Now you can delete that file, and use the pattern.

Votes

Translate

Translate

Report

Report
Community guidelines
Be kind and respectful, give credit to the original source of content, and search for duplicates before posting. Learn more
community guidelines
Community Expert ,
Jul 20, 2019 Jul 20, 2019

Copy link to clipboard

Copied

1. Open a new file of appropriate size to hold the finished Image and add a transparent layer.

2. Use the Line tool to draw the line. Pixels in the Options bar

3. Select the line using the Rectangular Marquee tool.

4. Hold down Cmd+Opt+Shift and choose Edit > Free Transform. Be sure to release the mouse before releasing the keyboard keys.

5. Hold down the Shift key for alignment and drag the framed line down. Do not use the center mark in the image when dragging. Then key Return. The second image willl display marching ants.

6. Hold down Cmd+Opt+Shift and strike the T key repeatedly. Each time you do, another duplicate will appear, following the spacing you designated.

7. Select > Deselect to remove the marching ants.  Job done.

Note that all of the duplicate images appear on one layer.

Votes

Translate

Translate

Report

Report
Community guidelines
Be kind and respectful, give credit to the original source of content, and search for duplicates before posting. Learn more
community guidelines
Community Expert ,
Jul 20, 2019 Jul 20, 2019

Copy link to clipboard

Copied

Hi

I would put those lines on separate layers because these projects always need editing.

  1. Draw a line with the line tool and Shift. I set the mode to Pixels, but you could use Shape.
  2. Cmd+J to duplicate the layer for as many lines as you need.
  3. With the Move tool, move one line down to the bottom. Use Shift to constrain.
  4. Multiple select all the layers with lines (use Shift), then click the ellipses in the options bar for the Move tool and Distribute Vertical Centers to space equally between the top and bottom lines.
  5. The reason I like this method is that it's flexible when you need to move the top and bottom lines or add/delete lines.
    Here I've deleted three lines and adjusted the top and bottom lines. All I need to do is select the layers and distribute again.

~ Jane

Votes

Translate

Translate

Report

Report
Community guidelines
Be kind and respectful, give credit to the original source of content, and search for duplicates before posting. Learn more
community guidelines
New Here ,
Jul 20, 2019 Jul 20, 2019

Copy link to clipboard

Copied

Thanks for all your help!

Votes

Translate

Translate

Report

Report
Community guidelines
Be kind and respectful, give credit to the original source of content, and search for duplicates before posting. Learn more
community guidelines
Contributor ,
Jan 31, 2024 Jan 31, 2024

Copy link to clipboard

Copied

I had this same issue a while back. I found the various instructions kind of confusing so what I ended up doing was taking a picture of a piece of lined paper and inserting it into my document, adjusting the color and opacity as desired. That's what worked for me. 

Votes

Translate

Translate

Report

Report
Community guidelines
Be kind and respectful, give credit to the original source of content, and search for duplicates before posting. Learn more
community guidelines
Community Expert ,
Jan 31, 2024 Jan 31, 2024

Copy link to clipboard

Copied

LATEST

There are technical considerations when it comes to printing consistent thickness/colour lines, however, that is another discussion!

Votes

Translate

Translate

Report

Report
Community guidelines
Be kind and respectful, give credit to the original source of content, and search for duplicates before posting. Learn more
community guidelines