

- Home
- Photoshop ecosystem
- Discussions
- Perspective Warp Guidance - Grids and straighten b...
- Perspective Warp Guidance - Grids and straighten b...

Copy link to clipboard
Copied
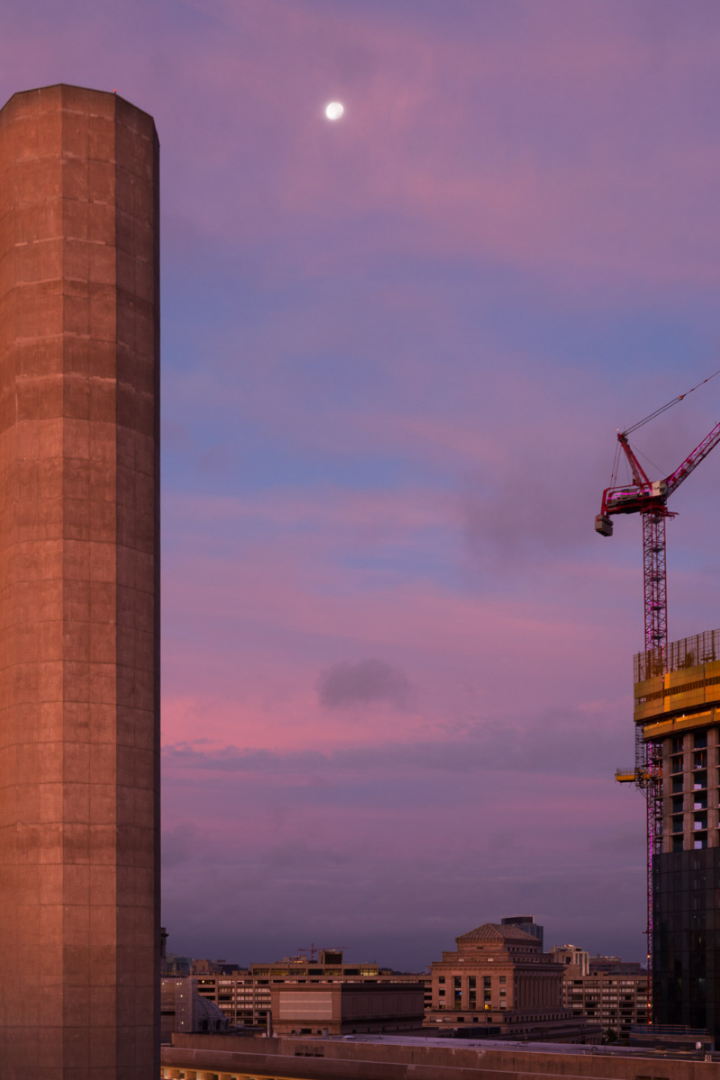
I have an image with two buildings on the vertical edges of the frame are leaning in and buildings between them, which are at a much lower height that I want to 'protect'. When I create the grids by following the instructions laid out in Greg Benz's video with the sea stack, I'm unable to get the grids to snap together the way I want.
I tried to do Transform -> Perspective, which works beautifully, but the lower buildings between the two buildings get squashed a bit.
So I have a few questions:
- How could I do the Transform -> Perspective and keep the lower buildings from being affected?
- When doing Perspective Warp, is there a way to get the grids to snap to each other and maintain their rectangular shape?
- It seems that an edge will snap to an existing edge, but in a shape I don't want.
Note I don't want the sky between the two edge buildings to be affected so I need to protect this area as well.
I was thinking to approach the problem as a three sided building, which I believe makes sense. However for this to work I think the grids should connect.
Thanks for any help and/or guidance.
David


 1 Correct answer


Consider this:
Fig 1. Widen the canvas
Fig 2. Drag out reference lines from the Ruler. Then Edit > Transform > Distort to straighten the keystone effect
Fig 3. Select the white area and then Edit > Contact Aware Fill
Fig 4, Crop in on the left, select a portion of the outer unit and create a common tone with Edit > Transform of a section for its entire length.
Not shown: If the original file proportion is important, you may Content Aware Fill with sky
NOTE: Often, this type of transform has a tendency
...Explore related tutorials & articles
 16
Replies
16
16
Replies
16

Copy link to clipboard
Copied
Can you post a sample image?
What version of photoshop are you using?
Do you have a link to the video?
Copy link to clipboard
Copied
Hi,
I'm using PS 20.0.2.
Image attached: I'm probably good with the image the way it is, but would
like to have the perspective correction to compare and more importantly to
know how to do it in the future.
Here is the link to the video: https://youtu.be/XNWf_IjaX0g
Thanks,
On Fri, Jan 25, 2019 at 11:20 PM Jeff Arola <forums_noreply@adobe.com>
Copy link to clipboard
Copied
Unfortunately, the adobe forums don't accept email attachments.
You have to use the Insert Image button on the forum.

Copy link to clipboard
Copied
I think I might've known that, but forgot.
Copy link to clipboard
Copied
You can also try Upright Transform in Camera Raw.
Automatic perspective correction in Adobe Camera Raw
Before using Upright Transform, enable the Lens Profile Correction in the Lens Correction tab of Camera Raw.

Copy link to clipboard
Copied
As we put this one to bed, a bit of nostalgia:

Just a vertical alignment of lens and camera back. Job done.
I miss the good old days.

Copy link to clipboard
Copied
norman.sanders wrote
As we put this one to bed, a bit of nostalgia:
Just a vertical alignment of lens and camera back. Job done.
I miss the good old days.

Yes Norman, but would it fit in your pocket?

Copy link to clipboard
Copied
Actually, I used the Dehydrated Disposable Deardorff. It's about the size of a penny. Just add water and you're good to go.
Copy link to clipboard
Copied

Consider this:
Fig 1. Widen the canvas
Fig 2. Drag out reference lines from the Ruler. Then Edit > Transform > Distort to straighten the keystone effect
Fig 3. Select the white area and then Edit > Contact Aware Fill
Fig 4, Crop in on the left, select a portion of the outer unit and create a common tone with Edit > Transform of a section for its entire length.
Not shown: If the original file proportion is important, you may Content Aware Fill with sky
NOTE: Often, this type of transform has a tendency to make items in the image slightly squat. If that is apparent to you, you may elongate the entire final image with Edit > Transform Distort after addition a bit of height or length to the canvas.
Copy link to clipboard
Copied
Perspective Warp only makes sense when you have two adjacent plains to manipulate, and that is not the case here. So I would simply use Free Transform, and drag the corner handles while holding down the Ctrl key.
Note I have diagonal lines for Free Transform, because I made the layer a Smart Object. This lets you edit the Transform to make fine adjustments, while keeping the handles at the corners of the original image. This is a big advantage when using Free Transform.

The disadvantage of this approach is that you can't use Content Aware Fill to fix the missing corner, because Smart Objects are not directly editable. I don't actually know of a workaround for this, other than rasterising the SO.

Copy link to clipboard
Copied
You can make a fuller fix filling the missing corners with Content Aware Fill, and new updated CAF does a surprisingly good job. There is so misalignment of the floors on the right hand structure, but I think you could avoid that by taking smaller stabs at it, and fixing it in multiple smaller stages. Note I added som width to the Canvas to make room for the additional pixels.

Copy link to clipboard
Copied
Is there a way to keep the buildings in the middle from getting squished by perhaps using a mask? Trevor.Dennis your Content aware fill looks really nice. I like how you've maintained more of the left tower. Did you restrict the sampling area to a pretty tight portion? In studying this more, I understand how you approached this. It looks like you widened the base rather than narrowing the top of the tower. I like that approach!
I followed norman.sanders instructions and am pretty pleased with the results. Not perfect, but the lower buildings are less squished now.
Thanks all!
Copy link to clipboard
Copied
Everything in the scene should share the same vanishing point, so correcting the verticals for the larger, nearer objects, should do the same for the smaller, far away objects/buildings.
When making composites, I usually make selections of near-field objects, and copy to new layers. Composited objects then go on layers beneath the copied foreground layers, and overlap behind them. Or I might clip an introduced object to the copied layer layers to prevent it overflowing. or Ctrl click to load as a selection, and layer masks. The important thing is putting things on separate layer, as this produces lots of options, and makes life easier going forward from that stage.
I increased the Canvas width as the Free Transform was going to leave triangular gaps at the bottom corners. You might be away that CC2019 introduced a new Content Aware Fill accessed from the Edit menu. I'm finding it a lot more effective, but this sort of image AI is not going to be perfect.
Copy link to clipboard
Copied
I'm fairly new to Photoshop so I'm still working to wrap my head around how to use different layers and mask portions of them prior to combining into a composite. I know it will come with practice though.

Copy link to clipboard
Copied
David
Take a look at this article which describes how to correct verticals and then correct the "squashing" distortion. It is written by Rodenstock so of course extolls the virtues of using a shift on the lens (as Norman shows with the view camera in his last post). But the Photoshop technique shown is good and valid.
http://www.rodenstock-photo.com/Archiv/Perspective%20Control.pdf
Dave
Copy link to clipboard
Copied
Thanks Dave for providing that. As someone completely fascinated by architecture, I've consciously avoided doing a lot of architecture photography because 1) I'm afraid I'd spend all my time shooting that genre (which isn't a bad thing) and 2) I wouldn't be able to resist spending the money on a tilt-shift lens. Silly reasons I know and probably not too logical.

Find more inspiration, events, and resources on the new Adobe Community
Explore Now
 AdChoices