• Global community
    • Language:
      • Deutsch
      • English
      • Español
      • Français
      • Português
  • 日本語コミュニティ
    Dedicated community for Japanese speakers
  • 한국 커뮤니티
    Dedicated community for Korean speakers
Exit
1

Photoshop Action that can autosave 50 design

Community Beginner ,
Jun 10, 2016 Jun 10, 2016

Copy link to clipboard

Copied

I have tried to do a Action that can autosave 50 design in one time but i need to change the T-shirt Mockup Name after that because the Action has to be set in that way

I need your help to create a Batch Automate Action that can unlimitedly

1. Autosave the design in "Your Design" Smart Object after I scale the design right.

2. Export the T-shirt Mockup out (with design on it) with the same name as the Deign File Name.

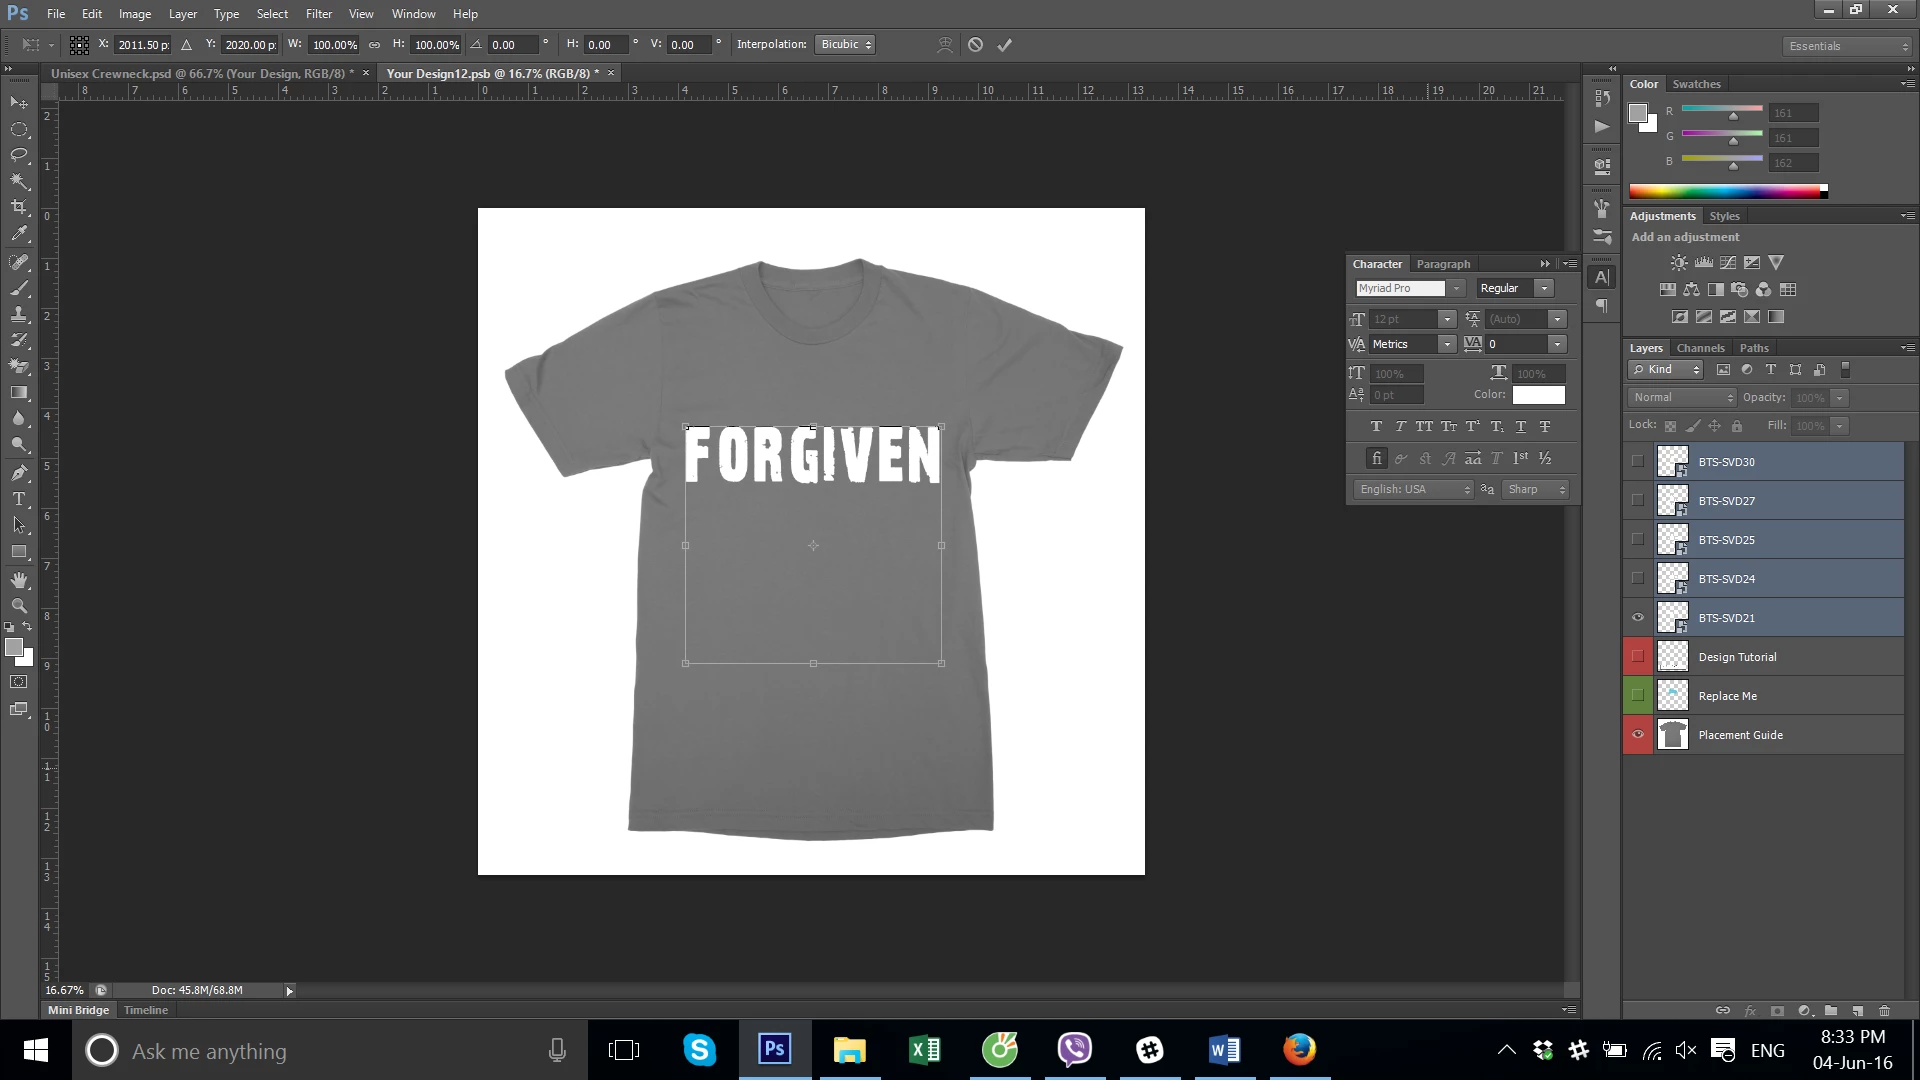
For example in the attached picture, After I scale design (BTS-SNK21, BTS-SNK24, BTS-SNK25....). I will manually save each design and then export the T-shirt Mockup which takes a long time.

Here is source file http://www.mediafire.com/download/eztdjp5h273fjf3/Unisex_Crewneck.psd

Thanks in advance

SCALING_DOWN_DESIGN.png

Step_2_Save_the_Smart_Object_after_Scaling_the_Design.png

TOPICS
Actions and scripting

Views

5.1K

Translate

Translate

Report

Report
Community guidelines
Be kind and respectful, give credit to the original source of content, and search for duplicates before posting. Learn more
community guidelines
Adobe
Community Expert ,
Jun 10, 2016 Jun 10, 2016

Copy link to clipboard

Copied

IMO you template is too complex hard to use and is a large file with a structure not easy to understand.  I simplifies your 215MB PSD  with many layers including large smart object layers to a smaller 48MB PSD file with few layer that is easy to comprehend and simple to batch populated using a script. The Template can be customized before running the script or populated collages can be opened later to change the text the color and tweak the image placement.

You can  also try doing what you want using a template designed for Photoshop Data Driver graphics. The text would be  via png overlay images rather than text replacement. Two Image replacement the png on top of the image.  All image files would need to have the correct size the fit the template.

You could also write a custom script actions can not use to select the correct text based on filename.....

Can also be done with the my Photo Collage toolkit with a simpler template that two images locations one which is on top of the other and careful file naming so the two image will sort together in the correct order a jpeg and a png for the text. The png image would need also the be created so it will align correctly.  The transparency make that difficult.  You need to add pixels with 1% opacity one pixel to the top left bounds and another to the bottom right bounds of the canvas. The text png need to have the aspect ratio as the text image location.  Image and text will be resized for their locations. Best results when the aspect ratios match the image location in the collage template. Text  need to be correct aspect ratio  you do not want text being masked off.

Capture.jpg

JJMack

Votes

Translate

Translate

Report

Report
Community guidelines
Be kind and respectful, give credit to the original source of content, and search for duplicates before posting. Learn more
community guidelines
Community Beginner ,
Jun 11, 2016 Jun 11, 2016

Copy link to clipboard

Copied

Thanks mack, I just try BatchOneImageCollage but scritp says background layers is not available although i have make one background layer below the layers, would you please tell me steps how to compete this task in steps.

Thanks for your help and cooperation i really appreciated your help.

Votes

Translate

Translate

Report

Report
Community guidelines
Be kind and respectful, give credit to the original source of content, and search for duplicates before posting. Learn more
community guidelines
Community Expert ,
Jun 11, 2016 Jun 11, 2016

Copy link to clipboard

Copied

There is only one background layer possible in a Photoshop document. It is a special layer type the bottom layer that has its transparency locked and have the name Background. That layer does not support transparency.  You can have a normal layer names Background as the bottom layer and not be a Photoshop Background layer. That is most likely your problem,  You can download the T-Shirt.PSD I created using your PSD.

http://www.mouseprints.net/old/dpr/T-Shirt.psd

JJMack

Votes

Translate

Translate

Report

Report
Community guidelines
Be kind and respectful, give credit to the original source of content, and search for duplicates before posting. Learn more
community guidelines
Community Beginner ,
Jun 11, 2016 Jun 11, 2016

Copy link to clipboard

Copied

Please see attached image after executing this message popups??Capture.PNG

Votes

Translate

Translate

Report

Report
Community guidelines
Be kind and respectful, give credit to the original source of content, and search for duplicates before posting. Learn more
community guidelines
Community Expert ,
Jun 11, 2016 Jun 11, 2016

Copy link to clipboard

Copied

You are using CS6 Perpetual. Adobe has a bug in CS6 perpetual scripting they fixed in the subscription CS6 version 13.1.2.  If you set your Photoshop Preferences Interpolation from Bicubic Automatic to  Bicubic you will not have a problem.   Bicubic Automatic is a bad choice to begin with but it was new in CS6 so Adobe made it their default setting.  However Adobe forgot to support the setting in Photoshop scripting. I Save the users interpolation setting set what I want to use resize then reset the users setting.  Your seeing what happens when I try to save your preference. Adobe Scripting bombs with and internal error.

JJMack

Votes

Translate

Translate

Report

Report
Community guidelines
Be kind and respectful, give credit to the original source of content, and search for duplicates before posting. Learn more
community guidelines
Community Beginner ,
Jun 12, 2016 Jun 12, 2016

Copy link to clipboard

Copied

Thanks Mack for your cooperation, I have couples of issue regarding script, I have changed interpolation preference to Bicuibc, script working but make one jpeg file and one .psd file and also text will not change although i have change text but image save with defult text i.e Love is Enough.

Votes

Translate

Translate

Report

Report
Community guidelines
Be kind and respectful, give credit to the original source of content, and search for duplicates before posting. Learn more
community guidelines
Community Expert ,
Jun 12, 2016 Jun 12, 2016

Copy link to clipboard

Copied

I did not make a custom script for you. The Text will not change based of filename.  All the text layer you showed are in the Text Layer group.  My Collage populating script always make a layered populated collage so the results can be  manually tweak.  You would need to edit the output layered Collage and change which text layer is visible in the text group.

If you do not want to have to edit the results to change the text you would need to create a different template which will be populated with two images one on top of the other. The first Image is placed in the second  a text Png with a transparent background  is then placed in on top of the first placed image file.  You would have to use the BatchMultiImageCollage script.  The File names must sort in the order they need to be populated in.    Like 1001.jpj, 1002.png,   2001.jpg, 2002.png,  etc.  The png text files must also be created with the correct aspect ratio and have a 1% opacity pixel in the top left canvas corner and the bottom right canvas corner so the text will align correctly over the placed image.

You could also write you own custom script.  Need to be a script actions can not use logic.  What you want to do requires the use of logic....

JJMack

Votes

Translate

Translate

Report

Report
Community guidelines
Be kind and respectful, give credit to the original source of content, and search for duplicates before posting. Learn more
community guidelines
Community Beginner ,
Dec 05, 2018 Dec 05, 2018

Copy link to clipboard

Copied

JJMACK,

would you be able to modify the scripts for me?

I am willing to pay for it...

I really just need to have tshirt 5 mockups in a folder... then 100 designs added to each mockups... (different colors)...

and saved in a different folder... that's about it.. nothing fancy...

Votes

Translate

Translate

Report

Report
Community guidelines
Be kind and respectful, give credit to the original source of content, and search for duplicates before posting. Learn more
community guidelines
Community Expert ,
Dec 05, 2018 Dec 05, 2018

Copy link to clipboard

Copied

Mockup templates normally use Smart object layer that contents is replaced populating new designs.  The smart object layers associated transform sizes, positions and distorts the Smart object to warp and add perspective for the  mockup subject matter and composition.  Each Mockup template design varies so a custom scripts will normally be need for each Mockup template and each Smart object layers that content is replaced must be replace with an object the is exactly the same aspect ratio, size and print resolution. Or the Object needs to be edited and  the replacement image design fitted to the work document canvas. 

My scripts are designed to populate my generalized template design.  A template can have 1 to 53 Image Frames maps and any size image can be placed in to these frames.  However for good composition replacement images should have an aspect ratios that is close to each frame map in the Template.

My scripts are not designed to populate mockups.  You need to fine script deigned to replace or edit smart object layer content in mockup templates. Then modify these script for your mockup  designs.  You may need 5 custom scripts.

JJMack

Votes

Translate

Translate

Report

Report
Community guidelines
Be kind and respectful, give credit to the original source of content, and search for duplicates before posting. Learn more
community guidelines
Community Beginner ,
Dec 06, 2018 Dec 06, 2018

Copy link to clipboard

Copied

Hi JJ,

I don't really need complicated smart objects and etc...

I just need a design layered on top of 5 mockups...

they don't need to blend in or any fancy stuff... the designs are only text (over 9000 texts designs in folder)... and the tshirt mockups are all facing upfront... similar to the original poster of this thread...

I just need the 9000 text designs from a folder layered on top of 5 different t shirt colors...

I have started doing them manually... but i am getting tired of doing it... there's got to be easier way to do it so I did a little research...

so far I have done 100 (manually).... and it is time consuming and pressing ctrl+alt+shift+w is tiring too... and renaming the jpg file...

Votes

Translate

Translate

Report

Report
Community guidelines
Be kind and respectful, give credit to the original source of content, and search for duplicates before posting. Learn more
community guidelines
Community Expert ,
Dec 06, 2018 Dec 06, 2018

Copy link to clipboard

Copied

Read this append then look at my first reply in the thread  .

Design are normally Image not text.  If you design are updated via Image files and you do not need any fancy stuff done to your designs by fancy mockup template.  You should not use fancy mockup template instead you should use simple Photo collage template that comply with my template Photo Collage Template design.  Then you can use my scripts to batch populate your simple t-shirt templates that have mapped area that you image will be placed into.  If Template have more that one image that need to be populated the image must be in a folder so the name will sort the image into the order needed  for correct populating order.   Images are populated in image map number order.

Photo Collage Templates are very easy to create.  All that is actually required is a background layer that image will be place in over in order on the map name. Stack order Image 1 on top of the background Image 2 on top of image etc. All Image will be above the background layer and below and other layers that are in the Template PSD file.

Image 1, Image 2, ..., Image N where N can not exceed 53.    Image maps need to be sequential.   No gaps in the sequence ie. 1,2,3,4,5 not 1,2,3,5  My scripts would see 1,2,3,5 as a sequence of 3 images for Image 4 map does not exist the sequence would be a sequence of 3 images.

There are only four simple rules to follow when making Photo Collage Template PSD files so they will be compatible with my Photoshop scripts.

  1. Size the photo collage templates for the print size you want - width, height and print DPI resolution.
  2. Photo collage templates must have a Photoshop background layer. The contents of this layer can be anything.
  3. Photo collage templates must have alpha channels named "Image 1", "Image 2", ... "Image n". These map your images Location Position, Shape and size.
  4. Photo collage templates layers above the background layers must provide transparent areas to let the images that will be placed below them show through.
JJMack

Votes

Translate

Translate

Report

Report
Community guidelines
Be kind and respectful, give credit to the original source of content, and search for duplicates before posting. Learn more
community guidelines
Community Expert ,
Dec 06, 2018 Dec 06, 2018

Copy link to clipboard

Copied

they don't need to blend in or any fancy stuff... the designs are only text (over 9000 texts designs in folder)... and the tshirt mockups are all facing upfront... similar to the original poster of this thread...

Are the 9000 separate text image files already correctly sized and positioned for the base colour shirt layer?

Can you provide download samples of half a dozen of the variable text image files and a couple of the base colour shirts in the exact file formats, sizes etc. that you hope to finally batch process?

EDIT: I now see that the screenshots you originally showed are from a smart object layer. I’d like to help if I can, however like JJMack I think that this has become too complicated, even more so with all of the unknowns...

Votes

Translate

Translate

Report

Report
Community guidelines
Be kind and respectful, give credit to the original source of content, and search for duplicates before posting. Learn more
community guidelines
Community Expert ,
Dec 06, 2018 Dec 06, 2018

Copy link to clipboard

Copied

If I understand correctly, you have multiple layered PSD files and you simply wish to save out various combinations of the variable layers and the static base image, as per the upper screenshot? Or is as per the lower screenshot, where only the variable layer text is saved and not the bottom base image?

Will there ALWAYS be 5 variable layers above the single visible static base layers as per your screenshots? You mentioned 50 designs, not 5... Also the downloaded PSD template had a very different layer structure to what is shown above.

What is the final desired file format to be exported from the variable layer name combined with the bottom visible base image – PSD with layers? PNG, JPEG etc?

Votes

Translate

Translate

Report

Report
Community guidelines
Be kind and respectful, give credit to the original source of content, and search for duplicates before posting. Learn more
community guidelines
Community Beginner ,
Dec 06, 2018 Dec 06, 2018

Copy link to clipboard

Copied

@Stephen_a_marsh

Yes yes and yes...

Basically... I have a basic static tshirt mockups... EXACTLY the same... except for the colors...

something like this:

BASIC MOCKUP.png

and I have a PNG file like this... (same size.. I made them myself... and I continue to make them everyday... and I also have 2 staffs who makes them every day.. I also have purchased a couple that was ready made... that is why I have over 9000 of them...)

MOM SQUAD.png

and I want the end result to be like this... a jpg..

RESULT.png

pls pls pls... thanks a lot in advance!

Votes

Translate

Translate

Report

Report
Community guidelines
Be kind and respectful, give credit to the original source of content, and search for duplicates before posting. Learn more
community guidelines
Community Expert ,
Dec 06, 2018 Dec 06, 2018

Copy link to clipboard

Copied

I can’t promise anything, a lot depends on you, such as my previous request:

Can you provide download samples of half a dozen of the variable text image files and a couple of the base colour shirts in the exact file formats, sizes etc. that you hope to finally batch process?

5 colours x 9000 variables = 45,000 final JPG files? Where does 50 come from? Are the 9000 images in folders of 50 items?

In order for me to help you, you need to help me by keeping it concise and informative.

Feel free to PM me if you don’t wish to post a link to the sample production assets in a public forum.

Votes

Translate

Translate

Report

Report
Community guidelines
Be kind and respectful, give credit to the original source of content, and search for duplicates before posting. Learn more
community guidelines
Community Beginner ,
Dec 06, 2018 Dec 06, 2018

Copy link to clipboard

Copied

I just sent u a pm..

Thanks!

Votes

Translate

Translate

Report

Report
Community guidelines
Be kind and respectful, give credit to the original source of content, and search for duplicates before posting. Learn more
community guidelines
Community Expert ,
Dec 06, 2018 Dec 06, 2018

Copy link to clipboard

Copied

Did you read any of me appends You seem to want to do what I did ins my first append but you doe not seem to get it. The only problem placing in Png file will have transparent borders trimmed off by place this is easy to overcome be eliminating the transparent borders in the first place by addin a 1% opacity pixel to the png top left and bottom right corners.  These will never be seen by your human eyes.

Capture.jpg

JJMack

Votes

Translate

Translate

Report

Report
Community guidelines
Be kind and respectful, give credit to the original source of content, and search for duplicates before posting. Learn more
community guidelines
Community Beginner ,
Dec 07, 2018 Dec 07, 2018

Copy link to clipboard

Copied

JJMACK

I did read your response and the whole thread like 4-5 times...

but... I am not too savvy with Photoshop... the moment I cannot follow one of your instructions I get very frustrated...

I have been using photoshop for around 9months.. and I basically just find/buy fonts and type them in and export them as png... and drag them into an existing image... etc... but not so techy with it yet... i will re-read again... and see if I can follow through...

Votes

Translate

Translate

Report

Report
Community guidelines
Be kind and respectful, give credit to the original source of content, and search for duplicates before posting. Learn more
community guidelines
Community Expert ,
Dec 07, 2018 Dec 07, 2018

Copy link to clipboard

Copied

Photo Collage Toolkit

Photoshop scripting is powerful and I believe this package demonstrates this here is a video showing a 5 image collage PSD template  being populated with images

The package includes four simple rules to follow when making Photo Collage Template PSD files so they will be compatible with my Photoshop scripts.

  1. Size the photo collage templates for the print size you want - width, height and print DPI resolution.
  2. Photo collage templates must have a Photoshop background layer. The contents of this layer can be anything.
  3. Photo collage templates must have alpha channels named "Image 1", "Image 2", ... "Image n".
  4. Photo collage templates layers above the background layers must provide transparent areas to let the images that will be placed below them show through.

There are fifteen scripts in this package they provide the following functions:

  1. HelpPhotoCollageToolkit.jsx - Online Help
  2. TestCollageTemplate.jsx - Used to test a Photo Collage Template while you are making it with Photoshop.
  3. CollageTemplateBuilder.jsx - Can build Templates compatible with this toolkit's scripts.
  4. LayerToAlphaChan.jsx - Used to convert a Prototype Image Layer stack into a template document.
  5. InteractivePopulateCollage.jsx - Used to interactively populate Any Photo Collage template. Offers most user control inserting pictures and text.
  6. ReplaceCollageImage.jsx - use to replace a populated collage image Smart Object layer with an other image correctly resized and positioned.
  7. ChangeTextSize.jsx - This script can be used to change Image stamps text size when the size used by the populating did not work well.
  8. PopulateCollageTemplate.jsx - Used to Automatically populate a Photo Collage template and leave the populated copy open in Photoshop.
  9. BatchOneImageCollage.jsx - Used to Automatically Batch Populate Collage templates that only have one image inserted. The Collage or Image may be stamped with text.
  10. BatchMultiImageCollage.jsx - Used to Automatically Batch Populate Any Photo Collage template with images in a source image folder. Easier to use than the interactive script. Saved collages can be tweaked.
  11. PasteImageRoll.jsx - Paste Images into a document to be print on roll paper.
  12. BatchPicturePackage.jsx - Used to Automatically Batch Populate Any Photo Collage template with an image in a source image folder.  Images Rotates for best fit.
  13. BatchPicturePackageNoRotate.jsx - Used to Automatically Batch Populate Any Photo Collage template with an image in a source image folder.
  14. PopulatePicturePackage.jsx - Used to Automatically populate a Photo Collage template Fill with the same single image and leave the populated copy open in Photoshop.
  15. PCTpreferences.jsx - Edit This File to Customize Collage Populating scripts default setting and add your own Layer styles.

Documentation and Examples

JJMack

Votes

Translate

Translate

Report

Report
Community guidelines
Be kind and respectful, give credit to the original source of content, and search for duplicates before posting. Learn more
community guidelines
Community Expert ,
Dec 07, 2018 Dec 07, 2018

Copy link to clipboard

Copied

Capture.jpg

Note: your png will need to have a 1% opacity pixel  in the the top left and bottom right corners to eliminate transparent borders else Place will trim the transparent borders and you png will not have the required 3:4 aspect ratio needed fot the t-shirt 3:4 area.  You will see this happen when the png is resized to fill the area

JJMack

Votes

Translate

Translate

Report

Report
Community guidelines
Be kind and respectful, give credit to the original source of content, and search for duplicates before posting. Learn more
community guidelines
Community Expert ,
Dec 07, 2018 Dec 07, 2018

Copy link to clipboard

Copied

michaelp83150986​ – I have only now just realised that you have “thread hijacked” a 2 year old post, which explains why I am so confused with the differences between what you want and the original post! I was wondering why the goal posts had shifted so much.

I will send you a PM with a link to download some bulk output files to see if this is what you are looking for.

Your variable input files are named "15.png” and "7.png” etc.

Are you looking for the sample combined text/t-shirt file to be named “15.jpg” and “7.jpg”?

Votes

Translate

Translate

Report

Report
Community guidelines
Be kind and respectful, give credit to the original source of content, and search for duplicates before posting. Learn more
community guidelines
Community Expert ,
Dec 07, 2018 Dec 07, 2018

Copy link to clipboard

Copied

I have been responding  to a Dec 5, 2018 post You may have missed that Post made two days ago.

JJMack

Votes

Translate

Translate

Report

Report
Community guidelines
Be kind and respectful, give credit to the original source of content, and search for duplicates before posting. Learn more
community guidelines
Community Expert ,
Dec 08, 2018 Dec 08, 2018

Copy link to clipboard

Copied

The mobile browser view of the forum lacks certain information that is only visible in a desktop browser, so it is harder to work out what is going on when casually browsing.

Votes

Translate

Translate

Report

Report
Community guidelines
Be kind and respectful, give credit to the original source of content, and search for duplicates before posting. Learn more
community guidelines
Community Expert ,
Dec 27, 2018 Dec 27, 2018

Copy link to clipboard

Copied

LATEST

I’m just updating this topic thread to possibly help others in the future. The discussion was taken offline and has now been resolved.

As the requirements were not too challenging and did not require a script, the task was easily accomplished by an action that was batch run from either the automate/batch command (with extra steps added for file saving) or via the Image Processor Pro script (the standard Image Processor script was not retaining transparency so it was not used).

The source folder for the batch contains multiple high resolution “slogans” that will be batch applied to a single static T-shirt image. If different shirts are required, the action is duplicated and the place command step is changed to point to a different shirt.

Here is a screenshot of the action, the key steps have been annotated:

TSHIRT-ATN.png

Video screenshots used to illustrate the process:

ipp-atn-v3.swf

step-by-step.swf

Votes

Translate

Translate

Report

Report
Community guidelines
Be kind and respectful, give credit to the original source of content, and search for duplicates before posting. Learn more
community guidelines