Inspiring
October 9, 2013
Answered

Photoshop CC 3D - how to wrap a smart object around a bottle

  • October 9, 2013
  • 7 replies
  • 42782 views

Hi There,

This seems to be a common question but none of the answers I've found make sense (I suspect they're for older versions of Photoshop).

I have a photograph of a jar and a smart object which is my label.

If I go: >3D >New mesh from layer >Mesh preset >Cylinder - then the label is wrapped around the cylinder and is actually perfect - job done.

Questions:

- How to I make the Cylinder transperant so I only see the label

- How do I get out of the 3D window so I can place my wrapped label on the photograph of the jar?

Sorry for the simple questions, I'm surprised I can't work this out (I have previous experience with Cinema 4d and  Modo) or find instructions/YouTube videos that make sense.

Any pointers in the right direction would be much appreciated.

Cheers

Ben

This topic has been closed for replies.
Correct answer SG...

Hi Ben,

I did these a while back with Ps CS5. I outlined the steps with that version's UI. I'll see if I can update the steps for Ps CC.

regards,

steve


Hi,

Outline for this exercise is to generate a 3D cylinder, create artwork you want to wrap around the cylinder, duplicate and modify that artwork to be used in an opacity map, and then arrange the 3D element on an image to composite together.

So the basic steps I used to do this:

1) New 1024px x 512px, RGB doc w/White background.

2) 3D> New Mesh from Layer> Depth Map to> Cylinder.

3) Change the workspace to '3D'

4) In the 3D panel, select the material 'Background'.

5) In the Properties panel, select the Opacity texture pop-up and choose 'Remove Texture' (you will be adding one back in step 10).

6) In the Properties panel, select the Diffuse texture pop-up and choose 'Edit Texture...'

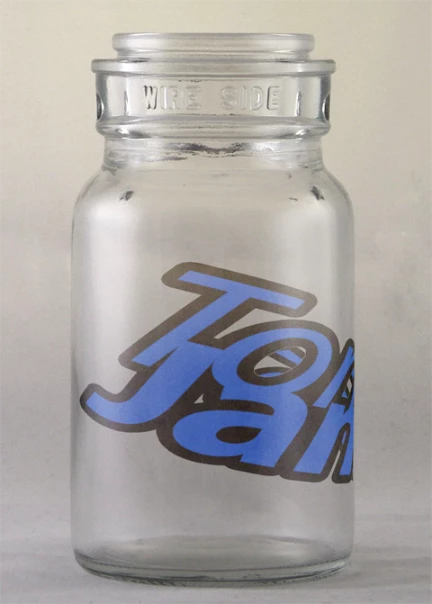
7) Here's where you add the label graphics that you want bending around the cylinder. I used a text layer w/stroke layer style for the jar example. You'll also want to scale the width down around 60% to account for the stretched UV mapping on the cylinder. (the scale factor changes if you use gray values instrad of white in step 1)

8) When you have the artwork as you want it, Layer> Duplicate Layer... to a new file.  This new file will be used for the Opacity texture which masks off the area of the label you want, while removing the unwanted cylinder (ie. die-cut label).

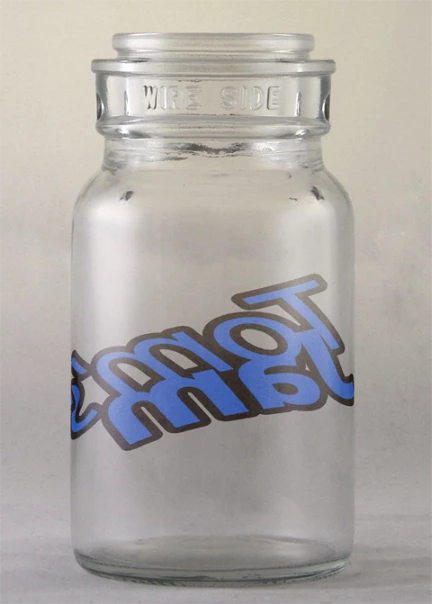
9) Select all the layer pixels and change them to white, then on a new layer below fill it black. This is your new Opacity map. Save it to a working directory for use in the next step, and close the file. Also save and close the artwork file from step 6 & 7 (it is stored as a smart object in the original file from step 1)

10) Back with the original file from step 1 (with the 3D layer selected) select the Background material again in the 3D panel. Now in the Properties panel, select the Opacity texture pop-up and choose 'Load Texture...'. Browse to the opacity texture from step 9 and choose 'Open'.

11) You should now see just your label artwork wrapping in a cylindrical shape. You can use the 3D Camera Rotate tool to view the various angles.

12) Now, bring in your jar image for compositing. This is where manipulating the 3D layer to align the scale and perspective can get tricky. I try to just use the 3D camera tools for this work (with global object scaling an exception). I also use the 'Shaded Illustration' Rendering preset to help visualize.

Hopefully this helps out. I left out details around interacting with the 3D layers, but ask questions if you get stuck.

regards,

steve

7 replies

Participant
August 6, 2021

This does not work anymore in the 22.4.3 I downloaded yesterday Aug. 5, 2021. I opened an existing bottle photo that I used a 3D wrap on to simulate the label I'm designing on the bottle. When I open the CYLINDER MATERIAL WRAP layer it does NOT SHOW ANYTHING BUT A BLACK EMPTY SPACE. This is why I hate updating anything Adobe. BTW, I have been using Ai/Ps/In since they came out.

davescm
Community Expert
Community Expert
August 6, 2021

To use 3D in v 22.x you will need to go to Preferences > Technology Preivews and check Deactivate native canvas. Then close and restart Photoshop.

This reverts the compositing to Open GL which is required for 3D preview


Dave

JJMack
Community Expert
Community Expert
August 6, 2021

Yes Photoshop 3D is nor ready for Photoshop 2021.  3D materials are not rendered correctly with UV so its not possible to use without deactivating  Photoshop 2021 native canvas support, Photoshop old support is required.


All 3D models do not seem the be created the same way. To populate a  Coffee Mug  cylindrical surface with an image I had to distort the images aspect ratio for the way the model applied the surface  stretched the image's vertical dimension.  I still had to use Photoshop 2020 to get it to render lighting correctly.  Photoshop 2021 has many known issued...

JJMack
Matthew A
Inspiring
August 20, 2020

Thanks for this — but on a 2020 version of Photoshop CC I simply dont see this step...

"6) In the Properties panel, select the Diffuse texture pop-up and choose 'Edit Texture...'"


Any ideas?

davescm
Community Expert
Community Expert
August 20, 2020

This is a very old thread. The materials system has changed.

Use "Base Color" instead of Diffuse


Dave

megans526091
Participant
December 17, 2019

This might be a dumb question as I am new to photoshop, but how do I select the layer pixel and change them to white?

Participant
November 10, 2016

After reading through this thread and trying to follow these steps. I feel very stuck. I am a visual learner, can anyone point me to a how to video using these steps? Or do a video screen capture using these steps and post? I'm using CC 2015.5

Thanks much

Shawn

SG...
Adobe Employee
Adobe Employee
November 30, 2016

Hi Shawn,

It has been a while since I stepped through the exercise. Was there any particular step where you got stuck, or was the general experience of reading then trying to replicate in app the sticking part? What OS are you using? Do you have an image in particular that your using to composite the 3D label on to?

regards,

steve

sinrise
Known Participant
June 22, 2014

Wow! This was so incredibly helpful, not because of how awesome the 3D tutorial part is, but because of what the process allows you to do-- rather, redo, over and over. What is great is the file you use to create the opacity mask can also be used to do repetitive product label replacements. The photographer takes several template shots. Using the vector files I created the product labels with, simply add layers to the 'diffuse texture' document, and resave. Go back to the original document and viola! The image is swapped, and everything else is preserved. Just make sure you use the exact same transforms each time so the label is always in the correct spot. Perfect for website product images with lots of similar products with different colors, flavors, etc.

I went looking for 'how to wrap an image around a cylinder' and stumbled on this gem, which opened up a whole new way of doing repetitive labels! Saves me a lot of time and with a little 3D rendering XP, getting the lighting, angles and scale right, you can create a much more diverse set of image processing and adjustment techniques. This is the kind of thing Adobe could consider creating a built-in process for. Skipping the opacity mask part would make the process much easier, and further improve on this time-saving masterpiece. Thanks, macopp!

Chuck Uebele
Community Expert
Community Expert
October 10, 2013

I'm not familar with the 3D programs you mentioned, but Chris is correct that it's a matter of opacity.  As you did, you wrapped your image around the cylinder.  Then you just turn the opacity of the ends of the cylinder down to 0 to hide them.  If your lable needs transparent areas, you need to create an opacity map, which you may be mistakenly being calling an alpha.  You can use your lable as a basis for this opacity map. 

Trevor.Dennis
Community Expert
Community Expert
October 10, 2013

I still struggle with Photoshop 3D, and I tend to cheat.  For instance, rather than try to affect an extrusion's face in the 3D panels, I copy the layer before extruding it, and then use normal tools on the copied layer.  For instance, I made this Facebook banner for a friend yesterday, and used Layer Styles on the copied text layer which would obviously perfectly cover the extrudied text layer it was copied from. 

cmscssAuthor
Inspiring
October 9, 2013

I can see the label has been applied to the diffuse channel - is there a way to add an alpha to clip the cylinder geometry or to use the alpha from the label smart object?

Chris Cox
Legend
October 9, 2013

An alpha channel wouldn't apply here - but image transparency, or an opacity map would help.

cmscssAuthor
Inspiring
October 9, 2013

I can't see any way of using the smart object's alpha as an opacity map - I can see an option for adding an opacity texture but it wants a separate file. In the end I've just manually created a path to use as a layer mask on the 3D layer - this has gotten rid of the geometry.

Is there a way to resize the texture independently of the geometry?