Participant
March 19, 2018
Answered

Textur verwäscht beim Rendern - am verzweifeln

  • March 19, 2018
  • 2 replies
  • 742 views

Liebe Community,

ich habe ein Problem mit einer Textur, die durch den Rendervorgang verwäscht.

Ausgangspunkt ist Bild (Fläche 1000x701px), welches Extrudiert zu einem Quader extrudiert wird. Das Bild ist somit als Textur an der Vorderseite festgelegt. Die Extrusionstiefe wird auf 50px eingestellt. Anschließend wird um den so entstandenen Quader eine umlaufende seitliche Textur (auf die extrudierte Fläche mit 50px breite) gelegt. Jetzt starte ich den Rendervorgang und bekomme als Ergebnis immer eine verwaschene Textur (siehe roter Pfeil)


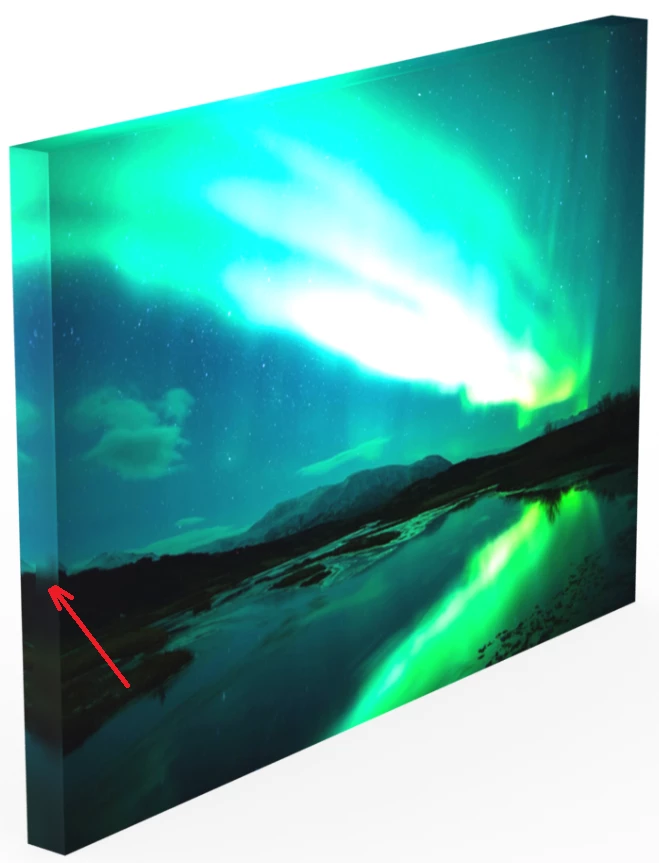
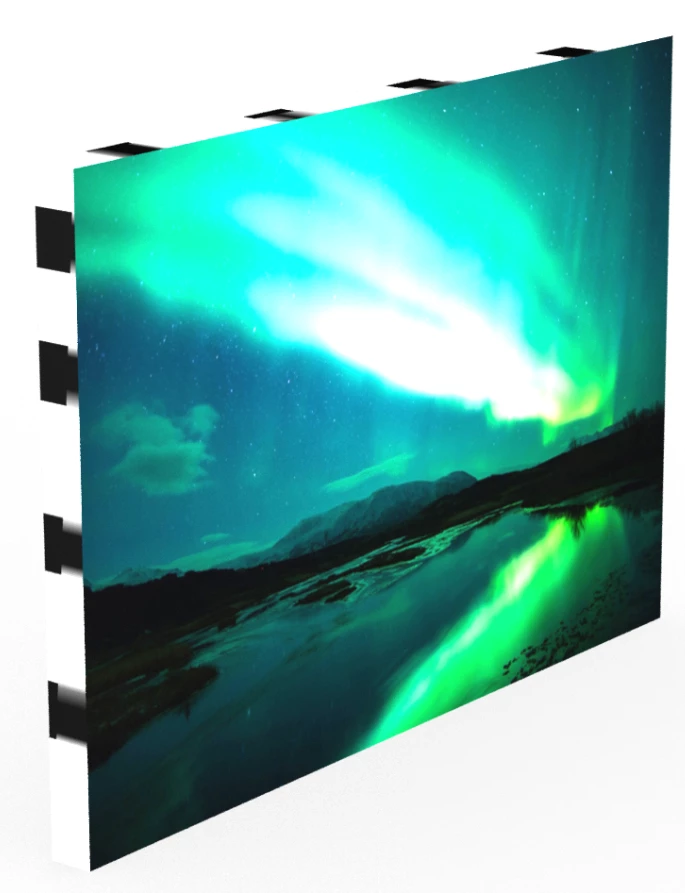
um das Problem besser sichtbar zu machen, habe ich die seitlich umlaufende Textur durch schwarz-weise Streifen ersetzt (siehe nachfolgendes Bild). Die Verwaschung verläuft diagonal über die Textur. Ich bekomme das Problem nicht in den Griff. Ich hoffe mir kann jemand weiter helfen. Habe das schon an einem anderen Rechner probiert, Rendereinstellungen variiert, Grafikkarte ausgetauscht, Standardtexturen von PS verwendet - immer das gleiche Problem. Das einzige was hilft, ist die Extrusionstiefe auf einen sehr hohen Wert zu setzten. Dadurch wird der Quader sehr dick. Er soll aber nur 50px dick sein.

Vielen Dank schonmal!

This topic has been closed for replies.
Correct answer rayek.elfin

Hey rayek.elfin

Thank you very much!

yes, the front and the back to share the same UV space.

You Result from Blender looks great. I am not familiar with Blender. But perhaps it's worth a try. I have to create several hundreds of those images. Therefore I am using the batch processing of PS combined with JS. Do you know if it is possible ti do batch processing in Blender and aotomate the whole process?

Everything  works fine in PS - except the problem with the texture. That's so annoying.


Here is an unwrapped canvas frame object. The same I used in Blender.

Open it in Photoshop, and replace the material texture with yours. I rendered it, and it looks fine in Photoshop.

http://www.upl.co/uploads/canvas1521491237.zip

Yes, it would be possible to automate what you need in Blender - with Python. But Blender seems a bit overkill for this project. Still, to fix UV maps for your future 3d objects in Photoshop, download it at www.blender.org

2 replies

rayek.elfin
Legend
March 19, 2018

To be honest, I checked the UVs and geometry, and they're a mess when Photoshop extrudes the plane. I'd clean those up in Blender first, but I am unsure if that is a workable solution for you, and it defeats the purpose of doing 3d in Photoshop, because the render result in Blender would be superior compared to the one in Photoshop - so why use Photoshop then?

It should be a simple enough thing. But Photoshop won't allow us to edit UVs, and it seems its too imprecise in this case.

Try this:

- #D-->Generate UVs

- open the texture, and adjust the texture for it to fit on the UVs.

That worked for me. However, the UV texture is very inefficient: ideally you want the front and the back to share the same UV space.

rayek.elfin
Legend
March 19, 2018

Ideally you would have a UV map like this one:

Which would result in a render like this (Blender):

Participant
March 19, 2018

Hey rayek.elfin

Thank you very much!

yes, the front and the back to share the same UV space.

You Result from Blender looks great. I am not familiar with Blender. But perhaps it's worth a try. I have to create several hundreds of those images. Therefore I am using the batch processing of PS combined with JS. Do you know if it is possible ti do batch processing in Blender and aotomate the whole process?

Everything  works fine in PS - except the problem with the texture. That's so annoying.

Chuck Uebele
Community Expert
Community Expert
March 19, 2018

It sounds like you need to adjust your lights so there is less light on the side, if you're using a 3d workspace.

Participant
March 19, 2018

unfortunately the problem do not depends on any light settings.

rayek.elfin
Legend
March 19, 2018

That looks like a UV texture problem: extruding in 3d in Photoshop creates a new side surface that consists of two triangles. Which is why you are seeing an exact diagonal blurring. The questions now are: why isn't it showing up in the preview, and is this a bug?

I'll do some testing myself. Which version of Photoshop do you use?