• Global community
    • Language:
      • Deutsch
      • English
      • Español
      • Français
      • Português
  • 日本語コミュニティ
    Dedicated community for Japanese speakers
  • 한국 커뮤니티
    Dedicated community for Korean speakers
Exit
0

Wavy text - Maybe displacement map?

New Here ,
May 11, 2017 May 11, 2017

Copy link to clipboard

Copied

Hello

Im creating a landingpage for a organization, and i would like to make wavy text for the frontpage like the text on the image.
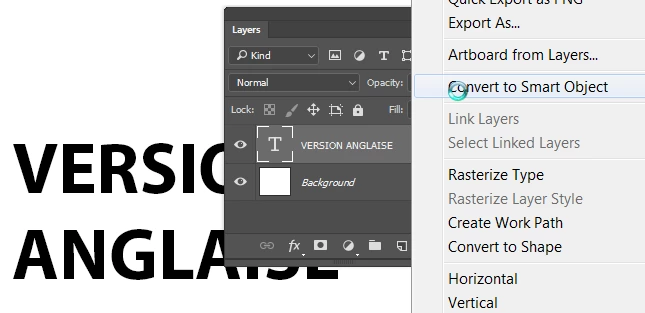
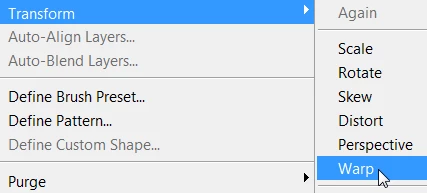
I have tried using displacement maps in photoshop, but it doesnt seem like i can get the text alone after i displaced it.
Also it would be nice if i could take it further into illustrator so i can stretch it into different sizes.

-Thanks

18010199_1880707278870263_2076884299455254314_n.jpg

Views

2.3K

Translate

Translate

Report

Report
Community guidelines
Be kind and respectful, give credit to the original source of content, and search for duplicates before posting. Learn more
community guidelines

correct answers 1 Correct answer

Community Expert , May 11, 2017 May 11, 2017

You'll need to eyeball it, but you might find it more intuitive than displacement map.

After typing the text, right click on the text layer and convert to smart object.

Choose Edit > Transform > Warp.

You'll get points and handles that you can move around until the text looks the way you want.

It's easy to edit if you need to. Just choose Edit > Transform > Warp again.

Votes

Translate

Translate
Adobe
Community Expert ,
May 11, 2017 May 11, 2017

Copy link to clipboard

Copied

Displacement maps work on pixels rather than vectors such as shape or text. However you can place the text inside a smart object and apply the displacement map to that smart object. That will let you open the smart object and alter the text later.

Edit the smart object text content:

Hope that helps you

Dave

Votes

Translate

Translate

Report

Report
Community guidelines
Be kind and respectful, give credit to the original source of content, and search for duplicates before posting. Learn more
community guidelines
New Here ,
May 11, 2017 May 11, 2017

Copy link to clipboard

Copied

Thanks!

What do you normally use as displacement maps?
I have a hard time finding a texture that could make my taxt look like the one on the picture

Votes

Translate

Translate

Report

Report
Community guidelines
Be kind and respectful, give credit to the original source of content, and search for duplicates before posting. Learn more
community guidelines
Community Expert ,
May 11, 2017 May 11, 2017

Copy link to clipboard

Copied

simonb44879216  wrote

Thanks!

What do you normally use as displacement maps?
I have a hard time finding a texture that could make my taxt look like the one on the picture

You have to make the map specifically for the job in hand.  We have had lots of threads on the subject here, with all the tips you'd need.  One thing I'll add regarding the image in your first post, is that after applying the Displacement Map, load the map layer again and copy it, and set one to Screen and the other to Multiply.  The resulting shading will supplement the distortion making for a much better effect.

Votes

Translate

Translate

Report

Report
Community guidelines
Be kind and respectful, give credit to the original source of content, and search for duplicates before posting. Learn more
community guidelines
Community Expert ,
May 11, 2017 May 11, 2017

Copy link to clipboard

Copied

The displacement map is just a grey image. So make it the same size as your poster.
Paint white to move pixels one ways - black to move the other. Then save it as an 8 bit PSD file.

Then you just use the Filter - Distort - Displacement to move the pixels.

So for a simple example - start with this:

Make a displacement map like this :

Use the displace filter with that map

Drag in the map layer and use the shading as described by Trevor

Dave

Votes

Translate

Translate

Report

Report
Community guidelines
Be kind and respectful, give credit to the original source of content, and search for duplicates before posting. Learn more
community guidelines
Community Expert ,
May 11, 2017 May 11, 2017

Copy link to clipboard

Copied

Screen Shot 2017-05-11 at 9.23.28 AM.png

I would also suggest just using transform and get into the distort grid. Often you can do things very easily by just nudging parts of the grid and it's anchors.

I made a quick video grab for you to see how here: Warping Text.mov - Google Drive

By using a smart object on the text layer, it will protect the text in case you need that warp to maintain as a placeholder.

@lifebypixels

Votes

Translate

Translate

Report

Report
Community guidelines
Be kind and respectful, give credit to the original source of content, and search for duplicates before posting. Learn more
community guidelines
Community Expert ,
May 11, 2017 May 11, 2017

Copy link to clipboard

Copied

A couple of years ago I posted this Tech Sheet that I had written for my students. I hope it helps you.

The Unique Effect of Displacement Mapping

Displacement Mapping is the process of changing the geometry of an image so that such things as straight lines are contoured according to the tones appearing the in image in the layer below. This is how it is done in Photoshop

man grid assembly.jpg

1. Open a file

2. Choose Image > Duplicate. In the As: field enter file name as: filename_map.psd. (Example: man_map.psd). This file, which will ultimately serve as the Displacement Map must be in psd format.

3. Choose Image > Mode > Grayscale.  Increase the image contrast using Curves or Levels. Since each image is unique, there is no exact setting. Then choose Filter > Blur > Gaussian Blur. Once again, there is no set amount. The sample below is a useful guide.

displ cntrast blur.jpg

4. Save this file – filename_map.psd -- to the desktop.

5. Open another file consisting of a pattern or type*. Drag that image over the full color image. It will be Layer 1. For the samples below, this was the image that was used. (You may recognize it as the Bayer array camera chip design discussed in the article related to image sharpening.)

man_pattern.jpg

* If you choose to use type for Layer 1, it must be rasterized. After typing, choose Layer > Rasterize > Type.

6. Choose Filter > Distort > Displace. The default numbers of 10 for Vertical and Horizontal Scale usually work very well. For greater displacement,15 is satisfactory, as well. Radio buttons should be set to Stretch to Fit and Repeat Pixel Edges. Click OK.

7. Choose a Blend Mode of Multiply or Overlay (the results appear on the following page). Experiment with other Blend Modes, as well. Adjust the opacity of Layer 1 for the most pleasing effect.

8. In the images below, a mask was added to Layer 1 by clicking on the mask symbol at the bottom of the Layers panel. Then, by painting in black on the eyes, that area of the bottom layer was revealed.

Multilpy & verlay.jpg

                     Multiply                                     Overlay  

XMultilpy & verlay opacity.jpg

                                      Opacity at 50%

In the example below, the same Displacement Map was applied as had been used in the previous example. A light blue Stroke was applied to the rasterized type so that it would be readable against the black background of the image when the 100% Multiply Blending Mode was added, as shown at the bottom/right.

man threesome.jpg

Votes

Translate

Translate

Report

Report
Community guidelines
Be kind and respectful, give credit to the original source of content, and search for duplicates before posting. Learn more
community guidelines
Community Expert ,
May 11, 2017 May 11, 2017

Copy link to clipboard

Copied

LATEST

You'll need to eyeball it, but you might find it more intuitive than displacement map.

After typing the text, right click on the text layer and convert to smart object.

Choose Edit > Transform > Warp.

You'll get points and handles that you can move around until the text looks the way you want.

It's easy to edit if you need to. Just choose Edit > Transform > Warp again.

Votes

Translate

Translate

Report

Report
Community guidelines
Be kind and respectful, give credit to the original source of content, and search for duplicates before posting. Learn more
community guidelines