- Home
- Photoshop ecosystem
- Discussions
- White pixels in animated GIFs with transparency
- White pixels in animated GIFs with transparency
White pixels in animated GIFs with transparency
Copy link to clipboard
Copied
Problem: at least one transparent pixel becomes solid white when exported as a GIF
Details: there is approximately one pixel per layer, but occasionally there are more. There doesn't seem to be a pattern in where the pixel(s) are located. How can I prevent this from happening? If I can't, what's a good way to get rid of the pixels later?
I use Photoshop CS3, but I think this problem may not be related to the version I'm using. Sorry if this problem has been resolved in a later version!
Explore related tutorials & articles

Copy link to clipboard
Copied
Newer software will not change the fact that GIF does not support partial transparency. It is either there or it is not. The transient white pixel you see is the software trying to figure out what to do with a partially transparent pixel.
You might experiment with the matte color used for the GIF. Or create a non-transparent GIF by including the web page's background as the bottom layer in the file.
Copy link to clipboard
Copied
That would make sense, but in all of these there's no partial transparency.
I guess I could include a background, but that's really not ideal for emoticons (which are what I'm creating).

Copy link to clipboard
Copied
Can you post an example with one of these white dots?
Copy link to clipboard
Copied
Here are two:
 This has one white pixel that lies two pixels to the left of the eye of the fourth small emote.
 This one has several, so I won't bother telling you where they are.
Would it be helpful to have .psd files as well?
Edit: it looks like they aren't showing up properly, so I've put them on Dropbox: http://dl.dropbox.com/u/6249583/eagerdummychoir.gif and http://dl.dropbox.com/u/6249583/banned%21.gif
Copy link to clipboard
Copied
The pixel is there. That's why it's showing.
What Marion was trying to explain is, you may not have seen it before trying to save as GIF. If a pixel exists which is 5% white, you really won't see it against the transparency checkerboard. When you save for web, the application can't make a 5% opaque pixel for a gif. It's either 100% opaque or 100% transparent. Since the Save For Web sees color there.. it assumes you want that pixel and chooses 100% opaque.
The solution is to find the partially transparent pixels and remove them before choosing save for web. Often adding a temporary solid-color layer below the artwork will help you see these partially opaque pixels, as will adding a temporary stroke layer style.
For example this image would appear to be transparent except the two circles (horribly blurred due to size increase to for this example).
![]()
But if I were to use Save for web, all sorts of things would appear. Look what happens when I put a temporary layer style stroke on the layer.....
![]()
All the white pixels which were not visible suddenly become visible. In fact, download the first image and add a layer style stroke to it yourself. You'll see how nearly transparent pixles can effect an image.
Copy link to clipboard
Copied
I know that. I assure you that there were no white pixels there beofre exporting, partially transparent or otherwise.
Copy link to clipboard
Copied
I've never seen a case where a pixel suddenly appears or where Photoshop creates a pixel from nothing unless it's told to.

Copy link to clipboard
Copied
As you are able to use a dropbox account to post files here, try posting the original PSD before you make GIF, if you think the GIF export is the problem.
Copy link to clipboard
Copied
How do I get rid of the thin white border around my transparent gifs?
A tutorial describing the technique can be fond here:
http://www.photoshopcafe.com/tutorials/transparent/transparent.htm
A GIF only supports 1-bit transparency - either full transparency or full opaque. - Nothing inbetween. So, if your graphics has anti-aliased (fuzzy) edges, Photoshop has to make those semi-transparent pixels either fully transparent or fully opaque (by removing them, or adding an opaque color 'under' the fuzzy edges. This is the Matte.
Creating aliased graphics (no fuzzy edges) eliminates this problem, but you´ll have a harsh-looking graphic.
Ways around this, besides the matte color and aliased graphics, includes copying your HTML background graphic into your transparent file, and make a custom, aliased Matte (edge around your graphic), then place the transparent file pixel-precise on your webpage.
Copy link to clipboard
Copied
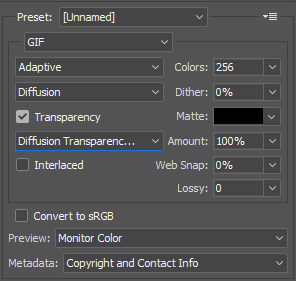
You can resolve it by settings in save for web dialog box.
Select transparency dither to diffusion, matte to grey or black.
See the image below

Hope it helps..
Find more inspiration, events, and resources on the new Adobe Community
Explore Now