 Adobe Community
- Home
- Premiere Pro (Beta)
- Discussions
- DISCUSS: Log color spaces now available in interpr...
- DISCUSS: Log color spaces now available in interpr...
DISCUSS: Log color spaces now available in interpret footage
Copy link to clipboard
Copied
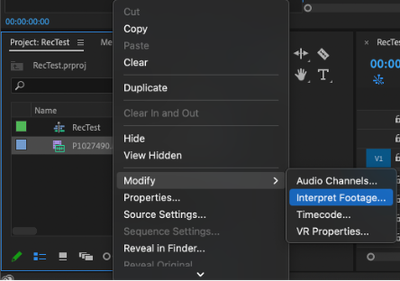
Color management is now available for log-based media. This allows for simpler, LUT-free workflows when working with log footage from popular camera makers like Sony, Panasonic, and Canon. Set the log color space correctly in Modify > Interpret Footage, then place the media on a Rec709 or HDR timeline and Premiere Pro will automatically apply the correct color conversions. Any camera that shoots log can now be used in HDR production easily.
This method transforms log footage to the color space of the sequence in a non-destructive, real-time workflow, rather than the common use of Log>Rec709 LUTs that can clip highlights, shadows and color information.
How It Works:
- Right-click on a video clip in the Project Window and select Modify > Interpret Footage.
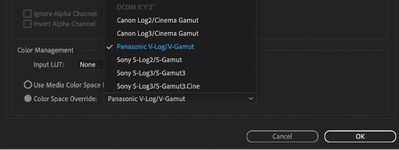
- In the Interpret Footage Window, scroll down to “Color Management” at the bottom of the panel. Click “Color Space Override” then use the pull-down menu to assign the format of the selected clip. This should match the color space that you shot in the camera – V-Log, S-Log, Canon Log.
- Place the media on a Rec709 sequence if working in standard dynamic range. You can also choose to put it on a PQ or HLG timeline to work in HDR. Premiere Pro reads the media color space and does the appropriate conversion from source media color space to the Premiere Pro sequence color space. When you change the working color space in Sequence Settings, Premiere executes the color space transformation, no need to add a different Log > Color Space conversion LUT.
This new color managed workflow is also useful for moving projects out of Premiere and maintaining the wide gamut and luminance of HDR video.
To export in HLG or PQ, choose format H264 or HEVC, select the Main10 or High10 MPEG profile under Encoding Settings, then choose Rec.2100 HLG or Rec.2100 PQ as export color space.
Make sure that the check boxes on the right of Profile and Level are NOT checked, and select Main10 if you are exporting in and HDR format. Then set the Export Color Space to one of the three HDR color spaces.
Beta testers should note that there is a significant difference between clips that are color managed from log to Rec 709, vs clips that use a LUT to convert.
LUTs can include tone mapping, knee and highlight roll off values that yield which yield a good looking image with little fuss but often clip highlights and shadows and that detail in unrecoverable. The LUT processing is destructive. With color managed workflows, none of the color information is lost. But significant tone mapping is required to fit the enormous dynamic range of log (~14 stops) into the very narrow range of Rec709 (~6 stops).
We are still working on a tone mapping approach. You are likely to see results that look a bit blown out in Rec709 sequences. Log to HDR sequences look fantastic, however.
The Waveform above is from a Color Managed clip, none of the highlight or shadowed values have been clipped or lost, you can see them extending way above 100 IRE and dipping below 0.
The Waveform above is from a LUT converted clip, all highlight values have been remapped or clipped to values below 100 IRE, and shadow values are either remapped or crushed to values greater than 0 IRE.
We want to know what you think. Please join the conversation below.
Copy link to clipboard
Copied
Color Space Transforms and LUTs are not at all the same.
That's exactly what I mean. The color space for the manifestation of the material. This is the right decision. We can use Luts for grading/styling. The main work is in redefining and preparing the material for painting.
Copy link to clipboard
Copied
I did some research and found the difference in manipulations when working with color. Note the significant difference in the screenshot with different ways of color influence on the clip.
Color correction/Grade on the clip itself (left) and the difference on the adjustment layers (right).
So explain the reason for this discrepancy in working with color? In this case, many people are used to working with adjustment layers that are not suitable for working with color at all. There are opinions
Copy link to clipboard
Copied
I'd have to be at that computer to really see what's going on. I can't repro that on mine. I can apply say Lumetri presets several ways, and get identical results.
For general information for those viewing this, there are several ways to apply changes/effects to clips. And sometimes that confuses people, though it's a large part of the usability of the app overall.
There are "clip" corrections, applied either by bringing up a clip in the Source monitor and using Lumetri, or by drag/dropping Lumetri presets to a clip in a bin, or by clicking the Source tab of the ECP while working on a timeline and then working Lumetri.
All of those will show on the "Source" tab of the ECP, but not on the 'regular' tab when a clip is on the timeline. I've seen quite a number of times when people have a "Source" effect going, can't see it in the ECP's normal working tab, and so are wondering where that change is coming from.
Then of course there are effects applied in the timline to clips, which are applied in the ECP via the normal tab. And processed top/down in ECP but of course, after any effects applied via Source.
Effects applied via AL ... adjustment layers ... are applied after effects on the Source and the clip itself. And if you have multiple ALs, they are processed in ascending order: lowest first, working up. Sort of opposite of the ECP 'stack' processing.
Or of course, one can duplicate a clip twice (Alt-drag up), apply a Lumetri to the top with only a key set in the HSL Secondary tab and left active with the Black/Color key option. This will take the 'key' from the original clip data before alterations at any point, a nifty capability.
Then on the middle clip, apply the Track Matte effect, setting the Matte to the track of the upper clip, and the mode of the matte to Lumininance. Now add Lumetri 'below' the Track matte effect on that clip, and anything you do is applied only to the signal data that 'comes' through the HSL key on the upper clip ... but is applied to the original, lowest clip, and before any 'clip' effects on that clip.
So there's all sorts of ways to apply effects, with a ton of implications for each. So figuring out what is going on can take a bit of sussing out.
Neil
Copy link to clipboard
Copied
Neil, I'm telling you that why in Comparison view mode shows different results. I want to bring it to a single color, but it turns out this mode incorrectly shows colors. If you turn off the comparison mode, everything is identical and excellent. That's what I don't understand the guess.
Copy link to clipboard
Copied
Wow ... it's different in Comparison mode? Never seen that, I wonder what the hay is happening there?
Neil
Copy link to clipboard
Copied
the screenshot shows differences in color and the background has differences in exposure.
Copy link to clipboard
Copied
Would it be possible to get the LUT Premiere is using to auto-map the footage to the correct color space ?
i.e, we have two footage from 2 sony camera, both shoot is Slog3. But for only one of then, the Slog info is understood by Premiere, not for the second one (I think it was because it's XACS-S). I would need to be abble to apply the same LUT Premiere is using for the first footage to have the same render.
Today I have to turn everything back to Rec709...
Copy link to clipboard
Copied
They aren't using a LUT for color space transforms is my understanding ... but a tonemapping mathematical formula. And that is based on Premiere recognizing the media.
Are you working for HDR deliverables? If not, you need to be working in SDR/Rec.709 anyway.
Neil
Copy link to clipboard
Copied
Thank you for you answer (and sorry for late reply). Because of an external media provider with asset not being ingested as file but as file pointer (with media asset management system), we can have some files being imported in Premiere without this smart recognition. And I would like to be able to apply it on a asset so it can match other footage, them imported as file and recognized, and with tonemapping...
Copy link to clipboard
Copied
Um ... I'm not sure that is possible. Premiere needs the full file, header and all, from what I understand.
That's an intriguing system you've got there. But it might be less than optimal for professional video production.


