- Home
- Premiere Pro (Beta)
- Discussions
- Re: Discuss: New Essentials Workspace
- Re: Discuss: New Essentials Workspace
Discuss: New Essentials Workspace
Copy link to clipboard
Copied
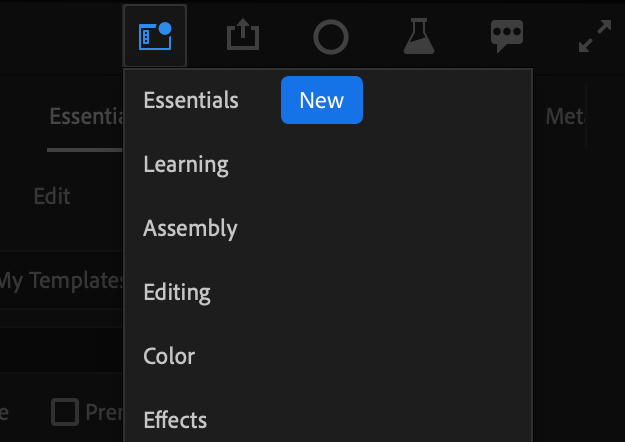
There is a new workspace called “Essentials” that can be accessed by clicking the workspace switcher icon in the top right-hand portion of the header bar.
Essentials workspace
The new Essentials workspace offers a clean and simple layout, makes better use of space and is ideal for editors working on laptops or lower resolution displays.
The panels have been rearranged according to a new left-to-right workflow. Find content on the left, edit and view work in the center, and adjust properties on the right.
This is the new default workspace after a clean install or after resetting preferences.
- Project panel, Effects, Libraries, Text. This is where you inspect content that you need to add to your sequence.
- The Source and Program monitor are docked in the same panel and switch automatically as needed. This gives the appearance of a single monitor layout, but don’t worry, we did not get rid of the source monitor. This is a much better use of space especially on small displays.
- Effects controls, Lumetri Color, Essential Graphics, Essential Audio, Metadata. All the panels needed for core workflows are docked in the same panel. This reduces the need to switch workspaces when moving through the different stages of work (color, audio, graphics, etc.) You can think of this area as the place you adjust properties.
- A nice big timeline 🙂
A few questions for the beta community
- How do you like the experience of editing without the source monitor always visible?
- Does the automatic switching of Source and Program work for you and your editing style?
- Are you able to achieve all the key workflows without switching workspaces(editing, color, audio, graphics) ?
- When would you choose to switch to a different workspace and why?
- Do you still think the Learning workspace should be the default?
We want to know what you think. Please join the conversation below.
Copy link to clipboard
Copied
I already have a daily workspace where the Source and Program Monitor are in one panel so when I saw this I thought it was cool. I've been able to edit fast and put my screen real estate to use by having the Source and Program Monitor in one panel. I think this should be the default.
Copy link to clipboard
Copied
@Kes Akalaonu thanks for the feedback. We feel the same way! FWIW I have been editing with this setup for a few months now and like it a lot . . . even on a larger monitor.
Copy link to clipboard
Copied
Awesome! I first modeled the panels based on FCPX to some degree but once I had the workspace, I found I actually worked faster for some reason.
Copy link to clipboard
Copied
Q1/2: Real estate and the freedom to adjust the workspace to your personal preference is key.
As I edit on a 49" curved wide screen monitor from LG, I always customize my workspace by switching the Source and Program monitor around. The program monitor sits in the middle, while the Source monitor is on the right. I tend not to use the Source monitor that much anyway, as I often do multiple sequence or pancake editing, drag or copy/pasting portions of clips from one sequence to the other. Thus, in a way, I'm using the timeline as a source.
Q3: I will need to do a project to find out.
Q4: I definitely switch workspaces when I do extensive color grading work. What I find puzzling, though, is that as soon as you drag one of the sliders in the Color tab, the effect Lumetri Color gets added inside the Motion and effects tab. IMHO, Adobe should assume the editor wants to adjust color in any way, shape or form in the first place, so you might just as well add an empty version of the Lumetri Effect by default. Or at least give me an option to set this in Preferences. Most filmmakers I know, shoot in some form of Log, which *requires* color correction, even if it's merely applying a LUT. I *always* color correct my footage, and, if there's time, I dig deeper into color grading.
Q5: It can be useful for first-time users. Or as a resource whenever a new version comes out. But it should be easy to get rid of as well, since it takes up valuable real-estate.


