- Home
- Substance 3D Designer
- Discussions
- Re: IRay VS OpenGL - Gloss sharpness
- Re: IRay VS OpenGL - Gloss sharpness
Copy link to clipboard
Copied
Hello,
My expriments for velvet and satin lead me to a question about Iray and OpenGL.
While OpenGL is not that bad, IRay anisotropy seems to be totally ignored in Iray mode. The shiny effect is totally gone. (Left is Iray, right is OpenGL).
What should I change, add, delete?
Currently, I have:
base color
normal
metallic
roughness
specular
anisotropy
Considering the OpenGL sample how could I make it a bit more glossy? Currently my attempts make it looks wet, metallic or mirror-like but never "glossy" (I've tried with sheen channels, with no avail, it become grey, overexposed).
PS : Side question, how to enable auto-smooth in Iray mode?
 2 Correct answers
Hello @arthenics,
Thanks for the question.
The difference between the two renderers comes from the way Substance 3D Designer handles OpenGL. Some approximation can appear with OpenGL and with a HDRI environment really contrasted, these approximations will be even more noticeable, especially on the specularity and anisotropy.
For a more even result, you can increase the sample count of OpenGL:
Edit>Preferences>3D View>OpenGL>Sample Count
I'd advise you to set it to Ultra.
About the result
...To make sure I get you well and cover every aspects:
To display your outputs in the 3D view, right click anywhere in your graph > View Outputs in 3D view
The 3D view displaying your outputs should be the by default set up.
If one map is not correctly linked to the 3D view, it might be a Usage issue. In the Integration Attributes of your output, make sure the Usage is set to the map you need.
With that being said, I am not entirely sure this is the answer you're looking for, so feel fre
...Copy link to clipboard
Copied
Hello @arthenics,
Thanks for the question.
The difference between the two renderers comes from the way Substance 3D Designer handles OpenGL. Some approximation can appear with OpenGL and with a HDRI environment really contrasted, these approximations will be even more noticeable, especially on the specularity and anisotropy.
For a more even result, you can increase the sample count of OpenGL:
Edit>Preferences>3D View>OpenGL>Sample Count
I'd advise you to set it to Ultra.
About the result you're looking for, you'll have to tweak the output you are already using depending on what you're aiming. Do not hesitate to take a look inside our Substance 3D Assets library, you will find a bunch of material you could inspect and some of the assets even have the .sbs file to take a deeper look.
PS: The visible polygons in your Iray Render is unfortunately an issue we already know about and are working on it. The issue usually appears on rounded meshes with a strong normal or lighting.
Best regards,
Copy link to clipboard
Copied
Thanks.
It helps but...
How do we save the maps affectation? It seems I'm missing something.
There are two maps : glossiness and diffuse but I don't see to what maps these are related.
Copy link to clipboard
Copied
Hey arthenics, about the maps affectation:
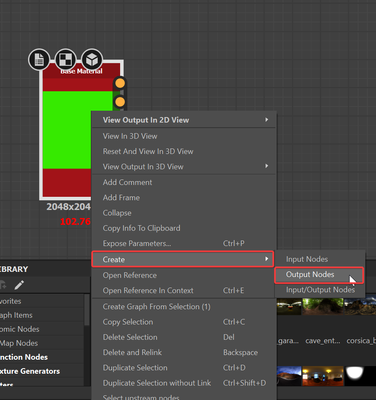
Natively, the 3D view displays the Output nodes from the graph. Do you have output nodes in your graph or did you use the Base Material node to preview your graph ? If so, you can easily create Output nodes from your Base Material node and if not, you can create a new graph with all the outputs you need and copy/paste all your nodes in the new graph.
or
And to make it simple about the Glossiness and Diffuse:
the Diffuse is simply a map that defines the color of the material and the Glossiness defines how the material reflects lights.
These should be outputs of your graph.
Best regards,
Copy link to clipboard
Copied
Hello,
About glossiness and diffuse... ohhhhh ok, thanks XD
About the output, yes of course, I have the outputs and know how to display them in the 3D view, the thing is every output affectation to the 3D view seems to reset at the opening of the project. I need to re-tell what output go where in the 3D view.
When we download a ressource with the SBS, the texture is displayed mapped in the 3D view, when I load my project, the 3D view is the default empty one, not a mapped one.
Copy link to clipboard
Copied
To make sure I get you well and cover every aspects:
To display your outputs in the 3D view, right click anywhere in your graph > View Outputs in 3D view
The 3D view displaying your outputs should be the by default set up.
If one map is not correctly linked to the 3D view, it might be a Usage issue. In the Integration Attributes of your output, make sure the Usage is set to the map you need.
With that being said, I am not entirely sure this is the answer you're looking for, so feel free to share a little bit more on your issue or even photos of your graph.
Have a nice week-end.
Copy link to clipboard
Copied
Ahhh ohhh, thanks, I've missed this part, to "add item" and the right parameter for "usage".
Find more inspiration, events, and resources on the new Adobe Community
Explore Now


