



Set your PNG compression level on export
Rolling out now in After Effects Beta, starting with CCD Beta build 27.0.048
After Effects now lets you choose how much to compress PNG files when you export. When you set PNG as your Output Module format, the PNG Options dialog now includes a Compression slider. This is similar to the kind of control you already have for JPEG.
Steps to Access the Output Module and PNG Options
- Open the Render Queue: Select your composition in the timeline or project panel, then go to File > Export > Add to Render Queue (or press Ctrl+M on Windows or Cmd+M on Mac).
- Click the Output Module Link: Look for the section labeled Output Module in the Render Queue panel. Click the blue underlined text (which often says "Lossless" or displays a format name like "H.264") to open the Output Module Settings dialog.
- Adjust Your Settings: Choose your desired Format (PNG Sequence) from the dropdown menu. Under Video Output, click on format options to open the PNG Options dialog to access the compression slider.
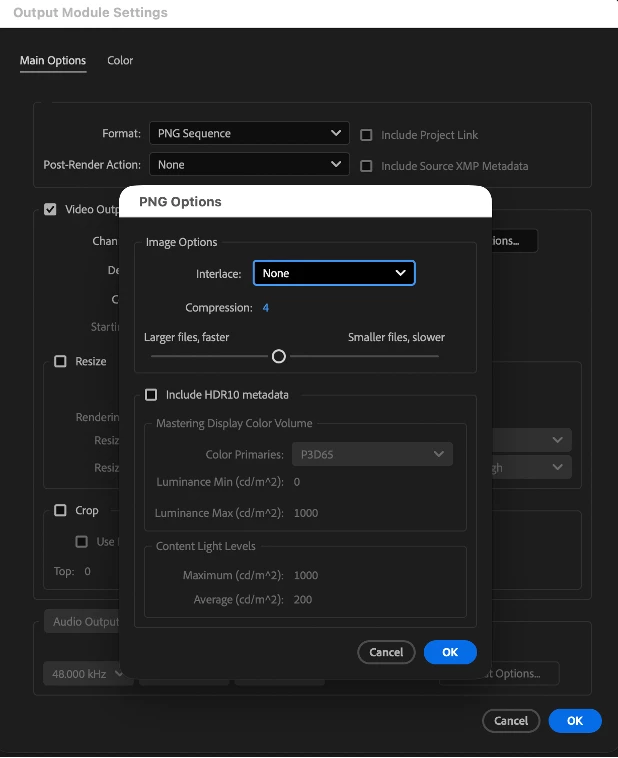
The Compression slider in the PNG Options dialog, running from “Larger files, faster” to “Smaller files, slower.” The slider is a simple trade-off between file size and export speed. Drag toward ‘Smaller files, slower’ for more compression and smaller files that take longer to write; drag toward ‘Larger files, faster’ for quicker exports at the cost of larger files on disk. As PNG is lossless, your image quality stays exactly the same for every compression level.
If you render PNG sequences often, this puts the choice in your hands: keep the default compression level if it's working for you, or lower it when export speed matters more than disk space.
As always, we welcome the feedback! Please let us know if you run into unexpected behavior or have suggestions to improve on it.


 AdChoices