

Color Mode in Adobe Premiere
Color Mode in Adobe Premiere
Color Mode is an application-sized release inside Adobe Premiere (Beta) — a purpose-built color grading experience with new controls, a clip grid, contextual HUDs, Styles, Modules, and a new grade management system called Operations. View the entire series here.
Video Tutorials
1. Five Things to Know Before You Start
Before you dive in, here are the five most important things to know to get the most out of your first session, now available in public beta.
2. How to Find the Timeline
In Color Mode, the timeline is replaced by the Clip Grid — a visual overview of every clip across your sequence, designed for color-focused navigation. Learn how to move through your edit, select clips, and filter by status without leaving the color environment.
3. The Fastest Way to Grade
Color Mode is built for speed — apply a Style to your entire sequence in one click, make a single adjustment that ripples across a group of clips, or fine-tune a single shot without ever leaving your edit. This video walks you through the fastest path from ungraded to finished.
4. Wide Gamut and Graphics: What's New
Color Mode introduces a modern wide gamut pipeline with tone mapping, automatic camera color space handling, and inverse tone mapping that keeps your graphics and Rec.709 media looking exactly as intended.
5. Where Curves Went and What Replaced Them
Curves haven't disappeared — they've been reimagined. Zones give you multi-point curve precision across up to six auto-analyzed tonal ranges, and the Contrast Kit module gives you direct S-curve control with a live HUD showing the curve bending in real time.
6. Where to Find Your Control Values
Color Mode surfaces numeric control values contextually through the HUD — the heads-up display that appears whenever you interact with a control and shows you exactly what you're adjusting in real time.
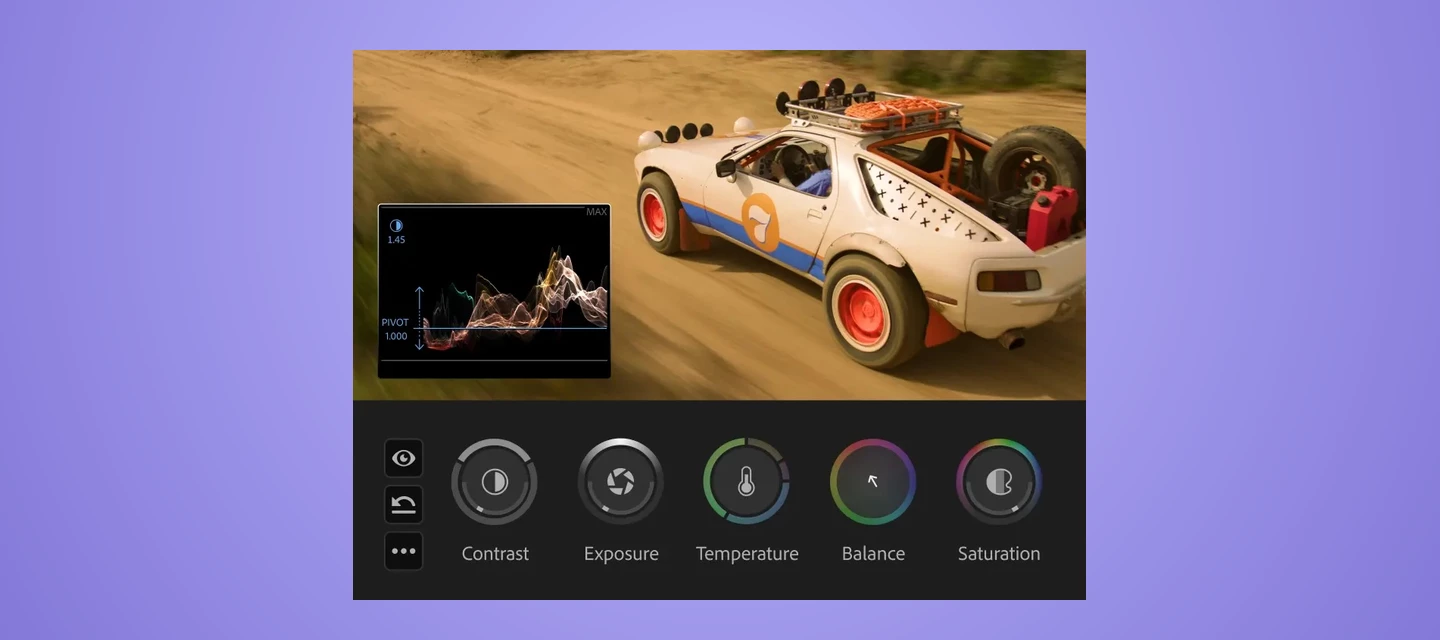
7. How to Use the New Color Controls
Bi-directional controls are one of the signature features of Color Mode — animated, interactive controls that show you what you're doing to the image as you do it, with different HUDs for every tool.
8. Color Controls Available in Edit Mode
You don't have to switch to Color Mode for every adjustment — Adobe Premiere now includes global color, contrast, and texture sliders directly in the Properties Panel in Edit Mode.
9. Clip vs. Sequence Playback Modes Explained
Color Mode offers two playback modes — Clip and Sequence — that control how the program monitor behaves as you navigate between clips in the Clip Grid. Learn the difference and how to choose the right one for your grading workflow.
10. Why Transform, Crop, and Masking Controls Are Hidden
Color Mode maximizes the program monitor for color-first evaluation, which means transform, crop, and masking controls aren't visible by default. This video explains why, and shows you how to access those controls when you need them.
11. How to Use Solo Mode
Solo Mode lets you isolate a single Operation to evaluate its effect on the image without the influence of other grades in your stack. Learn how to use Solo Mode to troubleshoot, compare, and refine individual color decisions with confidence.
12. How to Customize the HUD
The HUD in Color Mode is fully resizable and configurable — you can adjust its size, position, and behavior to fit your display and workflow. Learn how to set up the HUD so it gives you exactly the right feedback for the way you grade.
13. How to Move the HUD Out of the Way
When the HUD is blocking part of your image, you can reposition it, resize it, or temporarily hide it with the H key without losing your place in the grade. This video covers all the ways to get the HUD out of your way while keeping it ready when you need it.
14. Why Your Color Changes Between Play and Pause
If your image looks different during playback versus when paused, it's likely related to color management settings or playback quality resolution — not a mistake in your grade. This video explains what's happening and how to set up accurate monitoring.
15. How to Manage Workspace Layouts
Color Mode supports fully customizable workspace layouts, just like any other mode in Adobe Premiere — you can save, switch, and reset layouts to match different stages of your workflow.
16. How to Customize the Color Mode Workspace
Every panel in Color Mode can be resized, repositioned, and saved as a custom workspace — giving you full control over how your color environment is organized.
17. Where to Find Lift, Gamma, and Gain Controls
Color Mode replaces traditional three-way color controls with Zones — up to six auto-analyzed tonal ranges with more controls per zone than lift, gamma, and gain offered. This video shows you where to find tonal range adjustments and how Zones give you more precision.
18. How to Make the Color Controls Panel Smaller
The Color Controls panel is designed to give you full visibility into your tools, but it can be resized to reclaim screen space when you need a bigger view of your image.
19. How to Keyframe Color Parameters
Color Mode supports keyframing for color parameters, giving you precise control over how grades change over time within a clip. Learn how to set, adjust, and manage keyframes for color in your timeline workflow.
20. Using Beta Projects with Color Mode in Adobe Premiere 26
If you've been working in the Adobe Premiere beta, this video covers how your projects interact with Color Mode in Adobe Premiere 26 and what to expect when opening or continuing beta work.
21. Black vs. Flare: Understanding the Difference
Black and Flare are two distinct tools in Color Mode — black controls the darkest point of your image, while Flare is a Module that emulates the optical effect of light scattering into shadow areas for a cinematic look.
22. How to Use the Style Operation
Styles are preset collections of Modules that apply a complete cinematic look in one click — and unlike LUTs, every parameter is fully adjustable and non-destructive. Learn how to browse, apply, and customize Styles at the clip, group, or sequence level.
23. How to Keep the HUD Onscreen
The HUD is designed to appear contextually when you interact with a control and disappear when you're not — but you can anchor it to the program monitor or set it to freeform so it stays visible.
