Francis-Crossman17221443
Community Manager
Principal Product Manager
September 17, 2021
Question

DISCUSS: Log color spaces now available in interpret footage

  • September 17, 2021
  • 17 replies
  • 40213 views

Color management is now available for log-based media.  This allows for simpler, LUT-free workflows when working with log footage from popular camera makers like Sony, Panasonic, and Canon.  Set the log color space correctly in Modify > Interpret Footage, then place the media on a Rec709 or HDR timeline and Premiere Pro will automatically apply the correct color conversions. Any camera that shoots log can now be used in HDR production easily.


This method transforms log footage to the color space of the sequence in a non-destructive, real-time workflow, rather than the common use of Log>Rec709 LUTs that can clip highlights, shadows and color information.


How It Works:

  1. Right-click on a video clip in the Project Window and select Modify > Interpret Footage.


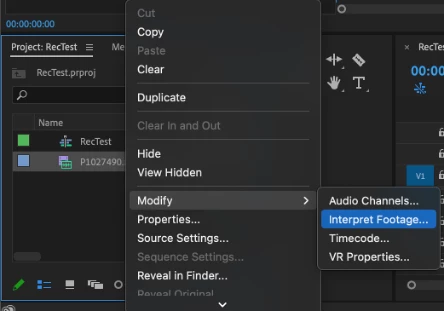
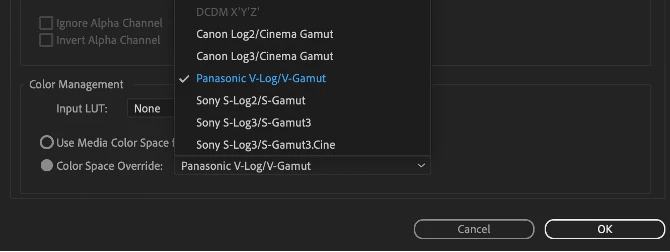
  2. In the Interpret Footage Window, scroll down to “Color Management” at the bottom of the panel. Click “Color Space Override” then use the pull-down menu to assign the format of the selected clip.  This should match the color space that you shot in the camera – V-Log, S-Log, Canon Log.


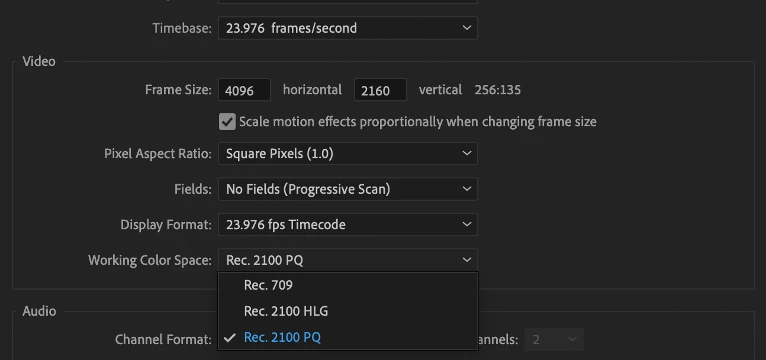
  3. Place the media on a Rec709 sequence if working in standard dynamic range.  You can also choose to put it on a PQ or HLG timeline to work in HDR.  Premiere Pro reads the media color space and does the appropriate conversion from source media color space to the Premiere Pro sequence color space. When you change the working color space in Sequence Settings, Premiere executes the color space transformation, no need to add a different Log > Color Space conversion LUT.


    This new color managed workflow is also useful for moving projects out of Premiere and maintaining the wide gamut and luminance of HDR video.


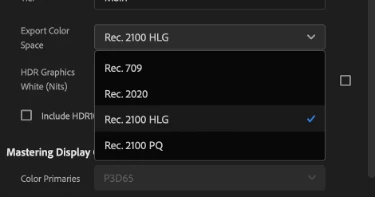
    To export in HLG or PQ, choose format H264 or HEVC, select the Main10 or High10 MPEG profile under Encoding Settings, then choose Rec.2100 HLG or Rec.2100 PQ as export color space.


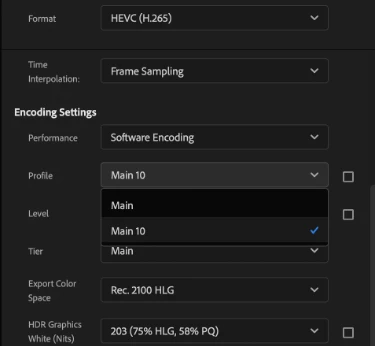
Make sure that the check boxes on the right of Profile and Level are NOT checked, and select Main10 if you are exporting in and HDR format. Then set the Export Color Space to one of the three HDR color spaces.


Beta testers should note that there is a significant difference between clips that are color managed from log to Rec 709, vs clips that use a LUT to convert.


LUTs can include tone mapping, knee and highlight roll off values that yield which yield a good looking image with little fuss but often clip highlights and shadows and that detail in unrecoverable.  The LUT processing is destructive.  With color managed workflows, none of the color information is lost.  But significant tone mapping is required to fit the enormous dynamic range of log (~14 stops) into the very narrow range of Rec709 (~6 stops). 


We are still working on a tone mapping approach.  You are likely to see results that look a bit blown out in Rec709 sequences.  Log to HDR sequences look fantastic, however.   


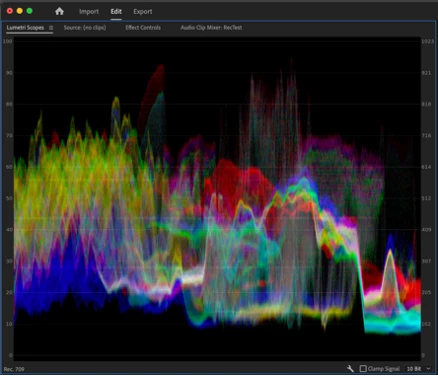
The Waveform above is from a Color Managed clip, none of the highlight or shadowed values have been clipped or lost, you can see them extending way above 100 IRE and dipping below 0.


The Waveform above is from a LUT converted clip, all highlight values have been remapped or clipped to values below 100 IRE, and shadow values are either remapped or crushed to values greater than 0 IRE.


We want to know what you think.  Please join the conversation below.  


This topic has been closed for replies.

17 replies

Participant
December 16, 2022

Would it be possible to get the LUT Premiere is using to auto-map the footage to the correct color space ?

i.e, we have two footage from 2 sony camera, both shoot is Slog3. But for only one of then, the Slog info is understood by Premiere, not for the second one (I think it was because it's XACS-S). I would need to be abble to apply the same LUT Premiere is using for the first footage to have the same render.

Today I have to turn everything back to Rec709...

R Neil Haugen
Legend
December 16, 2022

They aren't using a LUT for color space transforms is my understanding ... but a tonemapping mathematical formula. And that is based on Premiere recognizing the media.


Are you working for HDR deliverables? If not, you need to be working in SDR/Rec.709 anyway.


Neil

Everyone's mileage always varies ...
Participant
January 29, 2023

Thank you for you answer (and sorry for late reply). Because of an external media provider with asset not being ingested as file but as file pointer (with media asset management system), we can have some files being imported in Premiere without this smart recognition. And I would like to be able to apply it on a asset so it can match other footage, them imported as file and recognized, and with tonemapping...

Legend
June 23, 2022

I did some research and found the difference in manipulations when working with color. Note the significant difference in the screenshot with different ways of color influence on the clip.
Color correction/Grade on the clip itself (left) and the difference on the adjustment layers (right).


So explain the reason for this discrepancy in working with color? In this case, many people are used to working with adjustment layers that are not suitable for working with color at all. There are opinions

R Neil Haugen
Legend
June 23, 2022

I'd have to be at that computer to really see what's going on. I can't repro that on mine. I can apply say Lumetri presets several ways, and get identical results.


For general information for those viewing this, there are several ways to apply changes/effects to clips. And sometimes that confuses people, though it's a large part of the usability of the app overall.


There are "clip" corrections, applied either by bringing up a clip in the Source monitor and using Lumetri, or by drag/dropping Lumetri presets  to a clip in a bin, or by clicking the Source tab of the ECP while working on a timeline and then working Lumetri.


All of those will show on the "Source" tab of the ECP, but not on the 'regular' tab when a clip is on the timeline. I've seen quite a number of times when people have a "Source" effect going, can't see it in the ECP's normal working tab, and so are wondering where that change is coming from.


Then of course there are effects applied in the timline to clips, which are applied in the ECP via the normal tab. And processed top/down in ECP but of course, after any effects applied via Source.


Effects applied via AL ... adjustment layers ... are applied after effects on the Source and the clip itself. And if you have multiple ALs, they are processed in ascending order: lowest first, working up. Sort of opposite of the ECP 'stack' processing.


Or of course, one can duplicate a clip twice (Alt-drag up), apply a Lumetri to the top with only a key set in the HSL Secondary tab and left active with the Black/Color key option. This will take the 'key' from the original clip data before alterations at any point, a nifty capability.


Then on the middle clip, apply the Track Matte effect, setting the Matte to the track of the upper clip, and the mode of the matte to Lumininance. Now add Lumetri 'below' the Track matte effect on that clip, and anything you do is applied only to the signal data that 'comes' through the HSL key on the upper clip ... but is applied to the original, lowest clip, and before any 'clip' effects on that clip.


So there's all sorts of ways to apply effects, with a ton of implications for each. So figuring out what is going on can take a bit of sussing out.


Neil

Everyone's mileage always varies ...
Legend
June 24, 2022

Neil, I'm telling you that why in Comparison view mode shows different results. I want to bring it to a single color, but it turns out this mode incorrectly shows colors. If you turn off the comparison mode, everything is identical and excellent. That's what I don't understand the guess.

Legend
June 20, 2022

We need support for redefining the color space without the need to use third-party LUTs. For example, I shot material in Sony's SLOG 3 format and I need to redefine the color space in REC 709. This and the most correct redefinition of the color space without loss of quality is available in DaVinci. In Premiere, I use a third-party LUT to translate SONY SLOG 3 to REC 709. As we know, the use of LUT when redefining the color space loses the quality of materials, which is not good. When will we see the process of material development at the Premiere software level without additional LUT? It's hard to say, because they've been working on this for a very long time. Everyone is waiting for just such a process of working with raw material.

R Neil Haugen
Legend
June 20, 2022

"As we know, the use of LUT when redefining the color space loses the quality of materials, which is not good"


I would respectfully disagree ... a LUT can be damaging, certainly, but can also be the best tool for many transform processes. And this is the primary tool in most grading apps.


For instance, LUTs are the primary tool in Resolve for color space transforms. And they have a TON of LUTs for going from various media "spaces" to all the available working spaces in Resolve.


"Tonemapping" deals only with of cousre, tonal range ... brightness ... changes.


CSTs ... color space transforms ... are typically LUTs, often 3d ones. And can be pretty complex. Used properly, where you can 'trim' the clip to fit the LUT, there's no 'damage' issue involved.


So what we'll need to wait & see is the quality of the transform LUTs that Adobe's color scientists come up with. So far, the limited testing I've done with the S-log3.cine transform they have were pretty encouraging.


Especially as it did marvelous separations of the three color channels in the highlights that I simply could not even come close to manually.


Neil


Everyone's mileage always varies ...
Inspiring
June 20, 2022

Color Space Transforms and LUTs are not at all the same.


Read this article: https://blog.frame.io/2020/04/27/luts-vs-transforms/


Also, go watch this video that I have linked to here before: https://youtu.be/Hlj5ep-85ys

maya table
Participant
June 16, 2022

This is the worst update ever. The workaround is terrible and takes too much conversion time when prepping for a colorist.

R Neil Haugen
Legend
June 16, 2022

Um ... what extra time are you needing to (I assume) do a conform out to Resolve? Curious here as to what you're running into.


Neil

Everyone's mileage always varies ...
Participating Frequently
April 14, 2023

Is there a way to change the color management options in batches vs. one clip at a time?  

eelko ferwerda
Known Participant
June 10, 2022

Dear, when is open color space override, i only see different kind of Rec. I'm not seeing different camera log's. 
i'm using Premiere version 22.3.0 on an Apple Mac Studio.

R Neil Haugen
Legend
June 10, 2022

Yes, then simply use the Override to Rec.709.

Everyone's mileage always varies ...
Legend
June 7, 2022

I'm only thinking about one thing. It is necessary to implement the material development tool into the desired color space as soon as possible without third-party LUTS, so as not to distort the colors. This solution is still in DaVinci. I would like to see the principle of working with the manifestation of color in Premiere. Now Premiere is too weak to work with the original color.

R Neil Haugen
Legend
June 7, 2022

Resolve has built-in CSTs ... color space transforms ... that users can select for different media. We can set the desired default behavior for different media also.


Yes, Premiere needs that ability. Which is why I made that request for a color management PANEL. Something available from the list of panels in the Window menu of Premiere, and that has all defaults/overrides in one place. Can be floated, docked, available at any or all times.


Color Management Panel


Neil

Everyone's mileage always varies ...
Richard van den Boogaard
Community Expert
Community Expert
June 7, 2022

Instead of asking the user to correct this using the Interpret footage dialog, wouldn't it be wiser if Adobe would prompt the user to set CM upon the Import stage of footage? Or that Adobe will have the intelligence to interpret the footage correctly based on the metadata or a quick analysis of the clip? How hard is it to interpret a clip as being shot in Log?

Serghios
Known Participant
February 15, 2022

Any chance to support the log / color profile of the zcam zlog2? The zcam community is not small and it would be really useful to have a properly supported workflow. would be sick

Legend
February 15, 2022

Since we are talking about such a wonderful function as the correct interpretation of the material, without loss of image quality in light and dark areas, then add profiles of the manifestation of materials with a list of different color spaces that are used in cameras. Not two or three, namely, those that are used in cameras so that the creators choose their appropriate profile and take advantage of your wonderful function. And so this is profanity, as you have indicated several pieces of profiles.

Do the rest have to pray to their cameras?

Take DaVinci as an example. There is any profile and color space available.

R Neil Haugen
Legend
February 15, 2022

Baffy,


I'm as intrigued as puzzled by your last three posts here. The first one, the simple graphic with a caption ... I'm not sure what you mean there. Have you tried to apply a LUT there, and it didn't work? What?


The next post, with the image with the big no color graphics ... I have no clue what I'm supposed to be seeing there. A bit of explanation as to what you mean us to understand would be so useful.


Your last post seems to be about Premiere not having a list of  every camera possible with profiles for their different outputs or something? That will be nice as they add some in, and they have already added a number via the Override option as Francis notes in the first post of this thread. And more will be coming.


Personally, I compare Lumetri more to what we had in SpeedGrade, but to each their own. 😉


Resolve started as a full-on grading app, and a deep one at that. Just for grading, it used to be many thousands of dollars to buy a turn-key Davinci computer system with Resolve installed. Then it got bought out by BlackMagic, who makes their profit by providing software free or cheap in order to get us to buy their hardware. Like the $30,000 "Advanced" control panel. And it is still the most widely used grading app out there. So yea, Resolve will have more options for tools than any other app except for a couple of the still-turnkey options like Baselight.


There's no way a primarily editing app like Premiere will ever match Resolve for total color tools. Not that I wouldn't love it to, but ... it isn't the main emphasis of the app. And Resolve's color tools existed long before anyone added editing ability to it.


Neil


Everyone's mileage always varies ...
Legend
February 15, 2022
quote

I'm as intrigued as puzzled by your last three posts here. The first one, the simple graphic with a caption ... I'm not sure what you mean there. Have you tried to apply a LUT there, and it didn't work? What?


Neil

The second picture complements the first one. In the first picture, I applied the LUT that I showed in the second picture. Now we look at the second picture and we see that the LUT has been applied to the clip in the basket and on the timeline. BUT, it is not displayed in the viewer software. Do you see the difference in color? There is a grade in the basket and on the timeline. It is not displayed in the source and program view window.

Legend
February 14, 2022