



















Design the future of fashion, win Firefly Pro 👗✨
Announcements
Recently active
Hey everyone! One of the oldest, most persistent things you've asked us for just landed in Premiere Beta 27.0 (Build 29): New Audio Stretching Modes.Here's the pain we're finally going after. If you've ever needed to re-time a line of dialogue or pull a music bed to fit, you know the drill. You change the speed or duration in Premiere, listen back, and it sounds like a chipmunk or a robot. So you give up, round-trip the clip out to Audition, get a clean render over there, and bring it back. Every single time. That detour has been the default for years, and it breaks your flow for what should be a two-second edit.This changes that. We're introducing new stretching modes that hold pitch through speed and duration changes without the artifacts and the processed, robotic quality you get today. Re-time the clip, keep the pitch, keep the character, and stay on your timeline the whole time.What's New?You now get a choice of stretching modes right inside the Speed/Duration workflow you already
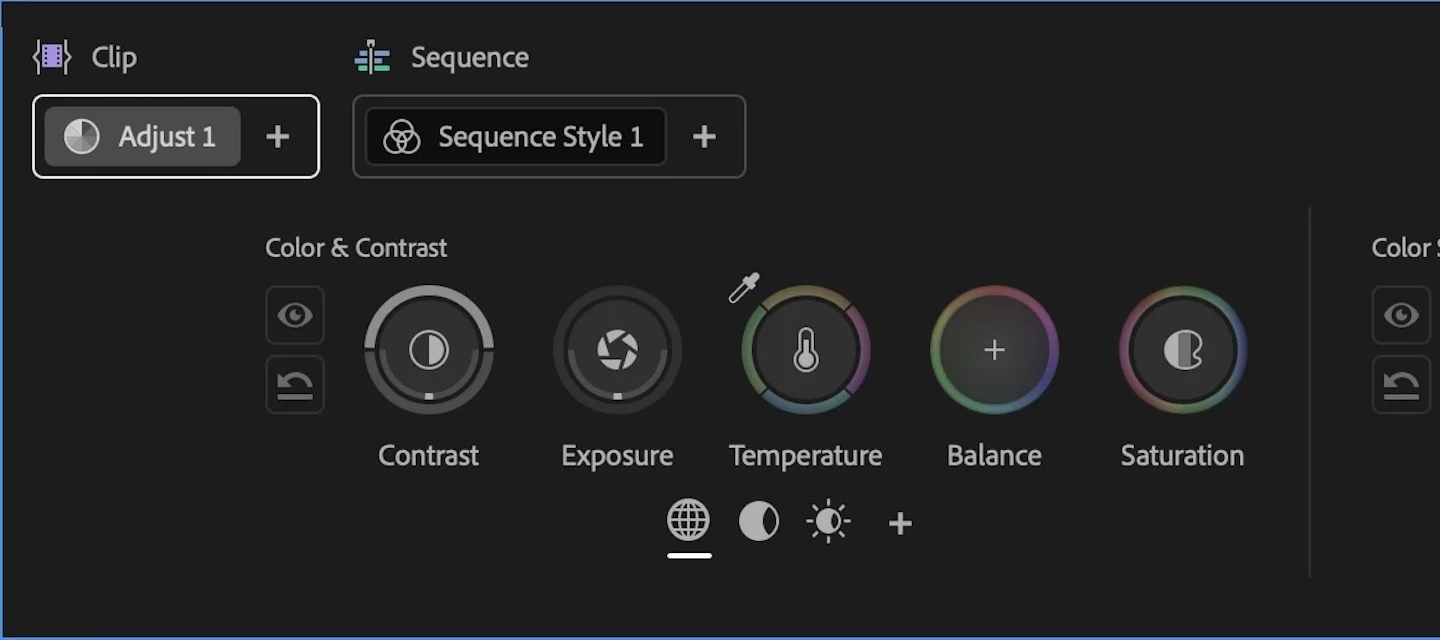
Welcome to the public beta of our brand new Color Mode! This is a colossal release that's been years in the making, months in private beta, and now we're excited to share it with you. Here's all the most important information to get you started.Resources for Learning About Color ModeGiven how new this is, we've prepared the following videos and articles to get you up to speed on Color Mode as quickly as possible. Color Mode Announcement Video Color Mode in Premiere Page Color Mode Training Course Frequently Asked Questions Videos HelpX ArticlesAbout Color ModeColor Mode is a brand new approach to color grading created specifically for the needs of editors. It's been designed to be an accessible, fast to learn, and efficient environment for making every clip in your sequence look its best right inside of Premiere. However, Color Mode has also been built to provide the full functionality necessary for users at every level to make highly detailed improvements as well as the broad stylisti
Hey everyone! We're excited to share a new addition that just landed in Premiere Beta 26.5.0 Build 66: iXML metadata right in your audio clip headers and source monitor. Production sound carries a wealth of metadata, and now you can see it without leaving the timeline or the source monitor.What's New?When your audio has iXML metadata, Premiere now surfaces it directly on the clip header. No more digging through panels or cross-referencing sound reports to know what you're looking at. The same metadata shows up in the source monitor too, displayed at the level of the channel labels, so you can make sorting and selection decisions before a clip ever hits your sequence. It's a global setting, so once you turn it on, it applies in the timeline and the source monitor.Where to find itThe control lives in Settings > Media, under a preference called Show iXML metadata in audio clip headers and source monitor. Flip it on to display the metadata across the timeline and source monitor and flip
Hey everyone! A new quality of life feature just landed in Premiere Beta 27.0 Build 39: color labels for timeline track headers. If you've ever wanted an at-a-glance way to tell your tracks apart on a busy timeline, this is for you.What's New?You can now assign a color label directly to any track header, video, audio, or caption track. It works just like clip labels: pick from any of your project's 16 label colors and apply it to the track itself. This colors just the track header, not the clips sitting on that track, so your timeline stays readable without re-labeling everything on it. Where to find itRight-click any timeline track header and choose a color label from your project's label colors. Click the swatch to toggle it off if you want the track back to no color, and click again to reapply a color. Track Header right-clic menuClick the swatch to toggle it off Why this mattersOn a timeline with a lot of tracks, it's easy to lose track of which is which, especially once you're jug
Hi everyone! As a dialogue editor, I've always chased the same thing: the tool that gets me the best-sounding result in the least amount of time, and the most control over my dialogue, whether I recorded it myself or it came back from set in whatever shape it happened to be in.For years, the answer meant reaching for a few different tools. One to make the voice sound better, another to wrestle down the background noise. And production audio is never just "speech." There's ambience, there's music, there are effects, all baked into the same recording, and that's exactly what makes cleaning it up so hard.This is where Enhance Audio comes to shine. In the same spirit as what we showed at MAX Sneaks last year, it hands you control over the ambience, the music, the sound effects, and the dialogue, and lets you rebalance every stem as much as you need. That's what makes it one of the most powerful noise reduction tools in Premiere today.For a couple of years now, the one thing you've told us
Editors can now generate images in the context they need it. They can describe the image they need, guide the results further using reference frames pulled from their own footage, and generate images that match the look, subject, or composition already established in their edit all using Adobe Firefly or supported partner models. Select a range, choose your model, add optional reference frames, describe what you want, and Premiere inserts the generated image into your sequence. Generating Images Select the Generative Media Tool from the Toolbar Drag across any video track or double click a gap to select the duration you want to generate. Select your model, select any reference images, enter your prompt and generate. The Generative task bar supports Adobe Firefly Image Models and Partner models. The default model on the Generative task bar for Generate Image is Gemini 3.1 (Nano Banana 2)You can use multiple reference frames per generation. Input frames can be sampled from
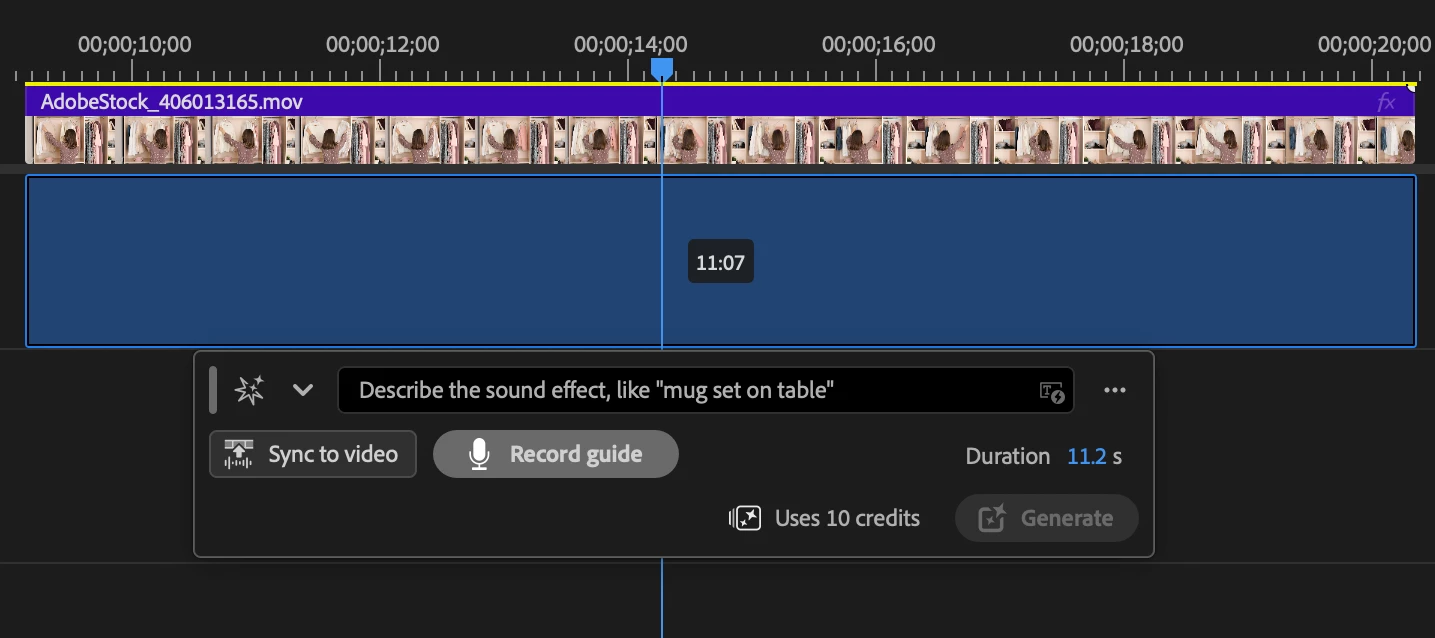
We’re excited to introduce a new generative workflow in Premiere. The new Generative Media Tool lets you generate sound effects and video exactly where you need them, directly in your timeline. Simply select a range in your timeline, describe what you want, and you can generate media directly into your edit. Whether you need missing ambience, a custom sound effect, b-roll, a cutaway or an establishing shot, you can stay focused on editing without switching applications. To add the visual context of your project, use the eyedropper to sample reference frames without leaving the timeline. Generate Sound Effects in ContextNow you can generate custom sound effects directly in the Premiere timeline.Select any audio range, describe the sound you want, and generate multiple variations that match the duration of your selection.Need more control? You can use your voice to guide the timing and intensity of the sound effect, making it easier to create sound effects that feel natural in your ed
Hey everyone! We're excited to share a new dialogue tool that just landed in Premiere Beta 27.0 Build 39: Audio Leveling. It analyzes a dialogue clip and automatically writes volume keyframes that even out the level, so your dialogue sits at a consistent, balanced loudness without you drawing automation by hand.What's New?Audio Leveling listens to your dialogue clip and rides the volume keyframes for you. It detects where the level jumps too hot or drops too low, then lays down clip volume keyframes that attenuate the loud spots and lift the quiet ones toward a steady target. Instead of one static volume adjustment for the whole clip, you get moment-to-moment level balancing that follows the performance. And because the result is real keyframes on your clip, nothing is locked in. You can nudge, reshape, or remove any of them just like keyframes you drew yourself. Where to find itSelect a dialogue clip and you'll find Audio Leveling inside the Loudness module of the Essential Sound pane
Hey everyone! Sync to Video just landed in Premiere Beta 27.0 (Build 30), and it's small enough to miss and big enough to change how you use Generate Sound Effects. It's really the next input we've handed the tool. First you told it what you wanted with text. Then you could shape the timing with your voice using Record a Guide. Now Premiere can watch the footage and time the effect to what's happening on screen for you.What's New?Sync to Video lets the picture drive the result. Instead of placing or timing your effect by hand, you let Premiere read the footage in your selection and match the generated sound to the action in frame. Type "dog barking," and if there's a dog barking on screen, the effect lands on that bark.Think of the three inputs as doing three different jobs. Text says what the sound is. A voice guide lets you perform the timing and intensity. Sync to Video reads the action straight off the picture, so the hit lands without you tapping it out by hand. Sync to Video for
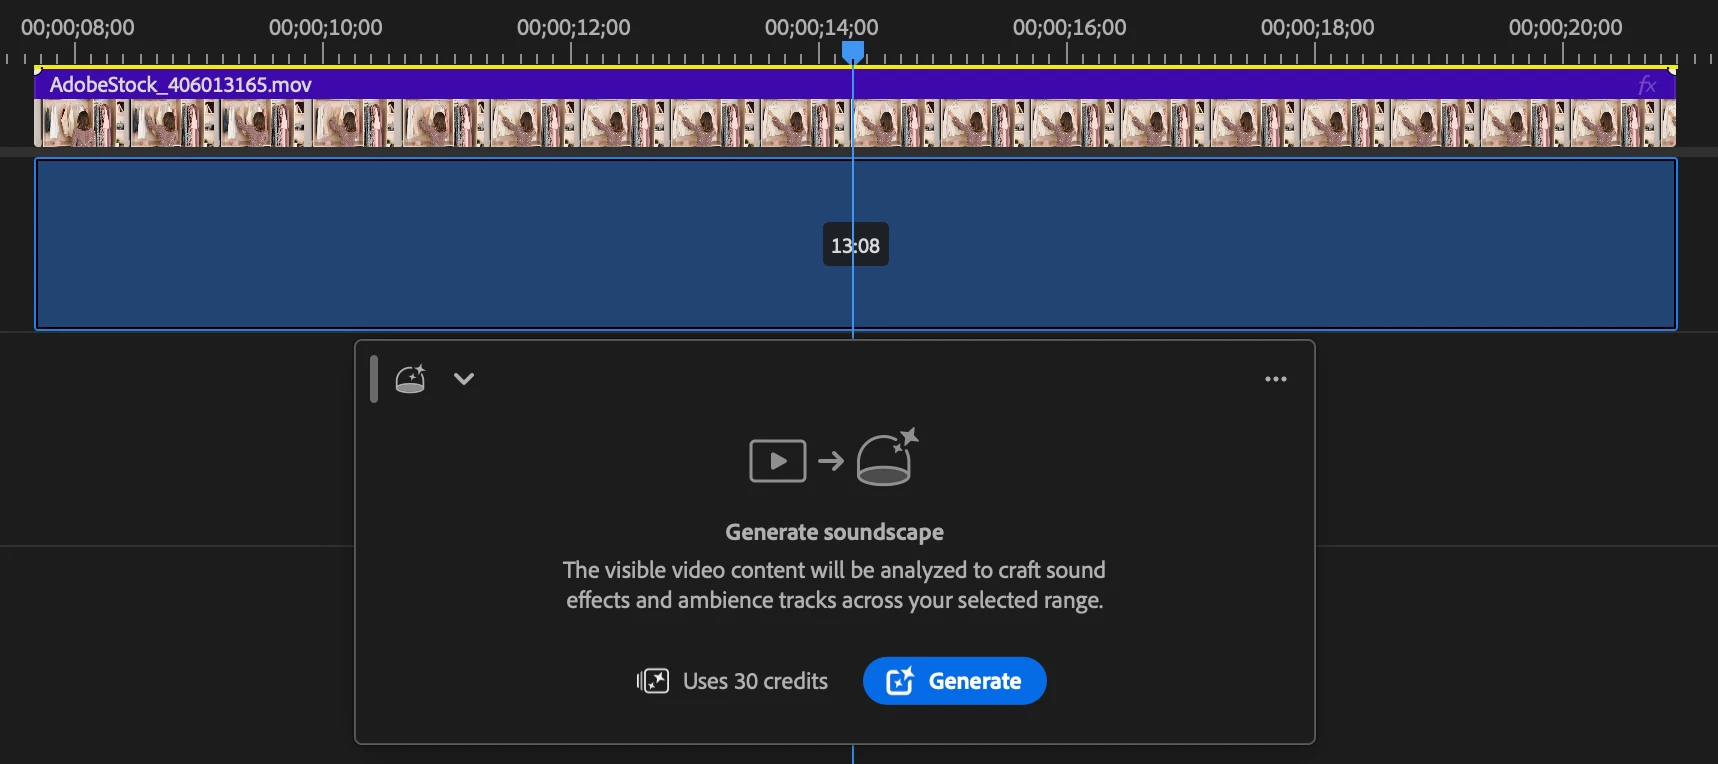
Hey everyone! You know the moment. Picture's basically there, the scene is dead quiet, and you can already hear what it should sound like. Getting that out of your head and onto the timeline is the slow part. And on the flip side, sometimes you're staring at a silent scene with no idea where to start, and you just need something to build from. That's the whole reason for Generate Soundscape, and it's live now in Premiere Beta 27.0 (Build 30).What's New?Select a range in your timeline and Premiere "listens" to the picture, then builds a soundscape that moves with it. It creates two background layers and two foreground layers, all landing where the action does. And you're not stuck with one baked-in mix, you get four editable stems. Regenerate a layer until it clicks, nudge one that's almost there, or rebalance the whole thing.If you've used Generate Sound Effects, this picks up right where that leaves off. Generate Sound Effects hands you one sound; Soundscape hands you a whole bed, wit
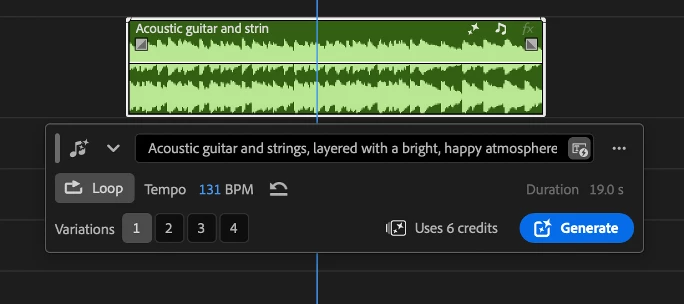
Hey everyone!We're excited to share that Generate Music is now available in Premiere Beta 27.0 (build 22), powered by the Firefly Music model. It brings AI-generated background music right into your timeline, so you can score a scene without ever leaving your project.What's New?Generate Music lets you create original music without stepping outside Premiere, right from your timeline.You've got a few different ways to generate:Describe the music you want in a prompt, with built-in prompt enhancement to help you get better results. Generate from your video with Video to Prompt: make a range selection under a video clip, choose Video to Prompt, and the music is generated to match what's happening on screen. Generate loops for music that needs to repeat seamlessly.You're in control of the details, too. Set the tempo yourself in BPM, or leave it automatic and let the model choose, and pick a duration anywhere from five seconds up to five minutes. Every generation returns four variations, so
Hey everyone! We're excited to share a new Firefly AI-powered audio feature that just landed in Premiere Beta [26.5.0 (Build 75)]: Separate Crosstalk.If you've ever shot a scene on a single mic – whether that's a boom, a phone, or just one lavalier on set – you know the moment: two people start talking at the same time, the mic can't tell the voices apart, and the only real fix is a re-record. Now Separate Crosstalk gives you a way to pull those overlapping voices apart, right inside your timeline! What's New?Separate Crosstalk is built for one specific moment: when two speakers talk over each other at the same time on a single recording – actual overlapping speech, not just two people who happen to be in the same scene. It works on mono and stereo clips and separates up to two overlapping speakers from that shared audio. This isn't full diarization and it isn't meant to split every speaker onto their own track across a whole project. It's meant to solve the crosstalk moment that today
We added the ability to hide the on-clip fade/transition handles. Find this setting in the “timeline display settings” wrench menu. You have independent control over video and audio fade handles. If you find that turning them on an off is a common occurrence, keyboard shortcuts may be assigned as well.The on-clip fade handles make it easier to create audio fades and video cross-dissolves and can greatly speed up your editing. But for some users they get in the way of basic editing functions like trimming and moving clips. If you are one of these people for whom the fade handles are more of a hindrance than a help, we now allow you to turn them off. Just in case you didn’t know, you can customize the look and feel of your sequence in many ways in this menu. We want to know what you think. Please join the conversation below.
Hey everyone!We are excited to share a new feature in Text-Based Editing: Paper Edit. It is in build 34 of Premiere Beta. Many of you have asked for the ability to highlight multiple sections of a transcript and preview them before creating a new sequence.Here’s how it works:Start from a single Source Clip or an existing Sequence. Click the Paper Edit button Highlight what you want to keep. When you click into Paper Edit mode, you can read through your transcript and highlight the sections you want to use. Before you commit anything to a sequence, select “Preview.” This allows you to playback the selections and make changes. Click on a selection to omit it. If something doesn’t sound good in your preview, just remove it by clicking on the text. Jump between sections in long sequences. If your raw footage is long, you can quickly jump between sections instead of scrolling endlessly.We would love to hear what you think! Give Paper Edit a spin and let us know if there is anything we can
Color Mode is now in public beta, and your feedback is going to shape what it looks like at GA.If you've spent time in it, we want to know what's working, and what you wish existed. The survey only takes a minute and goes directly to the team building Color Mode. Thank you, and happy editing. Fill it out here →
Hey everyone, A few updates are landing in Object Masking ahead of the next release. Here's what's changing. Choose your tracking quality: Better Quality vs. Faster Today, tracking runs on a model which is tuned for speed. It does a solid job in the common case, but mask detail is capped by its resolution, and it can also lose the subject in longer clips and through occlusion. We've built a new tracking model to close both of those gaps. Better Quality tracks at a higher mask resolution than Faster, which shows up as real gains in mask detail and edge quality, especially on hair, fur, and fine edges. It also adds long-term memory, which should meaningfully help tracking hold onto the subject through occlusion and in longer clips. The tradeoff: the higher resolution makes Better Quality slower, noticeably so on some systems. So we're giving you the choice to select tracker of your choice. You'll see two tracking quality options: Faster: This is the default tracker, today's tracking re
Hi all,We've overhauled how Premiere handles Variable Frame Rate (VFR) media, and the change is now live in the latest Premiere beta. We'd appreciate your help testing it before it ships.VFR footage - screen and game capture, livestreams, phone video, and more - stores frames with varying durations rather than a fixed rate. Our aim with this change is smoother playback, more accurate timing and duration, and more consistent handling across clips.What we'd love you to testScreen recordings (macOS capture, OBS, Xbox Game Bar, ShadowPlay, etc.) iPhone and Android footage — very often VFR Game and livestream capture Any MP4 / MOV / MPEG clip with an unusual or fractional frame rate Timelines mixing VFR and constant-frame-rate clipsWhat to look forSmooth playback, no new stutter or dropped frames Audio and video stay in sync, especially on longer clips Reported duration and frame count match the source Frames land where you expect when scrubbing and stepping Exports match the source clipIf
Who just got a glow-up? Effects, that's who!If I had a nickel for every time a new video editor opened up the ECP and said, "Wow, was this built in the 90s?" I wouldn't be typing this blog post right now. I'd be sitting on my veranda with a strong Manhattan in my hand and looking out at the Caribbean. If I had a penny for every time a seasoned video editor told me they had the muscle memory of an Olympic typist, but that they need to invest in 4.00 reading glasses just to SEE the parameters for Bokeh blur well... you get it. Your disdain for the ECP is loud and clear.Have we got a solution for you! Brand new to Public Beta we now have Effects in the Properties Panel! Video Effects! Audio Effects! Masks! Even some color (but you should still go over to our brand new Color Mode for adjusting your Temperature and Saturation because oo la la!)You may have noticed that we are investing in better effects experiences. Building on the acquisition of Film Impact last year, we are now surfacing
The Effects panel just got a major glow-up! Animated previews give you a sense of what an effect does, and advanced search makes it more likely you'll find what you're looking for. It's visual, it's fun, and it just might help you find something creative that's been hiding in plain sight.Say hello to the New Effects Panel — a reimagined Effects panel that shows you what an effect actually does before you commit to it.What's NewAnimated preview thumbnails. Hover over an effect or transition and you'll see a short animated preview of it in action, so you know what you're getting before you drag it onto a clip. Preview from Source. Want to know what an effect will look like on your footage, not a generic clip? Preview from Source is an option that shows the effect applied to whatever's under your playhead in the Program Monitor. Scrubbing stays smooth — previews update once you let go of the playhead, not while you're dragging through it. Smarter search. We overhauled search with keyword
The HSL Mask Tool and Luminance Mask Tool let you create a mask based on color or brightness in your footage, rather than drawing a shape by hand. Sample a color or luminance range directly from the frame and Premiere generates the mask for you. This differs from HSL Secondary, which isolates a color for grading rather than creating a mask you can apply to any effect.To create a mask, long press the mask icon in the toolbar and select HSL Mask or Luminance Mask. Then click on the area of your clip in the Program Monitor that contains the color or brightness range you want to mask.Masks created with these tools appear in the Properties panel under the effect they are attached to, and work in both Edit mode and Color Mode. You can adjust the range at any time, invert the mask, or combine it with other masks on the same clip.Learn More about HSL mask
The object detection in Object Masking tool is getting an upgrade. If you are using the latest Beta, you are already using it. We wanted to share what's changing.When you move your cursor over the Program Monitor with the Object Mask tool active, colored overlays snap to objects in the frame before you click. That instant preview is meant to be fast, confident, and complete. It works great for common foreground subjects. But for many other things you might have found yourself reaching for the rectangle or lasso fallback more often than you'd like.What's changingWe've upgraded the underlying model powering object detection. The new experience is meaningfully better across three dimensions:More objects detected. The new model surfaces roughly twice as many selectable objects per scene. Objects that were previously invisible to the object detection pipeline- props, background elements, layered subjects with props, now light up.More complete object boundaries. Mask boundaries are more accu
TL;DRWe shipped three Beta improvements to Object Masking: Sharpness (Smooth Mask edge refinement) with two control modes, a Mask Expansion slider to nudge boundaries, and an in-session Mask Offline notification so you can locate or restore missing mask files while you work. What’s included in this BetaSharpness (Smooth Mask Edge Refinement) - A new control in Effect Controls for Smooth Masks that adjusts how much of the lower-confidence fringe around the confident mask core is included. That fringe is what gives Smooth Mask its soft, natural blend on hair and fine detail, Sharpness control lets you tune it. S-Curve (default) — Contrast and Midpoint sliders for quick, intuitive adjustments. Levels — Input Black, Input White, and Gamma for linear, granular control if you prefer level-style tweaks. Both modes operate on the same underlying mask data so you can switch between them to compare. Mask Expansion - A single slider centered at 0 that physically shifts a mask boundary inward
Hey everyone! We’re excited to share a new addition to the voiceover recording workflow that just landed in Premiere Beta 26.5.0 Build 59: Live waveforms while you record.This feature is on by default and is designed to give you immediate visual feedback as you record. No more recording blind and waiting until you stop to see what you captured.What’s New?When you record a voiceover now, the audio draws onto the timeline in real time. As you speak into the mic, the waveform renders live in the clip, so you can see your levels, pacing, and pauses as they happen. Your recording takes shape in front of you instead of showing up only after you hit stop.Where to find itYou’ll see the waveform render automatically in the target track the moment you start a voiceover recording. There’s nothing to turn on. As soon as you begin, the audio draws into the clip in real time so you can follow the take as it happens.Live waveform feedback while recording a voiceoverWhy this mattersRecording voiceover
In v25.3 of Premiere, After Effects, and Media Encoder, support was added for hardware acceleration of 10-bit 4:2:2 media in both H.264 and HEVC codecs in MP4 and MOV containers. Now in beta is an update to this support, adding hardware acceleration to files in the MXF container. This support applies to customers using NVIDIA’s Blackwell Architecture GPU in computers with Intel or AMD CPUs. It will also support customers using NVIDIA’s upcoming RTX Spark chip. We’d love to get your feedback on this expanded support for Blackwell Architecture!
As we prepare for our upcoming version 27.0 release of Adobe Premiere, After Effects, Media Encoder, and Audition, we are sharing an important update regarding Macintosh hardware compatibility. Beginning with version 27.0, our video and audio applications on the Mac platform will require Apple silicon (M1 or later) processors. Intel-based Mac systems will no longer be supported for v27.0 and future updates. What Macintosh Users Need to Know Intel-Based Macs: You can continue installing and using version 26.x. Security updates for v26.x will continue per our standard support lifecycle. To update to v27.0 upon release, an Apple silicon Macintosh will be required. Apple silicon Macs (M1 or newer): No action needed. You can update to v27.0 as normal. Moving exclusively to Apple silicon on macOS allows us to focus on modern architecture and hardware acceleration across our video and audio applications. This update also aligns our roadmap with Apple’s transition roadmap: Apple has announced
Remix with Firefly Community Gallery
Thousands of free creations to fall in love with and remix in Firefly.
Already have an account? Login
Enter your E-mail address. We'll send you an e-mail with instructions to reset your password.