Community Manager
August 26, 2026
StickyNews

Now in Beta: New Audio Stretching Modes in Premiere

  • August 26, 2026
  • 15 replies
  • 506 views

Hey everyone! One of the oldest, most persistent things you've asked us for just landed in Premiere Beta 27.0 (Build 29): New Audio Stretching Modes.

Here's the pain we're finally going after. If you've ever needed to re-time a line of dialogue or pull a music bed to fit, you know the drill. You change the speed or duration in Premiere, listen back, and it sounds like a chipmunk or a robot. So you give up, round-trip the clip out to Audition, get a clean render over there, and bring it back. Every single time. That detour has been the default for years, and it breaks your flow for what should be a two-second edit.

This changes that. We're introducing new stretching modes that hold pitch through speed and duration changes without the artifacts and the processed, robotic quality you get today. Re-time the clip, keep the pitch, keep the character, and stay on your timeline the whole time.


What's New?

You now get a choice of stretching modes right inside the Speed/Duration workflow you already use. Premiere is also context aware: it reads whether a clip is dialogue or music and tunes the stretch to match, so voices stay natural and music holds together, without you having to set anything.

There are three modes to choose from:

  • Legacy is the real-time behavior you know today: instant, but it's also the one that gets robotic the moment you lean on it.
  • Medium and High Quality are the new modes, the same high-quality stretching you'd go to Audition for, now right here in Premiere. These render modes are what Premiere reaches for by default now, so you get pitch-preserving quality out of the box. Because they render for quality, they'll take a little render time, the same way rendering has always worked in Premiere. Legacy is still one click away when you want instant real-time feedback.

That covers the everyday stuff and the fussy stuff. Re-time a line to fit a gap. Fix sync when your audio doesn't match a pulled-up or pulled-down picture, without leaving Premiere. Shift the pitch of a clip and have it still sound like something a person actually recorded, not something a machine mangled.
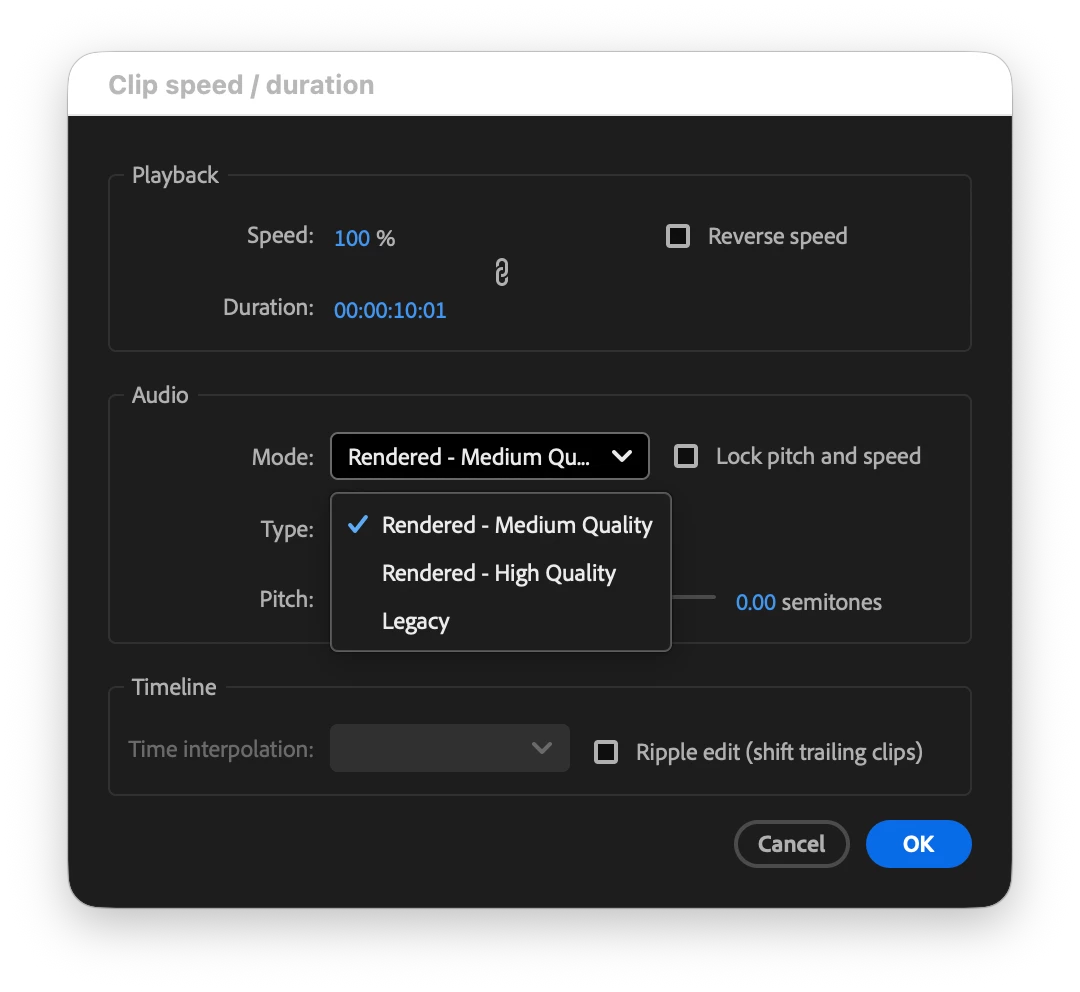
 

New Audio Stretching Modes
 
Choose between Polyphonic for Music and Ambience or Monophonic for Dialogue and Sound Effects

Where to find it

Right-click any clip and choose Speed/Duration, same as always. The new mode options are right there, and the dialogue/music detection is running automatically in the background, so most of the time you won't have to think about which one to reach for.
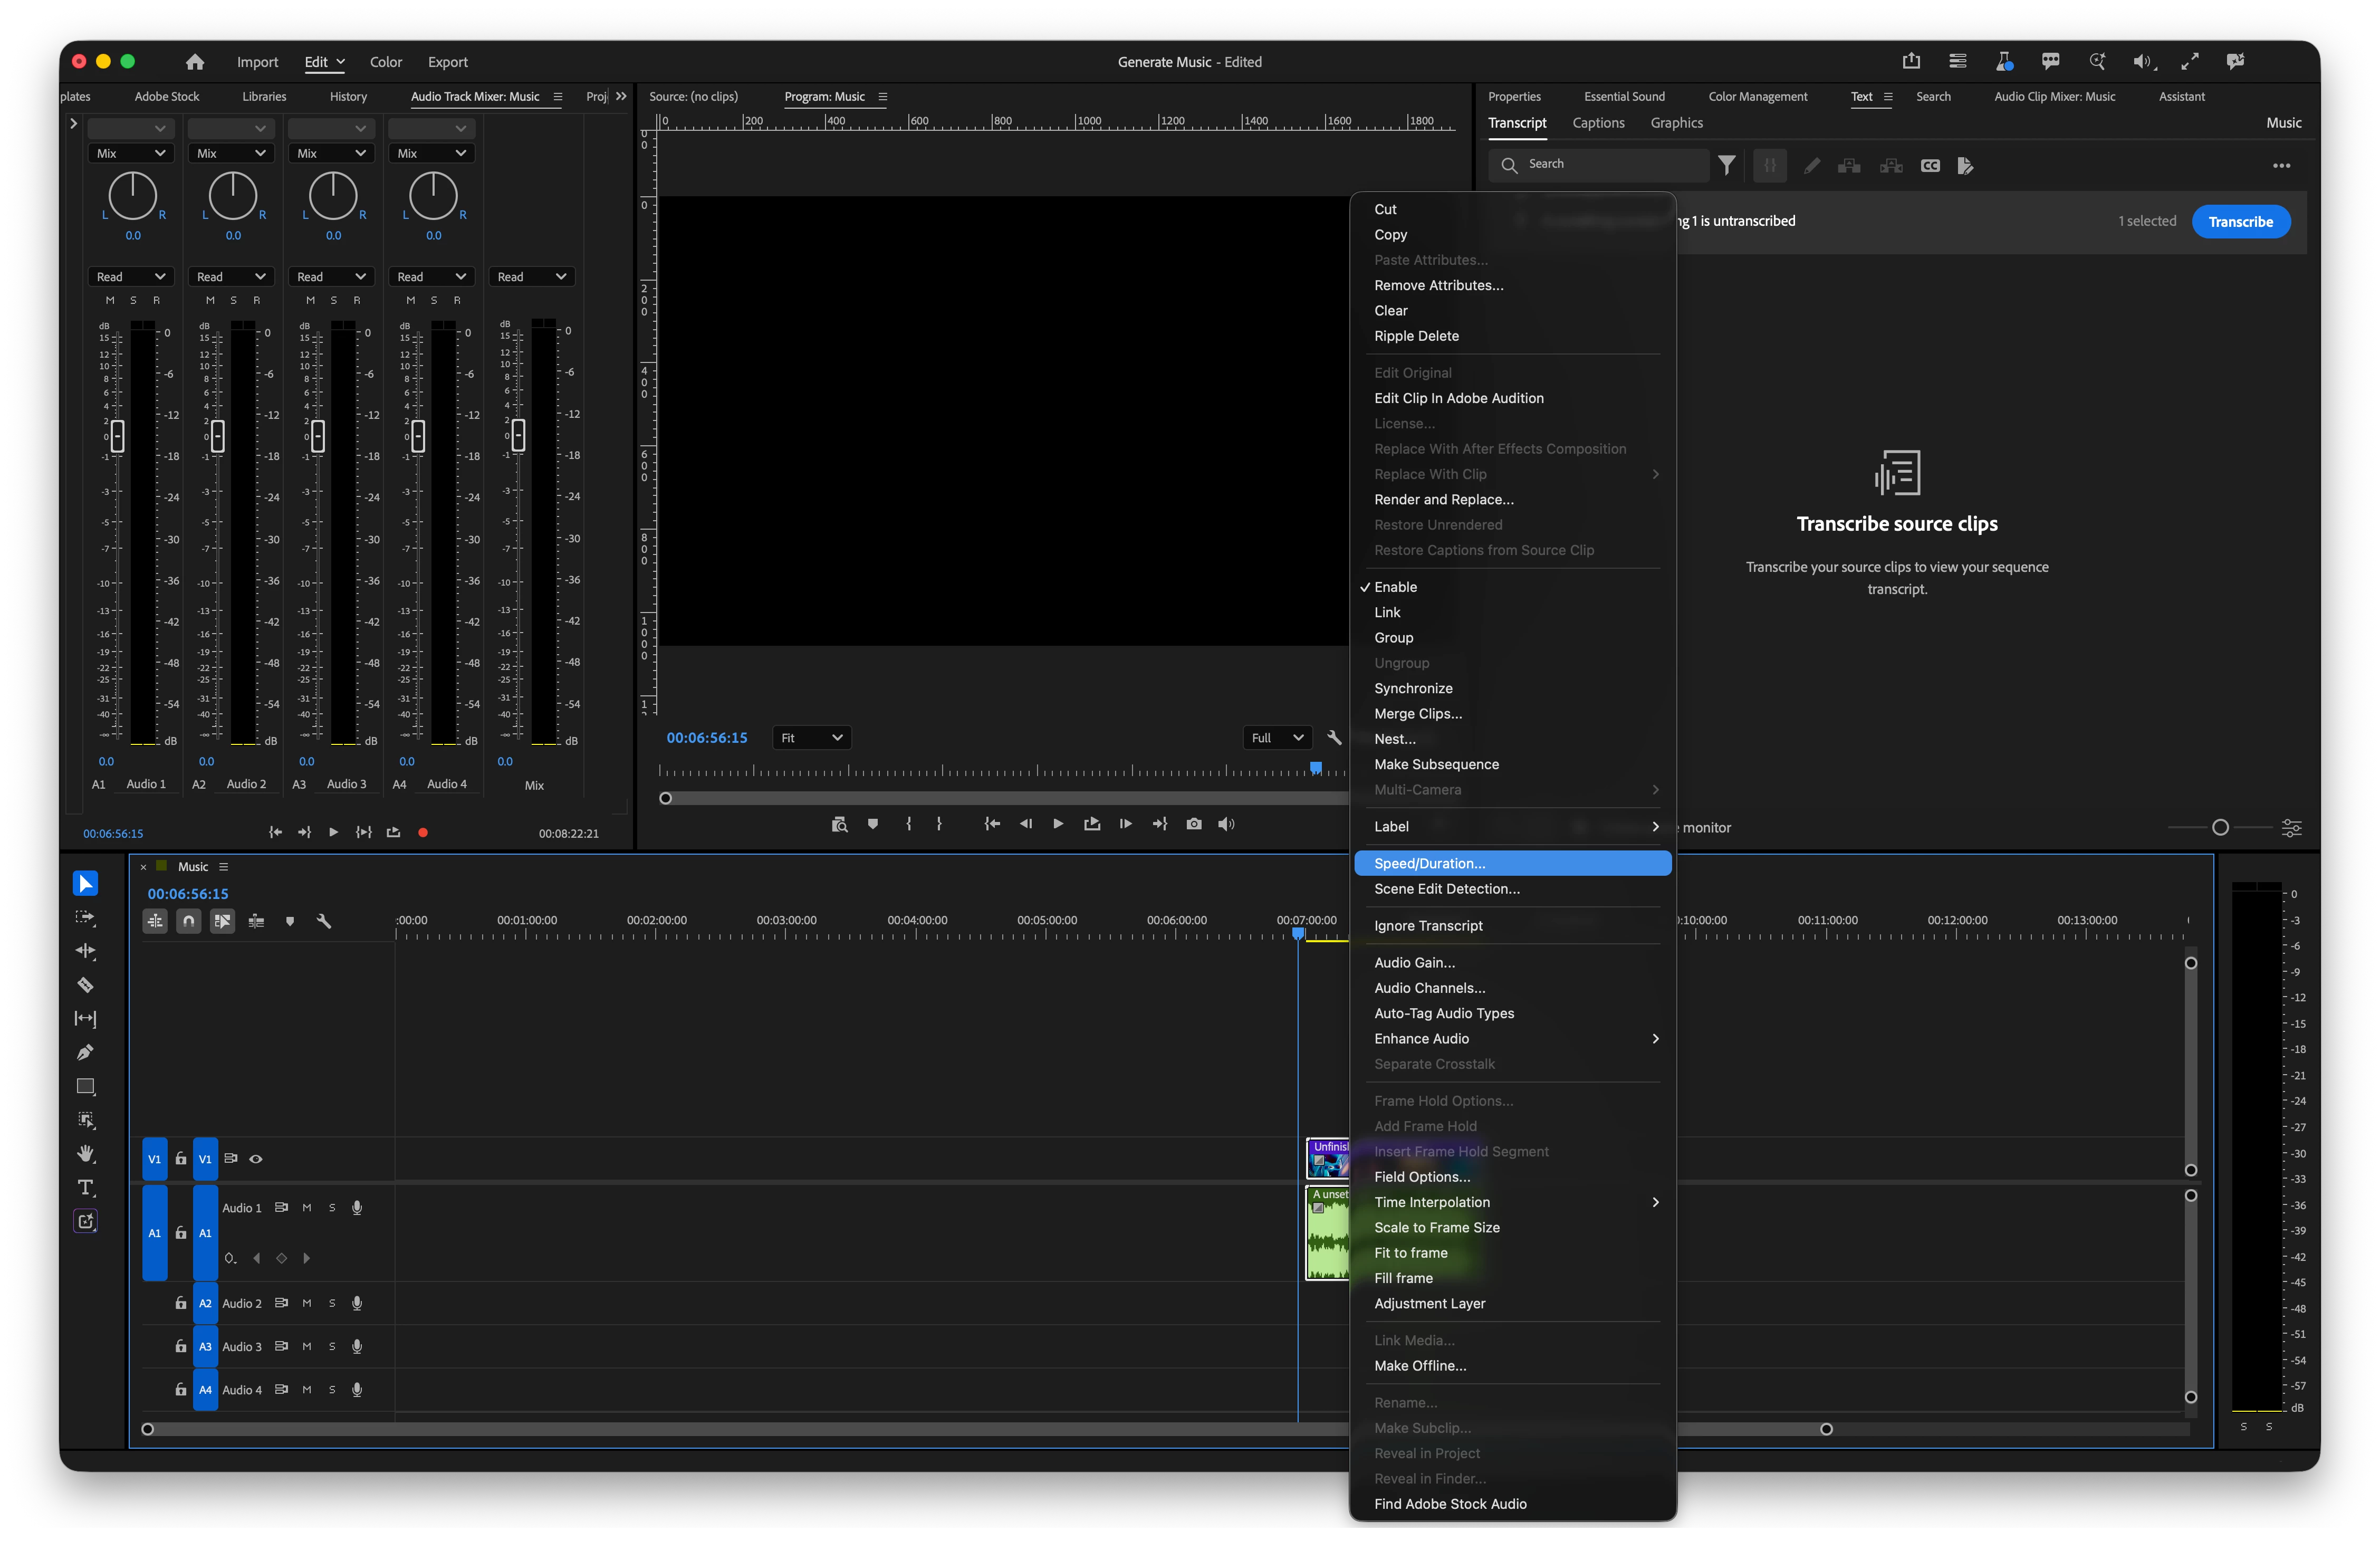


Right- Click Clip Menu
 

Why this matters

Round-tripping to Audition just to retime a line or fit a music bed is exactly the kind of small friction that adds up over a cut. It pulls you out of the edit for a change that should be trivial, and it turns a quick decision into a chore. Keeping this inside Premiere means retiming is just part of editing again, not a side quest.

You can:

  • Stretch or compress dialogue and music and keep the pitch sounding natural.
  • Skip the trip to Audition for a simple duration change.
  • Handle audio pull-ups and pull-downs right in the timeline.
  • Shift the pitch of a clip without it turning robotic.
  • Reach for Legacy when you want instant feedback, or Medium and High when the quality has to hold up.
  • Let Premiere adjust the audio stretch mode to the clip automatically, whether it's voice, sfx or music.


Try It Out


The new audio stretching modes are live now in Premiere Beta 27.0 (Build 30), and honestly, this is one where your ears matter more than anything we can tell you. So here's what we're really curious about: can you tell the difference between this and Audition? Take a clip you'd usually round-trip, stretch it in Premiere instead, put them side by side, and let us know if it holds up.


A few more things that we’d love your feedback on:

  • The new render mode is the default now, and it's the one that preserves pitch. Confirm your dialogue and music actually stay natural straight out of the box.
  • How do you feel about the render modes being the new default? Is quality on by default the right call for you, or would you rather reach for real-time yourself?
  • Pitch shifts: push a clip and listen for anything robotic or processed.
  • Render time: is it reasonable for the quality you're getting back?


We're still tuning things, so your feedback right now genuinely shapes where this goes.

Happy editing!


Note: We're still polishing some interactions, so expect to see improvements as we iterate.


    15 replies

    KeulerB
    Inspiring
    September 17, 2026

    After going through this post one more time, I feel the need to clarify a few things regarding my workflow.

    1. In all the years I've been doing this, I've never used the audio that was embedded in a video clip that I slowed or sped up.

    2. The Time Tuner in Premiere was used when I would have a show that was created using 29.97 and I needed International Audio that was created at 25 to be lengthened to fit. The video length wouldn't change, but the International Full Mix needed to match and would be slowed.

    3. Currently, I occasionally get a VO that was recorded at the wrong duration. Whether it was 5 or 30 seconds, Legacy Mode could not handle the speed change. I never used it. Time Tuner was great for this.

    Using Time Tuner for a 30 minute show was experimental. Meaning, even when plugging in a Duration, the time was always a little off and the show would go out of sync a few minutes in. I found that entering a percentage was key to perfect sync. I could adjust that percentage to the 100th of a percent. Still, it was a lot of trial and error. "Export a file, put in sequence, file length is incorrect. Change Time Tuner setting, export a file, put in sequence. Rinse and repeat until the desired result was achieved. 

    Having the ability to just grab the end of an Audio Clip and bring it to the desired length while maintaining pitch would be enormous.

    Again, thank you for working on this and I look forward to the day I see this in Premiere one day.

    Bob K.

    Participating Frequently
    September 17, 2026

    I really like the direction Adobe is taking with Premiere Pro and the improvements being made to the editing workflow.


    One feature I would love to see is automatic audio/video synchronization directly in the Project panel. Premiere could analyze the video and separately recorded audio, detect the matching waveform or timecode, and create a synchronized clip before the media is added to the timeline.


    This would make the workflow much more efficient, especially when working with external audio recordings. Instead of placing both the video and audio on the timeline and synchronizing them afterward, editors could have the synchronized media ready to use from the Project panel.


    It would be a small workflow improvement, but one that could save a significant amount of time on larger projects.

    Adolfo H.Community ManagerAuthor
    Community Manager
    September 17, 2026

    Love this! I’ll make sure to pass this to the team! thank you!

    KeulerB
    Inspiring
    September 16, 2026

    Hi, Adolfo.

    I just noticed that adjusting the Pitch in the “Clip speed / duration” box also changes the duration and speed of the clip. I don’t believe that should happen.

    I was thinking all along that Premiere would internally adjust the Pitch based on the clip length I chose. As of now, when I slow the audio clip by adding 10 frames to 96%, the Pitch shows -0.66%. I would think that the Pitch should go higher to keep the vocal sounding the same as before the slow down. So, I tried making the Pitch .066% and the clip was shortened. A Pitch of 0% made the clip duration the original length.


    Thank you all for working on this!

    Bob K.

    Community Manager
    September 17, 2026

    The UI for the new feature is different than the old UI.  What was called “Maintain Pitch” is now “Lock Pitch and Stretch”.   
    Can you confirm if “Lock Pitch and Stretch” is on or off in the scenario you are talking about above?
    The default should be unchecked.

    You can always attach a picture or video showing the issue.

    KeulerB
    Inspiring
    September 18, 2026

    I will check in the morning. In the image I presented in a previous post below, I see: "Lock pitch and speed" is unchecked. This image was captured while trying to change generated Tone using the Rate Stretch tool. I will look at it with dialog in the morning.

    Thank you.

    Bob K.

    Inspiring
    September 15, 2026

    Looks like rate stretch default is legacy?

    Community Manager
    September 17, 2026

    The default is the Medium quality setting.  
    And, if you are opening an existing project from before v27, any clip that was stretched will still be set to “Legacy” so there is no audible difference between the old project and the new.

    KeulerB
    Inspiring
    September 13, 2026

    Hi, Adolfo.

    My initial tests reveal the following:

    1 single channel dialog clip changes pitch when slowed or sped-up. This occurs even when using “Rendered - High Quality”. The dialog sounds MUCH better than Legacy. But the pitch does change.

    I tried a test with tone generated with Bars & Tone. Two things: The pitch did change. I put 5 seconds of Tone set to -20 at 1k in a 30fps sequence. Stretch it out 10 frames and the tone drops from 1k to 900 Hz. The second item is, I’m guessing that because the Tone is generated, the Speed/Duration property page is inaccessible except for the Duration.

    Everything else is off. I don’t have a problem with it and it probably is working as expected. Just wanted to mention it.

    Lastly, I wanted to mention that for about a decade, I used to slow mixed audio clips to -4.79% (I don’t remember the exact number) in Premiere and Media Encoder using “Time Tuner”, and it was always perfect. At the time, it was so good in fact, the company I worked for moved from Avid Media Composer to Premiere and Media Encoder as it was a very important aspect of the job. Note: Time Tuner is buggy in version 2023.

    So, whenever I needed to change duration of audio and maintain pitch, I would use Time Tuner and not Audition. I found that Audition took far to long to render. Especially for a 30 to 60 minute show. If I had multiple audio files to slow down, I’d load them into ME and batch process using a preset.

    This will be a wonderful addition to the features in Premiere. I love the idea of being able to grab the end of an audio clip and stretch it to whatever duration I need and maintain pitch right on the timeline.

    Bob K.


    Community Manager
    September 18, 2026

    Oh, the bars and tone as a source is not going to work correctly for testing this.  It is internally a different code path and certain things will not appear or work properly.  Bars and tones have as set of special properties that just will not work the same as a regular clip.
    That is why the UI above in the picture looks so odd, many things are disabled since the bars and tones clip is following a different code path than a standard clip would take.


    When testing this please use a regular clip.

    Homosolus
    Known Participant
    September 11, 2026

    I can notice a clear difference between legacy and medium quality. Though high quality and medium quality sounds indistinguishable. If you guys bring time remapping for audio as well, I can finally stop using audition for my workflow!

    Adolfo H.Community ManagerAuthor
    Community Manager
    September 12, 2026

    Thank you!! Time remapping is some that is top of mind for us. This is a step forward to that direction.

    thanks!

    A3user
    Inspiring
    August 27, 2026

    It’s good that now there is an option but I don’t like it to be the default. In my case, the majority of times I slow down a clip is to make it “slow motion”, going to 40% on a 60fps clip in a 24fps timeline. I don’t care about audio in those cases. I don’t like that now I would need to render all those clips or change the setting to the legacy one each time I slow a clip down. It would be great to get a setting that we can change to select which method is the default. 

    Adolfo H.Community ManagerAuthor
    Community Manager
    August 27, 2026

    This is exactly the type of feedback we are looking for. Thank you so much!