Community Manager
February 26, 2026

[Now in Beta] Introducing Smooth Mode in Object Mask

  • February 26, 2026
  • 5 replies
  • 659 views

We’re excited to release a new Smooth mode in Object mask to Beta which will let you create masks which handle fine edges better.  

When creating an Object Mask, you can now choose between Sharp and Smooth modes to achieve the best results for your specific masking needs. 

What's new 

The new Smooth mode creates masks with softer edges that are better suited for fine edges and detailed objects. This enhancement allows you to handle complex masking scenarios more effectively without compromising quality. 


Sharp mode


Smooth mode

Mask quality modes 

Sharp mode 

Sharp mode continues to create masks as they are currently created, with crisp, well-defined edges. This mode is ideal for: 

  • Objects with clear, distinct boundaries 
  • Standard masking workflows 

Smooth mode 

Smooth mode creates masks with softer edges that provide superior handling of fine details. This mode is particularly useful for: 

  • Objects with intricate or delicate edges 
  • Hair, fur, or fabric textures 
  • Subjects with semi-transparent or translucent elements 
  • Situations requiring natural-looking edge blending 

Creating masks with quality modes 

Follow these steps to create an Object Mask with your preferred quality mode. 

Select a clip 

  • Select a clip on the timeline that you want to mask. 

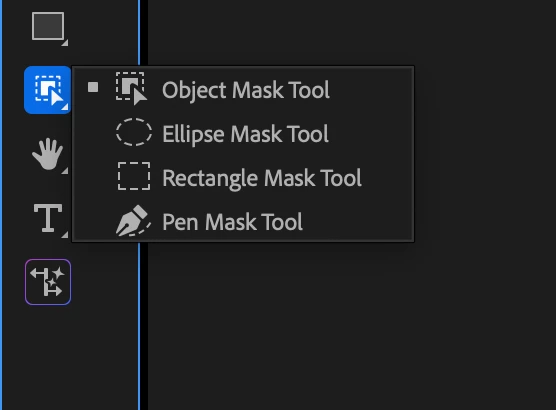
Access the Object Mask Tool 

  • Find the new Mask Tool group in the toolbar. 
  • Long-press on the tool group to see all the masking options. 
  • Choose the Object Mask Tool. 
Object Mask Tool in Tool tray


Choose mask quality 

  • Before creating the mask, choose between Sharp or Smooth mode from the quality options. 
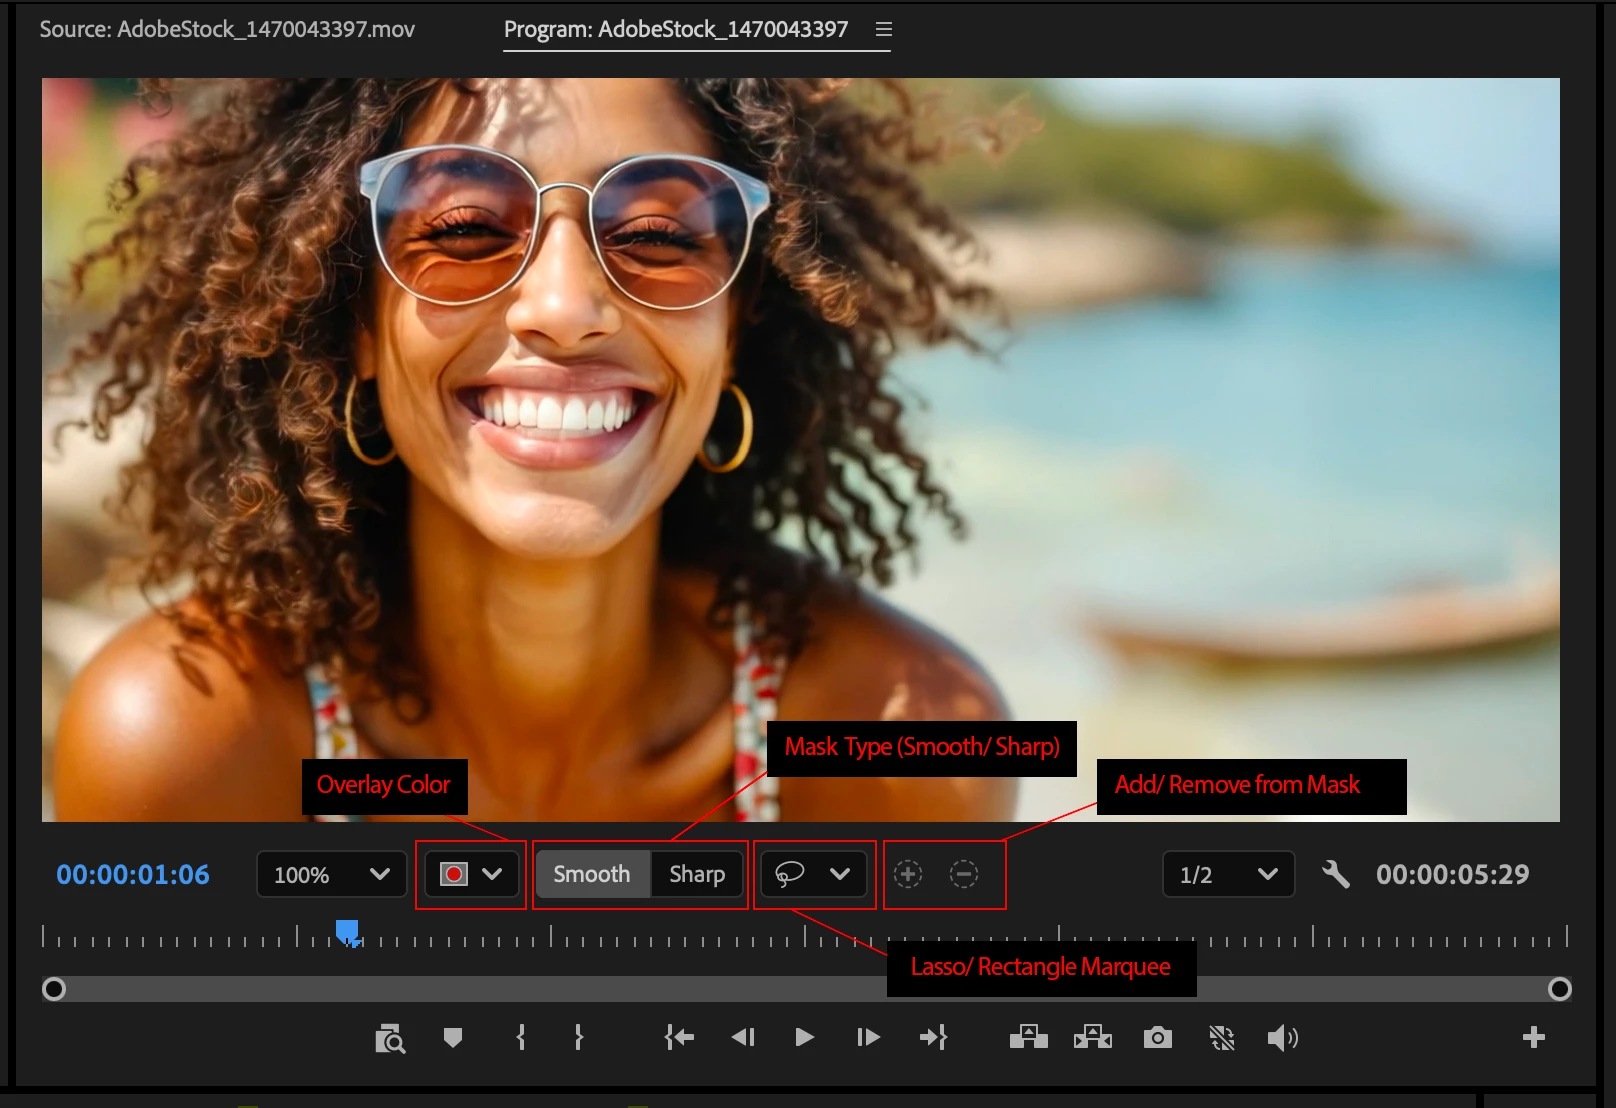
 

Object Mask Options in Program Monitor


Select the object 

  • Hover over the Program Monitor and watch as objects are identified automatically. 
  • Click on the desired object or person to create the mask, similar to the standard Object Mask workflow. 

Apply an effect 

  • Find an effect in the Effect Panel, such as Gaussian Blur. 
  • Drop the effect on the clip in the timeline. 
  • The mask will automatically be applied to the effect. 

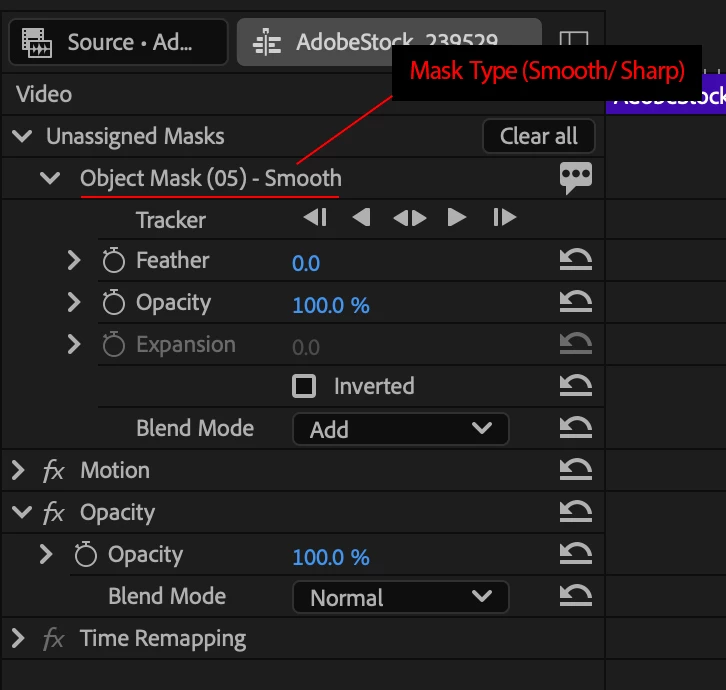
Viewing mask quality 

Once you've created an Object Mask, you can view which quality mode was applied: 

  • Open the Effect Controls Panel. 
  • Locate the mask in the effects stack. 
  • Next to the Mask name you'll see either "Sharp" or "Smooth" displayed, indicating which mode was selected to create that mask. 


Mask Type in ECP


In earlier Beta builds you could Switch mask quality modes from Smooth to Sharp (and the other way around). This has been disabled for now until we have a better way to change mode without users losing their masks and tracking data.

Now, if you made a Smooth mask and wanted a Sharp mask instead, delete your earlier mask and use Object Mask to create a new Sharp mask (remember to choose your new mask quality in Program monitor)


Best practices 

To get the best results with Smooth mask quality: 

  • Choose Smooth mode for subjects with fine details like hair, fur, or intricate patterns 
  • Use Sharp mode for objects with clear, defined edges 
  • Start masking from a frame where the object is most prominently visible 
  • Test both modes to see which works better for your specific footage 
  • Consider the limitations of Smooth mode (no extension capability) when planning your workflow 

Known issues 

Project compatibility with version 26.0 

If a project containing a mask created in Smooth mode is opened in Premiere version 26.0, the mask will not be rendered properly. Editing and saving a project with Smooth mode masks in version 26.0 could damage the mask data and corrupt the mask permanently 


This feature is available from Build 37. 

Your feedback helps improve these features. Please engage with the beta community forum to report: Bugs and technical issues, feature requests and suggestions, quality feedback on mask results and workflow improvement ideas 


    5 replies

    Shebbe
    Community Expert
    Community Expert
    March 25, 2026

    Hi, I've done some testing on high res media. There is a big issue with the current model or it's implementation that causes severe aliasing as soon as ‘tracking’ starts. I’ve made a post about it in the AE Beta board too as it concerns both packages.

    But here's the image for quick reference.


    This should really be fixed before it can be deemed production ready.

    ayaayaaayaaaayaaaaa
    Participant
    March 17, 2026

    Where is my Mask Quality my lovely Adobe team

    Smit-Shah
    Community Manager
    Community Manager
    March 17, 2026

    Hey
    When you used to switch masks, Premiere would lose the tracking and leave you without a mask on the program monitor. Lots of users complained of this experience. For now we have removed the Mask quality toggle. We are working on a better experience. 
    Mask quality is still displayed in ECP next to the name of the mask (smooth and Sharp)

    James_Keating8092
    Participant
    March 8, 2026

    Hi Adobe Team,

    I’d like to suggest an enhancement to Photoshop’s masking workflow that could benefit both intermediate and advanced users. Currently, creating precise masks from colour data often requires multiple steps — using channels, Apply Image, Selective Color, and Levels — which can be fiddly and unintuitive.

    My idea is an Advanced Masking Panel where users could:

    • Select a source channel (RGB, Lab, or individual channels)

    • Adjust hue range sliders to isolate specific colours

    • Adjust luminance sliders to target highlights, midtones, or shadows

    • Preview the mask live and refine it interactively before applying

    This would allow users to isolate very specific pixels — for example, only the brightest blue highlights in wave spray — without inadvertently selecting background elements. The workflow would remain non-destructive, visual, and much more accessible, reducing trial-and-error while retaining full creative control.

    It’s a small enhancement conceptually, but it could dramatically simplify advanced masking, making Photoshop more intuitive and powerful for a broad spectrum of users.

    Thanks for considering!

    Shebbe
    Community Expert
    Community Expert
    February 27, 2026

    Thanks a lot for adding the ‘smooth’ model which for many users is probably the most important. I had a play with it briefly and I’m really satisfied by it’s stability and ability to resolve edge detail, motion blur and going in and out of focus.

    I do however have a few things to note.


    Workflow

    The current limitation in switching models is something developers should address. I understand that the modes require different AI models but the part where the user decides which regions are objects to track is data that should be stored for each object mask. When switching modes, these definitions should automatically be reapplied for the new model so the user only needs to re-track, not redefine. Take a look at how this is tackled in DaVinci Resolve. There a clear UI is present with which frames have sample points from which the model would start detecting and tracking and you can jump to reference frame to check mask quality before tracking.


    Minor Issue

    An interesting observation was that on a particular shot, I tracked a talent but another talent came into frame which the model started to include even though they were fairly spread out. On one single frame there is also a visual glitch where it looks like the model has a certain search area/bounding box and on that frame it probably detected another person and thought to include it.


    Workflow wise this would obviously come down to adding a negative input and track from there instead, but if the model itself could also be fine-tuned to understand that if it tracks a person it should only keep tracking a single person unless the user adds more.

    If you're interested in looking at the shot, it's clip number 09 from here.


    Adobe Employee
    March 3, 2026

    Thanks ​@Shebbe for the feedback. 

    Because the two people look very similar, the model briefly confused them and gradually expanded the mask to include both. Restarting propagation before the error (for example, re-propagating from an earlier frame 159) resets the model state and resolves the issue.

    This behavior is less noticeable in Sharp mode, as thresholding suppresses minor score bleed. We are investigating improvements to further reduce this effect.

    AndrewTheGreat
    Known Participant
    February 26, 2026

    I don’t like the idea that you’ll have to reapply and retrack the mask if you choose smooth after sharp was tracked. Why couldn’t you just add a reduce chatter and smooth sliders to enhance the mask non-destructively? This way you always have to choose which sometimes may ruin your workflow. A better thing would have been to be able to keyframe the reduce chatter and smoothify parameters in a mask for situations when you need to gradually go from sharp to soft and back, loke when an object goes out of focus. Feather won’t always help because it changes the edge of the mask, not the details

    Stop trying to edit and EDIT!
    FlyingFourFun
    Inspiring
    February 27, 2026

    Being a machine learning AI tool, seems like the logical thing to do here is having to understand what should be smooth or sharp, and do a bit of that determination upfront, and have the user confirm it…  Seems reasonable to me for the AI to be able to determine which sections would benefit from what mode….

    But as ​@AndrewTheGreat has pointed out, if you have to retrack, I would be disappointed if I put in a bunch of work to tweak it and lost all that work. 

    Maybe offer the user to track in both ways - not sure what the performance impact would be, but maybe some people would want a preference to ‘track both small and sharp’ and ‘track sharp (requires retracking to switch to smooth)’