Known Participant
August 30, 2024

Beta Override Media Color Space Sony S-Gamut3.Cine, Direct PQ (HDR), Rec. 2100 PQ - EXPORT PROBLEM!!

  • August 30, 2024
  • 22 replies
  • 1758 views

Beta Override Media Color Space Sony S-Gamut3.Cine, Direct PQ (HDR), Rec. 2100 PQ - EXPORT PROBLEM!!

Below screenshot shows: Picture in Program Monitor (Right Side: which I spent loads of time editing based on) and a exported frame (Left Side: this is a single frame, but I'm trying to export video too and the whole video looks like this)


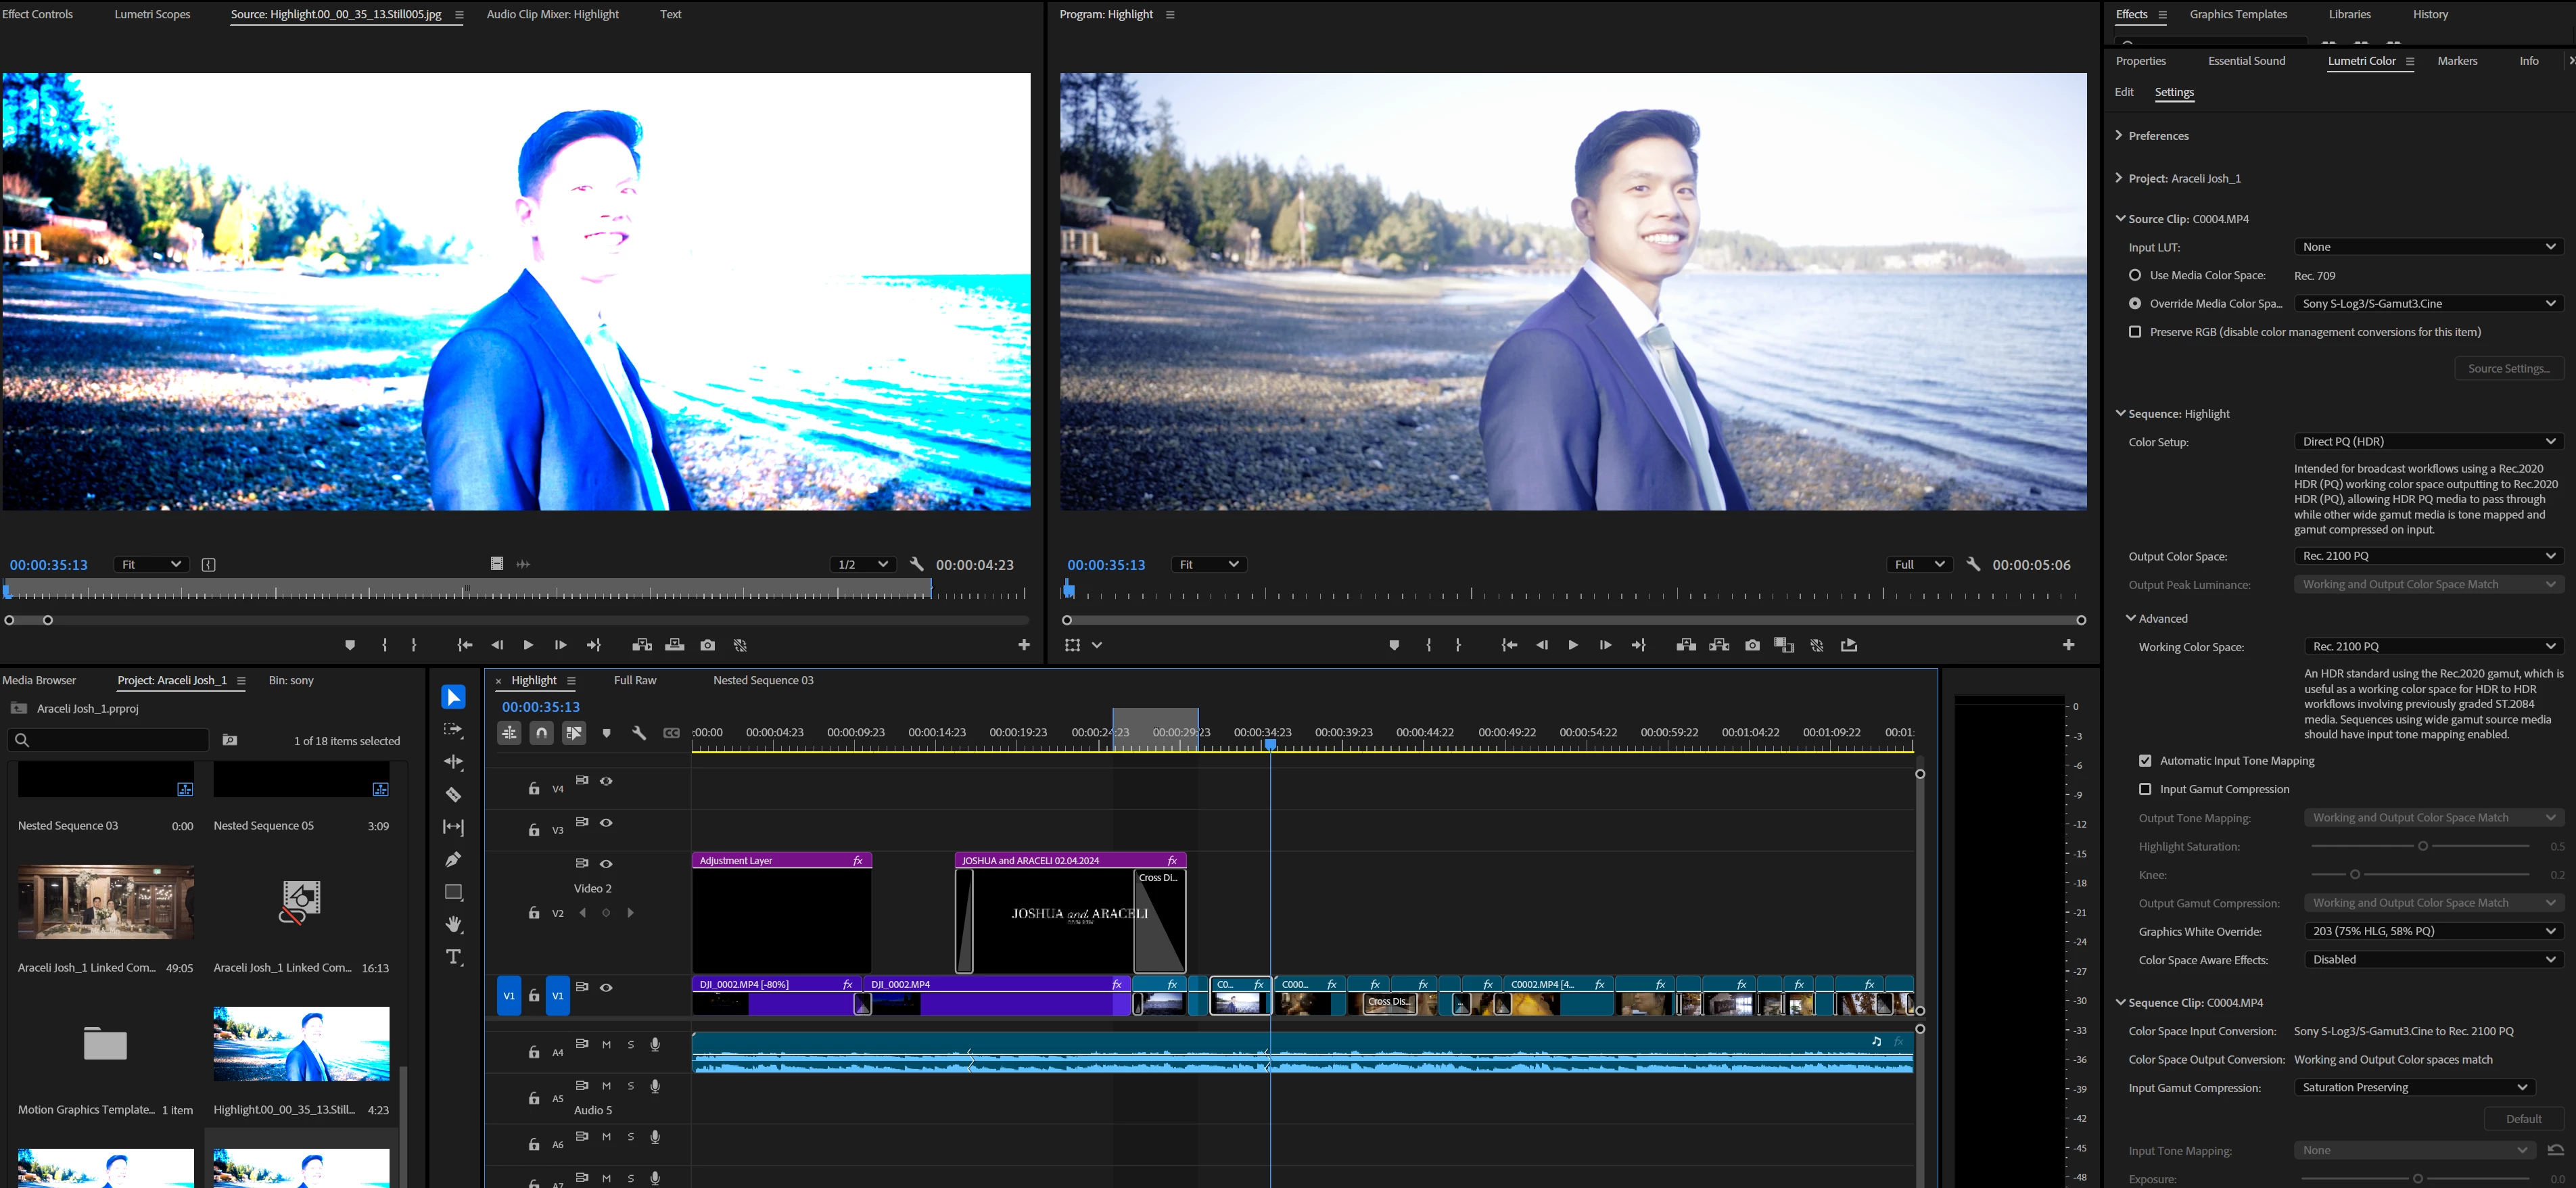
I was thinking the export video option labeled "Match Sequence Settings" would work but, every export option I've tried is producing colors like the one on the left.

I need help please. My last post, I posted 1 thread in the Discussion forum, and one in the Beta forum, and instead of just deleting one or the other thread, BOTH were deleted, even though the email for the reasoning I got was "Just add to one thread, don't create two threads"..... REALLY HOPING this doesn't get deleted.

My client is expecting this project done and I need help ASAP PLEASE.

22 replies

Known Participant
August 31, 2024

@jamieclarkeI noticed when I click on "Display Color Management" the program monitor now shows me what is getting exported. I think maybe a bug is occurring in which premiere isn't checking to see if that box is ticked or unticked on export stage, and assumes it's on the entire time.

Known Participant
August 31, 2024

My question @Alexis Van Hurkman is, what is the output of my OBS Record settings? It is NVENC, H.264. and Rec. 709.

What do I mean by this? Well, my OBS is recording in Rec 709 color space, a picture of the program monitor.
The OBS recording, IE the video you watched, is in rec 709. You can clearly see in my rec 709 video that you watched, is correctly showing the correct look in my program monitor. So I cannot agree with you saying that "The HLG preset may show more vibrant colors, but it's allowing signal ranges that cannot be output to Rec.709, so using that setting is what's causing your probem. It's really for outputting HDR." Because, again, my OBS rec709 footage IS SHOWING the frequency ranges in the final OBS recording.

So as much as I'd like to go back and color correct allllll of my footage manually with lumetri panel, manually adjusting the colors, highlights, hues, I love this new feature you guys put in with the conversion luts, and I really do think this is either a BUG or an export setting issue on my end, and not "because my timeline cannot be exported in those frequency ranges...." because otherwise I wouldn't be able to show you a rec709 video recording OF my program monitor showcasing HDR footage... My OBS footage would also be blown out when you tried to watch it, but no, you watched it just fine, in rec709, and all the colors in the video you watched were the correct color frequencies.

If this is a serious roadblock in premiere, couldn't it be coded in a way where I could just record the Program monitors output? That's essentially what I did with obs, which I keep hearing from multiple sources now that HDR footage cannot be in rec 709 color space....?

Alexis Van Hurkman
Community Manager
Community Manager
August 31, 2024

I've watched your video, and the first piece of advice I would give you is to change the output color space to Rec.709. Even if you like the results you're getting using the Direct HLG (HDR) preset, what you want is an SDR signal, not an HDR signal, and having the output color space set to Rec.2100 is likely messing you up, as it's what's allowing the clipping to happen (in order to output HDR).

Additionally, however, what's really making your footage look better is you retagging it to identify the media color space of each clip (which you can do in batch in the Project Browser selecting multiple clips and using Modify > Color). However, if you want your renders to match your output, you shouldn't change from the Direct Rec.709 preset, that's still the appropriate preset for the SDR output you want.

The HLG preset may show more vibrant colors, but it's allowing signal ranges that cannot be output to Rec.709, so using that setting is what's causing your probem. It's really for outputting HDR. That said, if you've already set up your sequence this way, changing the output color space will tone map everything back down to Rec.709 levels, but you'll likely notice that the output becomes similar to what the Direct 709 preset would have given you, which is correct.


The purpose of the presets is to set up color management to correctly transform and normalize all of your media to the neutral state your camera produced, not to make it look different or "better" (that's what Lumetri is for).

My advice is to stick to the default Direct Rec.709 preset, make sure all of your clips are tagged correctly using Override Media Color Space, don't turn on Preserve RGB for any of your clips (unless you're assigning an input LUT to those clips), and make sure your output color space is set to Rec.709. You can go ahead and customize the input tone mapping and input gamut compression settings of each sequence clip to taste, that's what those settings are for, but leave the Color setup preset to Direct Rec.709.

At that point, adding a creative LUT in Lumetri should work fine, and if you want any particular clip to be more saturated, use the other Lumetri controls.

jamieclarke
Community Manager
Community Manager
August 31, 2024

I see you are exporting as HDR and I was exporting as Rec 709.

 If you are grading in HDR you really need to enable "Display Color Management" and "Extended Dynamic Range Monitoring."  

Known Participant
August 31, 2024

With these export settings? because I tried these settings, same issue.

Known Participant
August 31, 2024


jamieclarke
Community Manager
Community Manager
August 31, 2024

Yes correct.

Known Participant
August 31, 2024

With these settings?

jamieclarke
Community Manager
Community Manager
August 31, 2024

In your export screen please select fomat "Quicktime" and then make sure "Effects" and "Metadata" switches are off.  I am able to export what you see in your timeline with those settings.

Known Participant
August 31, 2024

One thing I just noticed, not sure if it matters, maybe it does?

I have the same clip here in my sequence, but it is cut.

I was using a lut inserted in the creative tab of lumetri. I took them off for this demonstration and when I went to look at it just now, I noticed this grayed-out box. I notice it's different "color space"...? But the settings of that clip are identitcal when I go to the settings tab instead of edit.