Participating Frequently
January 18, 2012
Released

P: Make curves bigger

  • January 18, 2012
  • 44 replies
  • 3053 views

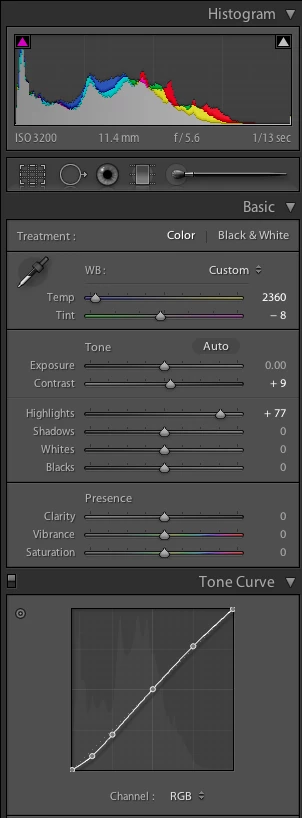
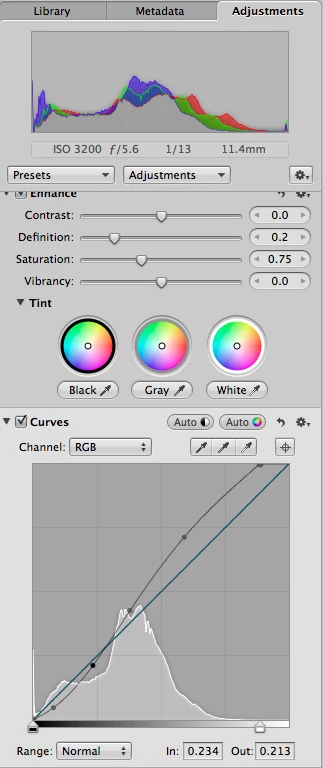
It would be great if the curves panel in Lightroom was physically bigger. The current panel is too small. While it's easy to make big adjustments, fine tuning is difficult and imprecise. I've attached two screenshots showing the curves panel for Lightroom (LR 4 beta) and Aperture (3.2.2) for the same image. In Lightroom, I've selected a medium contrast curve; in Aperture, I've used the "auto" curve option. Physically, the Lightroom curve panel itself measures 160 pixels per side. The Aperture one is 260 pixels per side, 60% bigger linearly, and three times the area! (67,500 pixels versus 25,600.)Aperture's bigger curves panel gives three big advantages:-- it's easier to see the changes, particularly in relation to the linear slope;-- it's easier to make changes, particularly precise ones; and-- it's easier to either select a current point or make a new one without accidentally doing the opposite.I'd also say a bigger panel encourages you to use it: just grab a point and yank it, without worrying that you have to be pixel precise.

44 replies

johnrellis
Legend
August 29, 2018
Thanks, I missed that in the release notes: 
https://helpx.adobe.com/lightroom/help/whats-new.html#main-pars_header_760724008.

And the histogram has better contrast.  Better late than never!

LR 7.2:


LR 7.5:


Bob Somrak
Legend
August 29, 2018
The curves box is bigger in Lr 7.5
M4 Pro Mac Mini. 48GB
Inspiring
August 29, 2018
A larger curves panel like in photoshop would be ideal for fine edits and should be a quick fix 
Inspiring
March 9, 2017
I think Curves could be enlarged both within the panel, and enlarge proportionally to fill the panel if we enlarge the panel, too. I agree the interface is too small. I think they developed it for parametric curves, then threw in point curves without consideration for the need to be able to easily place and manipulate the anchors and the curve right inside that little space.
Participating Frequently
March 8, 2017
Make the Curves frame fill its panel fully (see screenshot attached). As it stands now it is too small and has reduced precision in a small laptop screen.
Todd Shaner
Legend
February 4, 2017
One trick no one has mentioned here is to hold down the SHIFT key, which restricts control point movement to the Y axis. This useful if you want to enter specific control point values such as 22.0%/18.0%. Drag the control point to set the X axis value first and then hold down the Shift key to set the Y axis control point. The Shift key can be used in combination with the ALT/Opt key.
Inspiring
February 4, 2017


It's not comfortable to use such small curves. You need to hold down the [Alt/Opt] key to reduce curve movement to 1/10th strength.
But it can be more comfortable to use big "Tone Curve" panel.
Inspiring
July 11, 2016
Another vote for Larger Curves panel.
Make it identical to the significantly larger panel in Camera Raw.
Also, let the user adjust the points with numerical values like you can also do in Camera Raw
Participant
May 1, 2016
I cannot believe this hasn't gone into LR development roadmap yet. Curves control area is way too small to really unleash the power of this feature that resides in precise and small changes, not big curves deviation which leads you to undesired extreme editing techniques.
Inspiring
December 12, 2015


In the Lightroom Tone Curve panel, the graphic seems unnecessarily narrow considering the potential width of the panels themselves. From what I can tell, the graphic is limited to a square shape of constant width/height. In making restoration edits to scanned slides and film images, I rely HEAVILY on the tone curve adjustments to correct the images for fading, incorrect filter use during capture, etc. Unless these corrections are made using tone curves, white balance is not effective in restoring the colors of the original capture to life-like condition. I consider the channel-specific tone curve adjustment to be one of the most valuable tools in Lightroom for image restoration work.

As currently implemented, however, using the tone curve together with the histogram is less than fully effective. Since the histogram and tone curve graphic are of different widths, one must extrapolate the x-axis location on the histogram where the image needs correction to a different x-axis location on the tone curve. This situation could be easily remedied by making the width of the tone curve graphic adjust to the width of the overall panel (as the histogram already does on-the-fly), so that the tone curve graphic is always the same width as the histogram. Then, the point on the tone curve line is easily selected since it lines up immediately below the point on the histogram needing adjustment. This would require the targeted adjustment tool icon to be moved out of the way, but there seems to be sufficient room below the tone curve box, next to the "Channel: " label to relocate it. Unless for some reason the tone curve graphic must be square, there should be no need to increase the height of the tone curve graphic, avoiding making the tone curve panel take up more space.

I admit, this is not a big problem, but the solution is both simple and elegant, and would be an incremental improvement to Lightroom for the work I do.

Thanks for all you do!