Participant
July 10, 2020
質問

Convert Waveform to rounded lines (one sine wave that is moving accordingly to the audio)
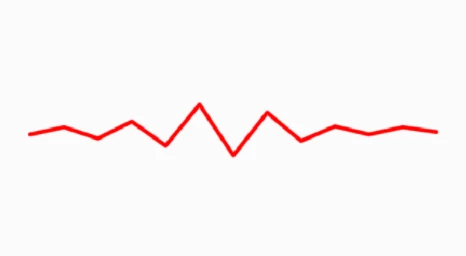
  • July 10, 2020
  • 返信数 3.
  • 4384 ビュー

Hello,

Is there a way to convert these lines that I made with audio waveform effect in After Effect, to be more round on the corners. When I increase displayed samples I get more roundnes, but to many lines, I also tryed Wave Warp, and that did't work for me. I wolud like only to round theses edges of the sound wave, one sine wave with rounded corners, that is moving accordingly to the audio. Thank you

このトピックへの返信は締め切られました。

返信数 3

Participant
August 19, 2021

Hello! 

The easiest way that I've found to achieve this is by changing the Display Option to Analog Dots and maxing out the number of frequency bands. You essentially get a solid line when you do this. 


Hope this helps! 

Participant
September 18, 2023

But it doesn't show like a sine wave...

Community Expert
July 10, 2020

There is almost always a workaround. Try this:

  • Add an audio layer to the timeline
  • Use the Keyframe Assistant to convert the Audio Layer to Keyframes
  • Delete the Left and Right channel sliders from the Audio Amplitude layer
  • Add a new shape layer and use the pen tool to create a curved line using a RotoBezier path with as many points as you want peaks and valleys, or
          Use the pen tool to create a straight line with as many points as you like, then select all points and use the Convert Vertex tool to add evenly distributed Bezier handles to all points (I prefer Rotobezier)
  • Press uu to reveal the modified properties of the shape layer
  • Select the Path
  • Open the Create Nulls from Paths.jsx panel from the Window menu and select points follow nulls
  • Reveal the position property of the first null by pressing p and the expression shown below
  • Right-click on Transform/Position in the timeline and select copy expression only
  • Select the rest of the nulls and paste
  • The sine wave will get bigger as the line gets longer but you can rearrange the high and low points by moving the layers up and down in the timeline

Here's the expression:


t = thisComp.layer("Audio Amplitude").effect("Both Channels")("Slider");
v = linear(t, 0, 16, index * -30, index * 30);
if (index % 2 == 0)
	y = v
else
	y = - v;

[value[0], (thisComp.height/2) + y]


The "v" variable is a linear method that reads the minimum and maximum values from the Both Channels slider values. This is how that works: linear(t, tMin, tMax, value1, value2) where t is the value of the Both Channels Slider, tMin is the minimum value of the Both Channels slider as set by looking at the Graph Editor and checking the value graph, tMin is the maximum value. You'll have to put in your own numbers. The ones in the expression fit my audio file. 


value1 and value2 are going to be multiplied by the Index value (layer number) of the Null layers. The more points/nulls you have in your comp, the lower the numbers need to be. Plus and minus 30 worked for my simple line, you'll have to make adjustments for your audio file and the number of points you want in your wave.


The if statement determines if the Null is an even or odd number and either subtracts the Y value or adds it to half the Comp height so the line's origin is in the middle of the comp. 


There you go, an animated curvy line generated by audio levels.

There are also distortion tools that can be driven by values using expressions, but this is the easiest way I can think of to make a shape layer line react to the audio.


Come to think of it, you could use the layer name instead of Index and then just enter in the value you want to multiply for the layer name. That would probably be easier to work with, but it would require you to rename all of the null layers. Here's how that expression would look:


t = thisComp.layer("Audio Amplitude").effect("Both Channels")("Slider");
val = thisLayer.name;
maxT = 30;
corFactor = t / maxT;
v = linear(t, 0, maxT, -val, val);
if (index % 2 == 0)
	y = v * corFactor
else
	y = - v * corFactor;

[value[0], (thisComp.height/2) + y]


If you use the second expression you will have to rename all of the Nulls with a number. It makes adjusting the shape of the path easier:

The posted expression is slightly different than the screenshot. The value of the layer name determines how far the null moves. The MaxT is the only value you need to edit in the expression for your audio amplitude. 

stehliks作成者
Participant
July 11, 2020

This work great. Thank you so much. All the best.

Participant
September 18, 2023

I'm having a hard time replicating this, can someone make a video or attach the project file would be nice...

Mylenium
Legend
July 10, 2020

Not really. You would have to write a whole bunch of convoluted expressions to a) extract the relevant info from converted audio keyframes and b) control the positions of the "waveform" points on a shape layer or similar oto which then a Rounded Corners modifier could be applied. Similar stuff would apply to alternate solutions using third-party plug-ins. That is to say unless there were a plug-in that does this right off the bat, it's pretty complicated or even impossible. I at least don#t know of any such plug-in, though naturally that doesn't rule out something like that exists. However, it's more likely that dedicated VJ-ing software offers more along the lines of these audio visualizations, so maybe look into that. Other than that it may be possible to get the results by processing the underlying audio file heavily, but that, too, could be infinitely complicated and time-consuming.


Mylenium

stehliks作成者
Participant
July 11, 2020

Thank you.