I am not sure I completely understand your workflow because there are no screenshots. I don't think creating a database with time and singer names and then using a JSON file to turn those times and names into animation would be faster than just setting keyframes. From what you describe, I think the whole animation can be simplified with a few markers and a few expressions. You would not need to set any keyframes; just add and name some markers. I have done a lot of dynamic text (Lyric Videos) where most of the animation is controlled by markers added to an audio track and layer in and out points.
If you added a marker to the audio track every time the singer changes, then you simply named each marker, you could use an expression to read the time of the marker, then use that time to drive an animation by cutting from one layer to another using opacity, moving a layer into position, or any other animation you would like. You can even use the marker time with a linear or ease interpolation method to ease one effect or movement into another.
You could also use Premiere Pro or Audition to generate an audio track with the words to the song added to markers in sync with the audio track, which can be used to animate a text layer to generate the lyrics.
Here's the basic idea. You start with an if statement that says when you get to the first marker, if the marker's name is "Bob," move the layer up 100 pixels over ten frames until you get to the next marker. Then all you have to do to adjust the timing and all the animations tied to the markers is move the markers left or right on the layer, and everything follows.
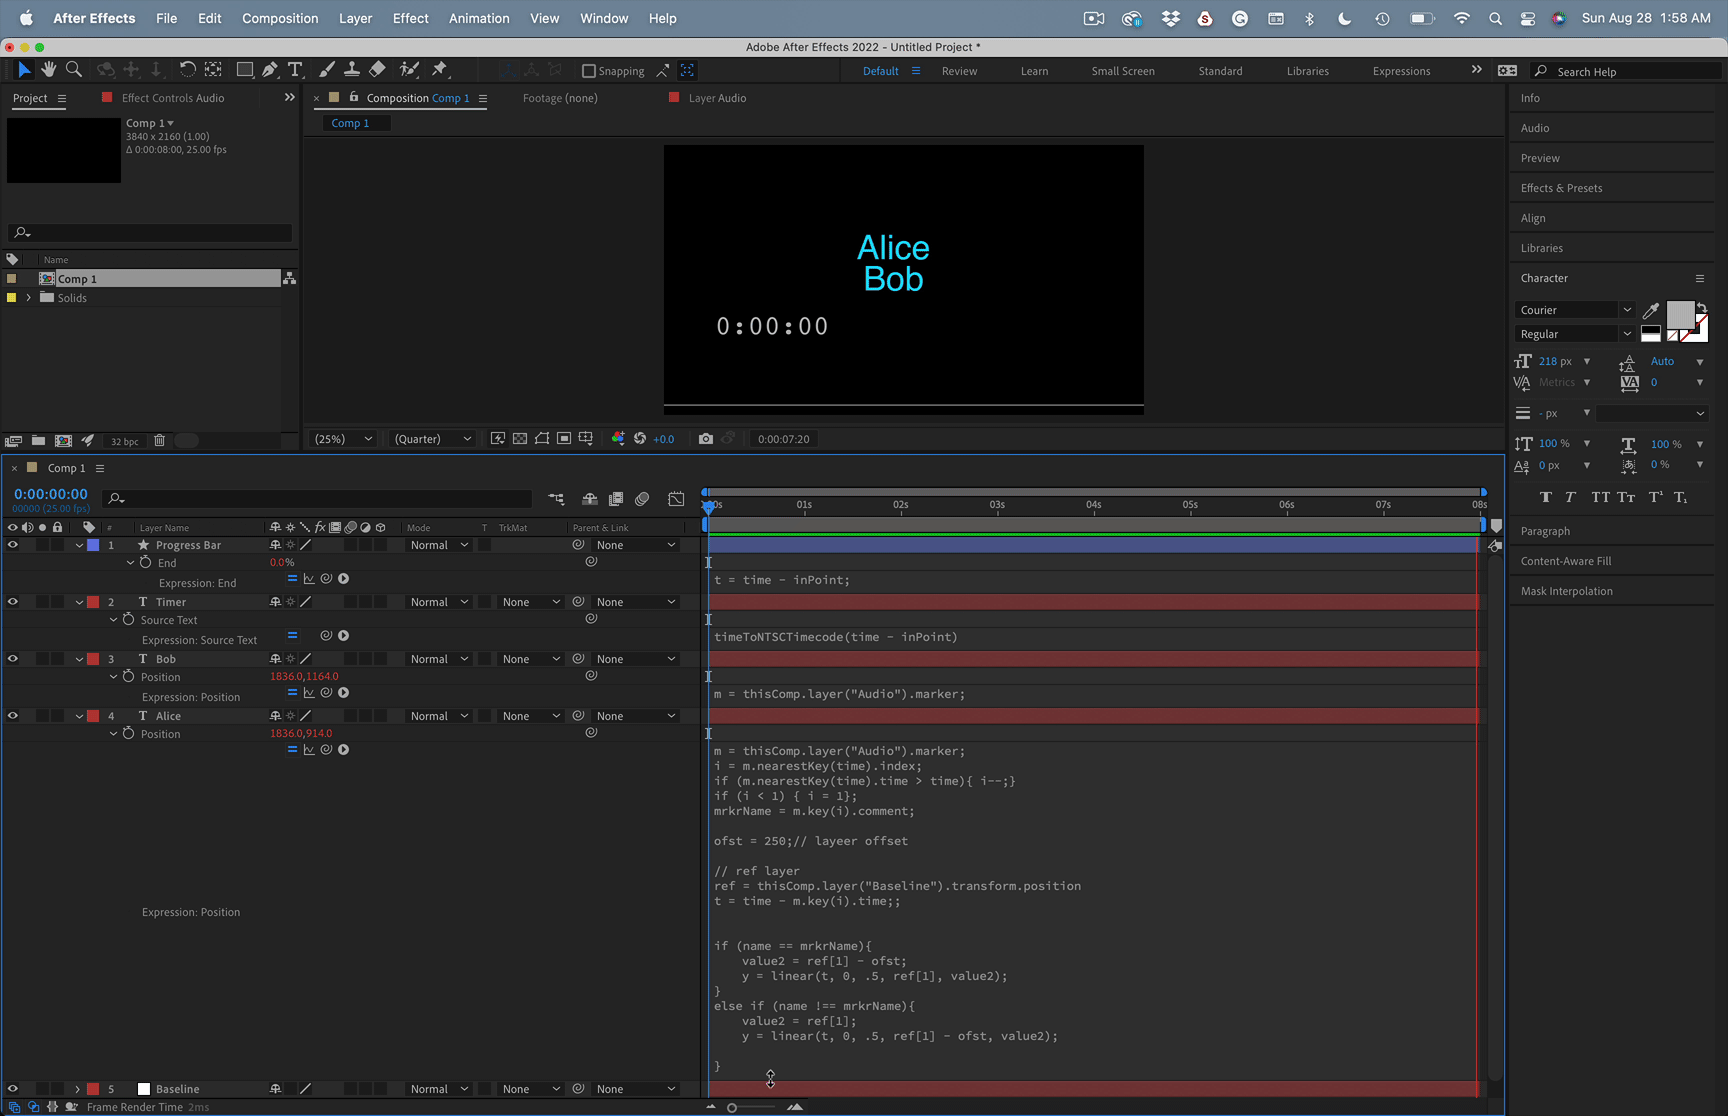
It sounds like your Expression Control Slider controls a shape layer or scale to control the progress bar's length and convert the value to time. A more efficient workflow for that kind of animation would be to use a time expression for the counter and to control Trim Paths or Scale for the progress bar. For example, add this expression to a text layer:
timeToNTSCTimecode(time - inPoint)
That will give you a timecode display starting from the in-point of the text layer. Use a monospaced font like Courier to keep the spacing consistent. If you only want minutes and seconds, you can use a mask.
If you want fractions of a second (less readable or understandable by the audience) use this expression for the text layer:
(time - inPoint).toFixed(2)
Now you have a text layer that reads the time of the layer without any keyframing or fiddling.
To create a progress bar, draw a horizontal line on a shape layer with stroke only, then add Trim Paths, then add this expression to the End property:
t = time - inPoint;
tMin = 0;
tMax =  outPoint - inPoint;
linear(t, tMin, tMax, 0, 100)
If you want to scale a layer instead, set the anchor point to 0, 500 (half the layer height) and modify the expression to look like this:
t = time - inPoint;
tMin = 0;
tMax =  outPoint - inPoint;
x = linear(t, tMin, tMax, 0, 100);
[x, value[1]]
As long as the text layer and the progress bar layer have the same length, the timer will run, and the progress bar will sync no matter how long the song is without any keyframes.
Now let's talk about the Audio Track and the layer markers. Assuming you have two singers, Bob and Alice. Every time Bob sings, add a marker to the audio layer and name it Bob. Do the same for Alice. You can do this using the Ctrl key and the 8 key while the audio is playing, then go back and name the markers.
If you set up a null as the starting point, you can add this expression to each singer's text layer position. The singer with the same name as the marker will be on top.
m = thisComp.layer("Audio").marker;
i = m.nearestKey(time).index;
if (m.nearestKey(time).time > time){ i--;}
if (i < 1) { i = 1};
mrkrName = m.key(i).comment;

ofst = 250;  // layer offset
movTime = .3; //transition time in seconds
// ref layer
ref = thisComp.layer("Baseline").transform.position
t = time - m.key(i).time;;


if (name == mrkrName){
	value2 = ref[1] - ofst;
	y = linear(t, 0, movTime, ref[1], value2);
}
else if (name !== mrkrName){
	value2 = ref[1];
	y = linear(t, 0, movTime, ref[1] - ofst, value2);

}

[ref[0], y]
If you have more than one singer you can add a layer index multiplier to the expression so that the one singing is always on top.
You could use the same approach to control text animators, opacity, or any other kind of movement you want. With a little modification, you could stack as many text layers as you want for vocalists and have the current person singing will always be on top. All you have to do is add the markers and name them. If you save the expression as an animation preset, you can use it any time to create this kind of project.

