glutenmedaddy
Participant
March 2, 2019
Question

Lock objects/videos onto a one point perspective grid?

  • March 2, 2019
  • 1 reply
  • 2444 views

Forgive me if this doesn't make sense, but I'll try my best. Refer to attached pictures for better idea of what I'm going for:

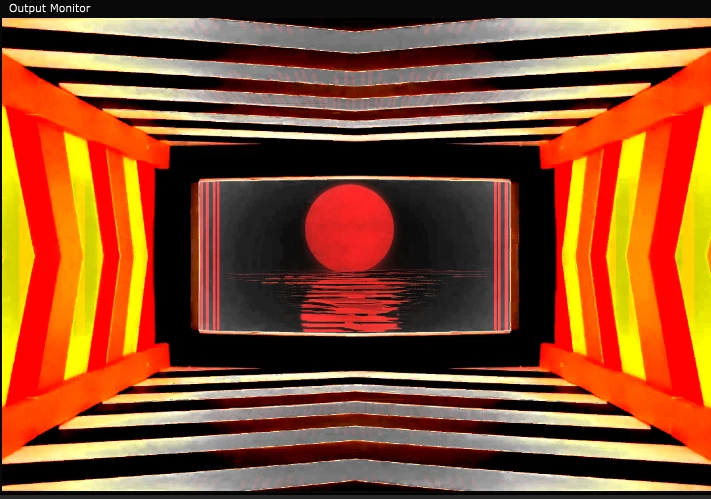
I'm looking to create a template of sorts to make consistent content in a one point perspective grid style. Simple VJ content, nothing too crazy. I've recreated a similar effect in Resolume Arena by using a fixed camera, shoebox claymation video to lineup and shift my video/picture layers for each wall. Basically I want a grid of sorts that I can import a 3d object onto and animate it along the Z axis but have it locked to where it follows a wall, floor or ceiling path until it reaches the vanishing point or zooms past the camera, without keeping the object perfectly centered and completely covering the camera. I'm aware I could just use Z axis or scale to blow up or vanish an object but I want it locked to the perspective and walls.

I'm also looking to make the walls interchangeable with videos, so I can have the video walls open/close or rotate to make more content but always keeping the angle and perspective consistent.

Not really sure of what kind of answer I'm looking for, but if anyone has any advice,  links or tutorials relating to this I would very much appreciate it.

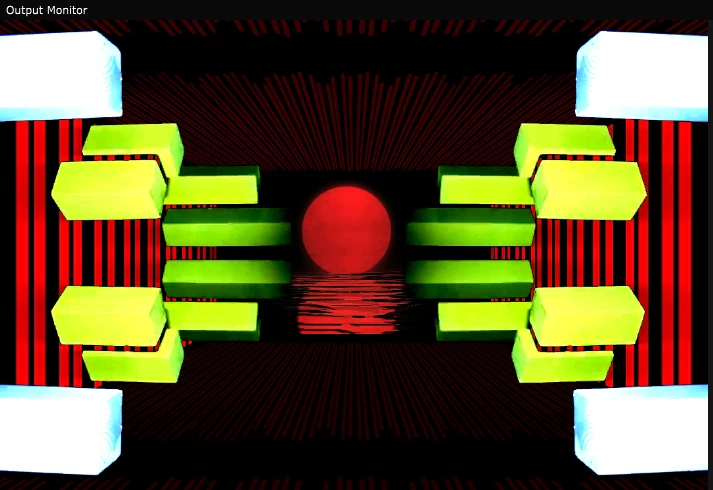
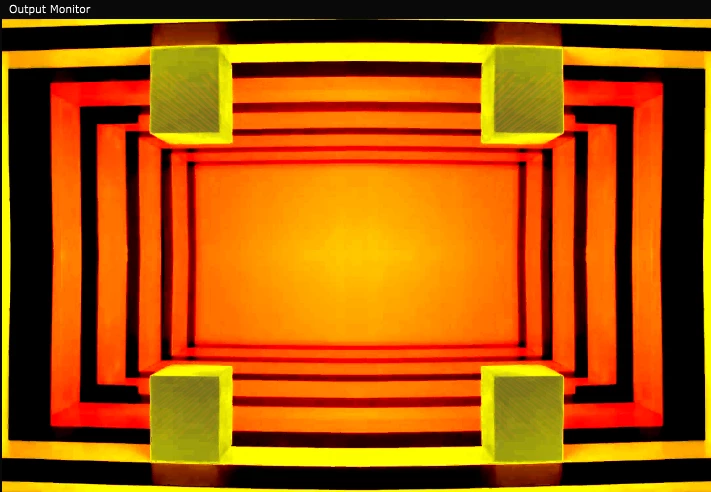
Red lines are videos shifted to match the walls of the orange/yellow video. Red moon is a video scaled to match the back wall of the orange/yellow claymation video

    This topic has been closed for replies.

    1 reply

    Mylenium
    Legend
    March 3, 2019

    Basically I want a grid of sorts that I can import a 3d object onto and animate it along the Z axis but have it locked to where it follows a wall, floor or ceiling path until it reaches the vanishing point or zooms past the camera, without keeping the object perfectly centered and completely covering the camera. I'm aware I could just use Z axis or scale to blow up or vanish an object but I want it locked to the perspective and walls.

    Nope. AE doesn't have interactive 3D grids and magnetic snapping of that sort. nor does it actually support 3D objects natively, so this could easily turn into some super complicated proeject where you need to connect and constrain everything with expressions, use elaborate sub-comps with expression linked cameras to "sync" movements and whatnot. No simple answers here. Same for replacing content - you need to figure out how to structure your project with pre-comps. This doesn't work like replacing a texture in a 3D program would. AE is a whole different thing in that regard.

    Mylenium

    Community Expert
    March 3, 2019

    You can fairly easily move things on a plane. Here's what I would do to build your virtual set:

    1. Create a large solid that is 2X the height and width of your composition and name it Rectangle
    2. Create a square solid that is 2X the width of the composition and name it square
    3. Add both layers to the composition
    4. Make the layers 3D
    5. Duplicate both layers
    6. Change the z anchor point to the comp width for both rectangle layers
    7. Change the z anchor point to the comp height for both square layers
    8. Rotate the first rectangle layer 90º in Y, the second rectangle layer -90 in y
    9. Rotate the first square layer 90º in X, the second square -90º in x
    10. Add a camera
    11. Add a point light at the center of the composition
    12. Move the camera back until you can see the leading edge of the tunnel you just made
    13. Add a 3D null to the comp and parent all solids to the null
    14. Add a shape layer to the comp, make it 3D, hold down the shift key and parent the shape layer to one of the sold layers
    15. Set the anchor point z value of the shape layer to the z anchor point value of the layer you chose as the parent
    16. Save the project
    17. Export the comp as a C4D project using the File>Export menu
    18. Import the saved C4D project and drag it into the comp
    19. Open the C4D lite editor and open the C4D file
    20. Add extrusions and caps to the shape layers
    21. Turn off the solid layers
    22. Save the file
    23. Return to After Effects
    24. Change the Cineware render to Standard Final and the camera to Centered Comp Camera
    25. Save your file
    26. Animate the position of the camera

    The project looks like this:

    There you go. 3D elements on virtual walls. You can move the shape layers anywhere you want on the walls or even past them using the position controls in the timeline and they will stick to the walls. You can re-arrange any 3D elements you created in C4D lite by simply moving them around on the stage. You have the walls for reference. You can even add additional 3D elements like this:

    If you want to map a video to one of the surfaces of the cubes you can just add a masked video layer to the comp, make it 32D and position it over one of the surfaces. You can even add textures to the shapes in C4D lite.

    I hope this helps. Just for fun here's a project file and the C4D file:

    Dropbox - Cube and cylinder.c4d

    Dropbox - 3D tunnel.aep

    These are CC 2018 files. If your browser adds a .txt extension to the files when you can just delete it.