markh17861918
Participant
September 5, 2017
Answered

Shape jumps across composition when path pasted after effects

  • September 5, 2017
  • 2 replies
  • 3318 views

Hello, so I am having a major problem and I have been searching forums for the past day and a half trying to find an answer and haven't found any so I've resulted in making my own in hopes of finding the answer!

I am trying to have a shape move along a tilted oval path. For now, I have simplified the design into simple shapes: (The oval in this picture is just to show you the shape of the path)

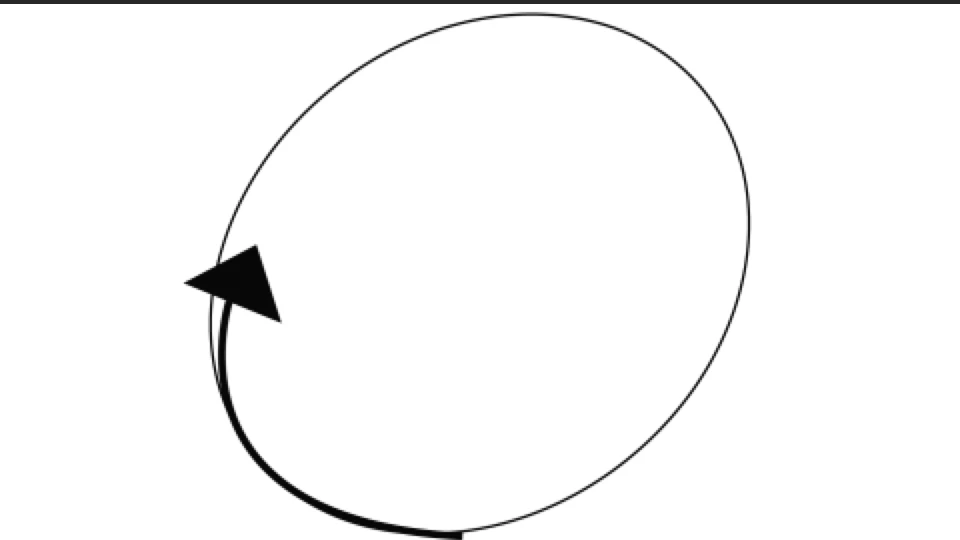
Now when I paste the path that I created with the pen tool onto the position layer of the arrow shape, the arrow always jumps to the other side of the composition:

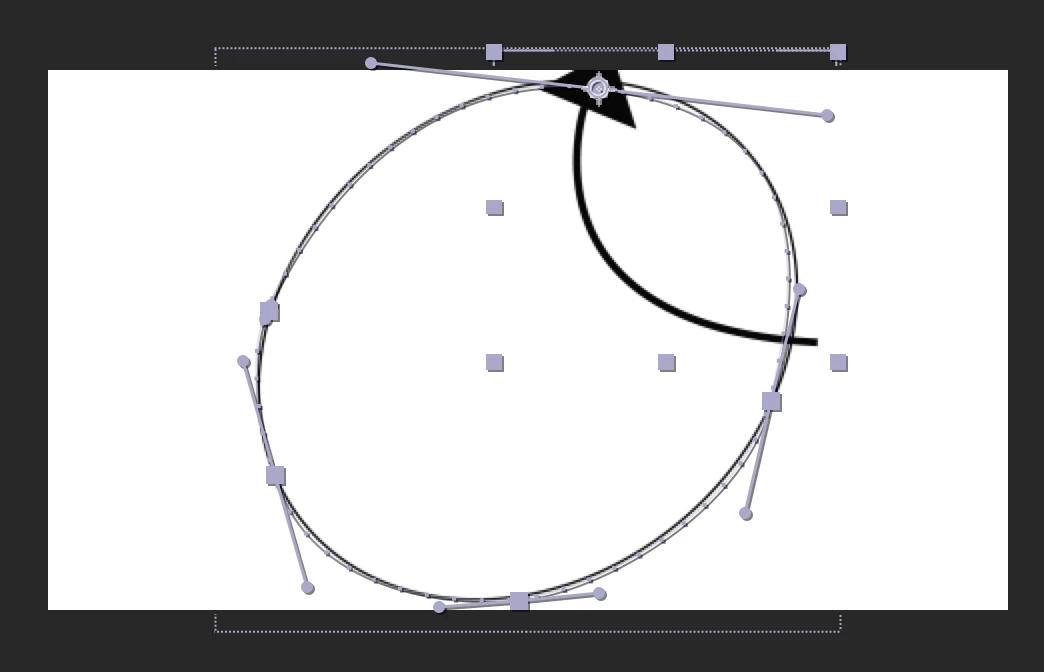
How can I make sure the shape stays in the same spot when the path is pasted on the layer?

I am a beginner in After Effects so I may be missing something really obvious

This topic has been closed for replies.
Correct answer Rick Gerard

Rules for turning a vector path (mask or shape layer path) into a motion path.

  1. The layer containing the path must be at 100% scale, at the default comp center position, and the rotation has to be zero - In other words, everything has to be reset
  2. When selecting the path you want to copy, if you want the entire path to be copied you have to make sure that the entire path property is selected and not just a few of the points on the path. The easiest way to do this is to simply set a keyframe then either cut it (Ctrl/Cmnd + x) or copy the keyframe. Most of the time just selecting the Path will work, but sometimes this will fail
  3. If the path you are copying is animated the resulting motion path will be a series of motion paths that match each keyframe followed by a straight line return from the first vertex to the new position of the first vertex in the path. If the first vertex changes position this can result in unexpected motion between keyframes.
  4. The motion path will always start at the first vertex in the path on the path and move counter clockwise for a closed path. If you need to reverse the path then you use the keyframe assistant and time reverse the keyframes.
  5. The layer you want to follow the path will always move to the first vertex when you paste so that is where the anchor point will be.
  6. If you set a position keyframe before you paste your copied vector path you will always  a new motion path starting at the current time indicator. Sometimes just selecting the position property does not work but using Alt/Option + p and then paste (Ctrl/Cmnd + v) will always give you a motion path starting at the CTI.

I hope this helps. It looks to me like your only problem is that you did not expect what happened. From your screenshot it looks like the anchor point of the layer containing the arrow is in the center of the triangle and it moved to the first vertex. That is exactly what should happen.

If you want to arrowhead to be there but the arrow to be pointed in the a different direction then you have to either set the transform options (Ctrl/Cmnd + Alt/Option + o) to auto orient to the path or adjust the rotation property of the layer manually.

If you expected the arrow to follow the path and bend around it then you did not follow the right workflow. You needed to create the path using a shape layer, apply trim paths to get a line segment to move around the path by animating the start and end points of trim path, then create the arrowhead on another shape layer, copy the path and paste to the arrowhead position and auto orient to the path. Your comp would look something like this:

2 replies

Colin Holgate
Inspiring
September 5, 2017

It turns out AE does have a magic way to do this.

First to say that I know nothing about AE, you're already miles ahead of me. But, I am extremely good with Google searching, and I now know a lot more about AE!

Before you copy the pen ellipse, select its path, then with the Selection Tool select a handle where you want the animation to start. If there isn't something there to select, use the pen tool to add a handle. Once it's selected go to Layer/Mask and Shape Path/Set First Vertex.

Now copy the path and paste it onto the position of your arrow, and the arrow will jump to the location of the first vertex you set.

Rick GerardCommunity ExpertCorrect answer
Community Expert
September 5, 2017

Rules for turning a vector path (mask or shape layer path) into a motion path.

  1. The layer containing the path must be at 100% scale, at the default comp center position, and the rotation has to be zero - In other words, everything has to be reset
  2. When selecting the path you want to copy, if you want the entire path to be copied you have to make sure that the entire path property is selected and not just a few of the points on the path. The easiest way to do this is to simply set a keyframe then either cut it (Ctrl/Cmnd + x) or copy the keyframe. Most of the time just selecting the Path will work, but sometimes this will fail
  3. If the path you are copying is animated the resulting motion path will be a series of motion paths that match each keyframe followed by a straight line return from the first vertex to the new position of the first vertex in the path. If the first vertex changes position this can result in unexpected motion between keyframes.
  4. The motion path will always start at the first vertex in the path on the path and move counter clockwise for a closed path. If you need to reverse the path then you use the keyframe assistant and time reverse the keyframes.
  5. The layer you want to follow the path will always move to the first vertex when you paste so that is where the anchor point will be.
  6. If you set a position keyframe before you paste your copied vector path you will always  a new motion path starting at the current time indicator. Sometimes just selecting the position property does not work but using Alt/Option + p and then paste (Ctrl/Cmnd + v) will always give you a motion path starting at the CTI.

I hope this helps. It looks to me like your only problem is that you did not expect what happened. From your screenshot it looks like the anchor point of the layer containing the arrow is in the center of the triangle and it moved to the first vertex. That is exactly what should happen.

If you want to arrowhead to be there but the arrow to be pointed in the a different direction then you have to either set the transform options (Ctrl/Cmnd + Alt/Option + o) to auto orient to the path or adjust the rotation property of the layer manually.

If you expected the arrow to follow the path and bend around it then you did not follow the right workflow. You needed to create the path using a shape layer, apply trim paths to get a line segment to move around the path by animating the start and end points of trim path, then create the arrowhead on another shape layer, copy the path and paste to the arrowhead position and auto orient to the path. Your comp would look something like this:

markh17861918
Participant
September 5, 2017

Thank you! I haven't seen any tutorials about adding a trim path - after I do, do I select "Path 1" as well as "Trim Path 1" and copy it onto the position layer of the arrow?

Mylenium
Legend
September 5, 2017

Well, you could adjust the nachor point and point order by defining a new first point for the path. These are simply limitations in teh workflow. You have to be super-exact and prepare your content suitably. AE has no magic way of knowing the relations between your pasted paths and the layers it is applied to. It's all just abstract data.

Mylenium