Known Participant
July 11, 2020
Question

The mask for my sky isn't working correctly???

  • July 11, 2020
  • 2 replies
  • 552 views

So I am trying to create a day for night scene in After Effects, and I am having a bit of trouble trying to mask in a starry sky. For some reason, the starry sky keeps overlapping over the mountains instead of staying behind the mountain (the picture below shows what I mean. Look at the red circle)

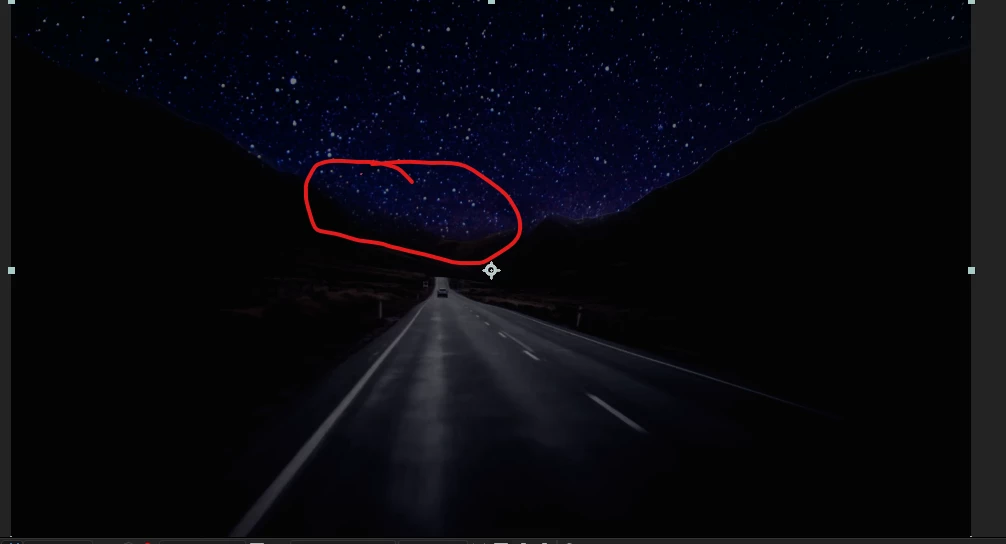
The starry sky also keeps flickering over the mountains as well.


To mask the starry sky behind the mountains, I used the Roto Brush and the Refine Edge tool (to make it less choppy).

I tried feathering the Roto Brush Matt, using and Exctract key, and a Luma Key... but nothing has worked. To be completely honest, I've never done something like this so I'm on unfamiliar ground.


Does anyone know how to mask the stary sky neatly behind the mountains???


I have attached a copy of the file and the assets, along with a video to better show the problem. Here is a link to the folder with the files.


This topic has been closed for replies.

2 replies

Community Expert
July 11, 2020

When I need to roto a scene I usually try and combine a procedural matte and motion tracking or motion stabilizing to the project so that the roto is easier. 


My approach for that shot would be to add the footage to a comp, duplicate the footage, name it stabilized, motion stabilize the stabilized layer using AE's Motion Track/Stabilize Motion/Rotation and Scale picking the farthest point on the road as the first feature region and a plant on the far side of the hill as the second, apply Stabilize Motion to the layer, add a red solid on top of the Stabilized layer and set the blend mode to Overlay so I could easily see through the layer, Draw a mask that cut just short of the sharp edges of the hills and closely followed the outline of the snow-capped mountains, set a mask path keyframe at the first frame, move to the last frame and adjust the mask, move somewhere in the middle and fine-tune the mask path - you'll only need 3 keyframes for the mask, add about 3 or 4 pixels of feather to the mask, Change the solid layer to black and set the blend mode to normal, add Calculations and levels to the stabilized layer to create a high contrast black and white imate, add a null to the timeline, apply this Animation Preset to the null to tie the nulls position to the Anchor Point of the stabilized layer, invert the scale, and invert the rotation, then move to he first frame and Parent the Stabilzed layer and the black solid to the Null so the motion is back in the stabilzed layer and the motion has been added to the black solid, Pre-compose the nul, the black solid and the stabilized layer and name the pre-comp matte.


That gets you here:

Copy the Null 1 and Stabilzed layer, return to the Main Comp, paste them in the timeline, move them to the bottom of the layer stack, add the Night Sky footage, position and fit it to the frame, parent the Night Sky layer to the Null, Move the Night Sky layer just below the Matte layer, Set the Matte layer as a Luma track matte for the Night sky footage, add color correction to the Footage layer to make it look like night (I used Curves and Hue and Saturation), add a shape layer with a gradient fill from 50% gray to black as a top layer, set the blend mode of the shape layer to overlay and adjust the start and endpoints to darken the snow, add Set Matte to the Shape layer and select the Matte pre-comp as the source. That will get you here, with just 3 keyframes and a few tweaks of the color.

And here's the flow chart and a Project file, just in case I missed anything. Took me about 15 minutes to get here.

Known Participant
July 21, 2020

Hey Rick,


This comment is a bit late. Been busy and it took me a while to get back to this project.


How were you able to have the mask stick to the mountains so well? 

Even after I stabilized it, I had to use like 11 keyframes for the mask path, and it still is shaking a lot (and it still doesn't look too good.


Here's a copy of my latest attempt. I haven't yet color corrected it to look like night yet, just trying to get the mask right. Also, I applied the scale for the Stabilize Motion, which is why I think it's zooming in in a weird way.

Community Expert
July 21, 2020

You forgot to parent the black solid to the null in the Matte comp and you didn't take advantage of the effects added to the stabilized footage. A couple of tweaks to Calculations and Levels and most of the ridgeline is a perfect matte.

Once the Black Solid is tied to the null you can use a lot fewer mask points. and get away with about 3 keyframes. You just need to mask out the white below the horizon and track the mountain top. I did it with 3 keyframes and this simple mask.

The whole reason for the color correction on the footage layer is to create a high contrast black and white mask for the sky. The only reason you need to add the black solid is to take care of the white parts the procedural matte created with the effects could not correct. Tying the black solid to the null takes care of almost all of the movement in the frame. If you could get good tracking points right on the horizon you would not have to animate the mask at all.

Mylenium
Legend
July 11, 2020

Rotobrush isn't going to do much with this kind of murky/ foggy footage. Also the footage is very "flat" and kind of blurry to begin with. You may simply need to mask it manually the good old-fashioned way.


Mylenium