Inspiring
July 13, 2018
Question

Tips for efficient diorama comp (large scale)?

  • July 13, 2018
  • 1 reply
  • 1403 views

Hi there,

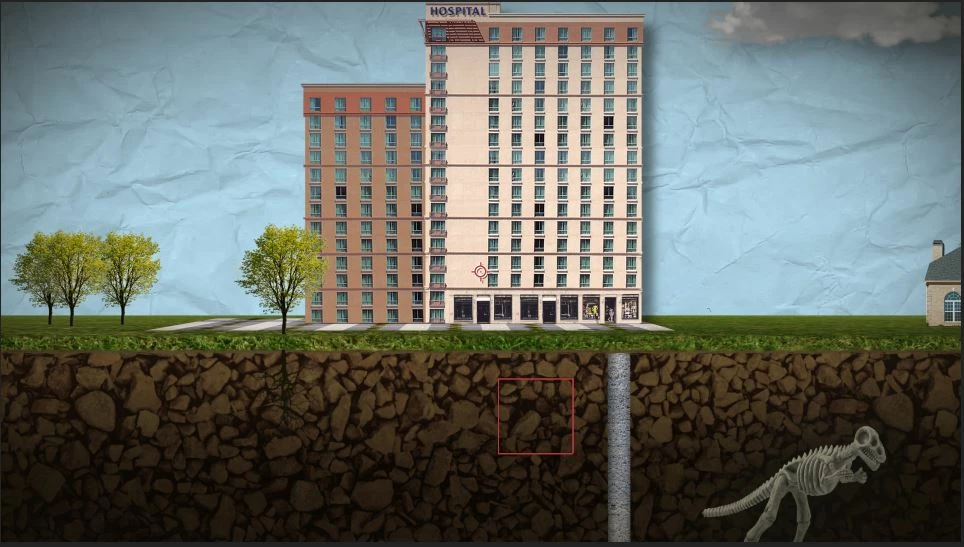
I'm working on a mock "diorama" (below) in After Effects where the camera follows a tunnel underground and horizontally destination.  The actual export will be 1920x1080, but to fit everything into one master comp to arrange the diorama, I'm guessing it's going to be pretty big (8k maybe?).  Everything is on 3D layers- I would like to use lights, but I'll have to test render times.  I probably won't have native motion blur on.  I've played around with a few setups but wondered if there are best practices that I should be following.

Here are a few questions:

  1. To make seamless tiles for textures (dirt or rocks) is it better to have a single image that is a very large dimension (either tiled in photoshop or just hi-res), or is it better to have a smaller dimension image that is tiled in AE?  I've always defaulted to Motion Tile.  Is Motion Tiling better than multiple instances of the image or pre-comp?
  2. For the Master Comp, it's going to be big.  Should I add a camera to that comp for animating or is it better to drop that big comp into a 1080 sequence, then move the pre-comped Master Comp within the 1080 sequence instead of a an actual AE camera?
  3. The tunnel passes under several houses, so, unfortunately, it's not a loopable scene.  If it ends up needing to be bigger than 8k, is it better to break the master comp into smaller dimension comps, then manually splicing or butting the comps together?
  4. Any other tips I should be aware of before I get in too deep?

Thank you for any tips you can give!

-Stephen
This topic has been closed for replies.

1 reply

Community Expert
July 13, 2018

If your final comp and render is just HD then there is really no need to create a huge comp to move the camera around in because the composition boundary makes no difference to the camera.

How long is the project? How many elements are you moving around?

If it were me I would create a master Illustrator document that had an artboard that was large enough to have the entire illustration for the tunnel background on one artboard that was 1080 points (pixels) high. Then I would create each scene that the camera was going to pass by on separate layers. If there were elements in the scenes that needed to be animated I would make each element a separate layer. I would use the same technique if I were using Photoshop to create the elements in the animation.

Once everything is laid out in Illustrator I would start grouping each scene in a separate 1920 X 1080 artboard. Each scene should fit in that artboard or come close to fitting because you can't see more than that in the master comp. You could either copy and paste each scene into a new document or you could just start adding artboards to your Illustrator document. You can't do that in Photoshop.

When you have all of the artwork created you could save the illustrator document and choose the option to have each saved as a separate file because AE will not import anything that is not included in an artboard.

Once you have all of the elements saved you can import them into AE, set up your master comp as an HD comp, then, instead of animating the camera, attach the tunnel background to a 3D null and animate the null. Basically, you are having your actors, your scene move and keep the camera in one spot. Each of the scenes that the camera passes by would be a new layer or if the scene is animated, a separate comp. You just drop the comps or the layers in the master comp, collapse transformations, and then parent them to the null. You could use expression controls to animate the speed of the master null that moves the entire scene. This would be a lot easier to manage than arranging everything on a single giant AE stage, then nesting that comp in an HD comp and trying to move the camera around.

If the project is going to be longer than a minute or two I would even break the comps up into sections. It would be pretty easy to have ten 30 second comps of the move that would match cut to make a five-minute movie and managing the layers required and making changes would be much easier, especially if you move the actors instead of the camera. As long as the tunnel background is always at the same distance and angle from the camera when you make the cut to the next comp you'll never see the edit.

If that workflow does not make your project easier to manage I probably don't understand exactly what you are trying to do.

Inspiring
July 13, 2018

Thank you, Rick,

I've attached another screenshot to be sure we're on the same page.  But I do think you're understanding it correctly.  I never thought to use Illustrator.  I've used Illustrator for character animation or flat-animation style (where it's all designed in layers in AI, then imported as a layered composition in AE with Collapse Transformations turned on), but I'm not sure if I'm following what you mean by creating it in a 1080 artboard.  Do you mean an artboard that is 1080 high but as wide as the "master" stage would be?

I love the idea of avoiding a giant AE stage.

When you say to "create each scene that the camera was going to pass by on separate layers", do you mean the different elements that will be moving in different z-space?

As long as the height dimension is correct, and I'm not zooming in, then I wouldn't need to worry about pixelation (none of the imagery I'm using is vector).  Since the camera starts above ground and then moves down to follow the tunnel, am I correct in assuming I would just make the AI master artboard the total height (so instead of 1080,  maybe 1600x(actual width))?  Then each of the other non-master artboards would be the standard 1920x1080?  Maybe the first board is taller but the rest are 1080?

Below is a screengrab showing the 3D.  It's not terribly complex, but I'm wondering what the workflow would be to place the elements in 3D space, if there are multiple 1080 scenes or "comps".  Since the dirt, tunnel, sky, and grass are always present (and are on different planes but consistent across the entire duration), would I just place all of the elements from the first artboard into the 3D space I want, then copy their positions into each of the remaining artboards?  Or am I misunderstanding this?

I think only the grass is a horizontal plane, the rest is verticle.  How would I handle this in Illustrator?  Or would I skip this element in Illustrator all together and just add the grass in AE?

The comp is going to be under 10 seconds. 

Thank you for your help with this, I really appreciate it!

-Stephen

Community Expert
July 13, 2018

If your screenshot is an accurate representation of the artwork I would just create one big artboard with each element on a separate layer, import as a composition, then go to composition settings and change the comp to a standard HD comp. Then turn all layers 3D. The vertical layers would all stay vertical, but the horizontal layers would all be rotated 90º on the X axis.

Then create a 3D null put that in the center of the comp. You can then change to Custom View 1 and see everything. Add your camera. Arrange the 3D layers on the stage as required, parent everything to the null, then with Custom View 1 and Active Camera view available drag the null to set up the starting shot, set a keyframe and then animate the null to move the set past the camera.

Here's what I mean using different colored solids to represent your artwork:

It took about 3 minutes to set that up. All of the movement of the set can be done in Custom view 1. You can even use camera tools to move around in the custom views, then see what you are actually going to render in Active Camera.

If you wanted to animate the camera instead it would be a good idea to add a camera dolly null to the scene, hold the shift key and parent the dolly null to the camera to snap the null to the camera's position and orientation, then reverse the parenting so the camera follows the null.

You could then add a placeholder solid to the scene, position and align the solid so it is on the plane you want the camera to follow, use the pen tool (g) to draw the motion path, press Alt/Option + m to set a path keyframe, then Ctrl/Cmnd + x to cut it and save it to the clipboard, then Select the Camera dolly null, press Alt/Option + p to set a position keyframe and paste (Ctrl/Cmnd + v) to paste the vector path to the camera dolly's position, adjust the timing of the move by dragging the last keyframe to the end of the move, use a parenting trick to rotate the motion path into position (see attached video) and then reelase the parent and have your move all set up in Custom View 1. Here's what I mean:

I hope this helps.