Hi Benjamin,
Hey, ya didn't tell me that!!
First off, congrats knowing that you do not want to jpg a jpg. That's the first step in proper photography-enhancement.
And no, I've not done that becuase there are other/better ways to do that.
When I open a jpg image that I want to enhance, the first thing I do (after making the 1st alternation) is to save the image as a TIF or PSD. The reason for this is that these two formats are non-destructive as opposed to the "lossy" format of jpg. Plus, there are gobs and gobs of ways to work with a tif or psd photo for many hours, days, or years and never change a single pixels by working non-destructively on the image.
One side point: let's say after making a bunch of changes on an image I want to send someone the image. At taht point I will re-save the image into a jpg solely for the purpose of sending it to someone else. The fixes are in and I might as well send a 500 kb image as opposed to (say) a 3 MG image.
I also only take raw images. You cannon "change" a raw image, only how it's interpreted. That means that I can open a raw image and work on it to make something completely different and if I don't like it I can close the image, make a right-click on the image in Bridge and select the following:
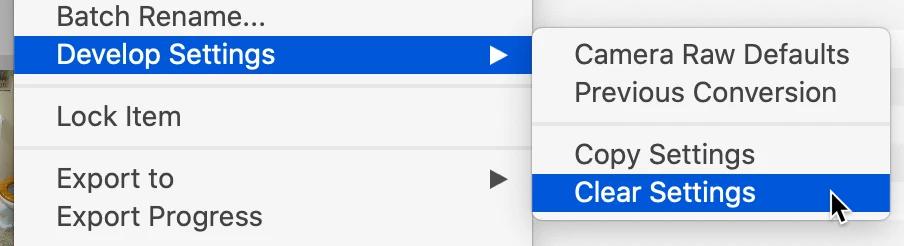
All that I'm doing here is to remove the "instructions" as to how that image is to be observed.
Again, you cannot change a raw image.
Now, here's an extra tip: if you open a jpg image in ACR, make a bunch of changes, close ACR, if you look at the image in Bridge you'll see the edit symbol on the upper right corner. That means there have been edits on this jpg image. Now, if you right click on the this image, you'll see the same option for Develop Settings with Clear Settings. Select that and the jpg will go back to where it was before you did anything.
There are some important ramifications to this: if you take a jpg image and do some alterations in ACR and email that to someone WHO DOES NOT HAVE ACR, when they open that jpg, they will see the original image before alterations. Why? Because they do not have the tool (ACR) to unlock the alterations that you made.
One last point: normally when you open a jpg up in PS and make some alterations, when you save those changes, they are baked into the image causing a re-save of a jpg (not a good thing as you know). But when you do those changes in ACR, where are the changes? They are "contained" in the jpg image. If you do a before and after of making changes in a jpg in ACR you will see that the size goes up. Delete those changes, and the size goes back down.
In the world of raw images, Adobe has created a new image format, DNG (Digital Negative). A normal raw image (e.g., CR2 from Canon cameras) are not containers. When you make changes in ACR, the changes are saved in XMP format files called "sidecar" files. These only work if they are in the same folder as the original files. If you move the orignal file to another folder without the sidecar, all of the changes will not be there. One does not need to convert their raw files to DNG format and many do not. I have always converted my raw images to the DNG format for many reasons, losing the sidecar file is a big one for me.
I know this is a lot more than a simple answer but I did want to give you the full rundown on what you were doing was for a good cause, but there are better ways to do the same thing.
I hope this makes sense, if you have any more questions, just ask.

