Emily LKJ
Known Participant
March 13, 2019
Question

How do I make the body structure when I have all the parts as layers

  • March 13, 2019
  • 14 replies
  • 4933 views

Hi! I just started using Adobe Character Animator today. I have used photoshop for half a year now and I have experimented with animation usually in photoshop but I wanted to try character animator to get a touch at the face and how that program works so I could later on use it on animate or after affects when I want to learn that. I have used a lot of time in photoshop so am well known to the program, but am new to how it works with character animator.

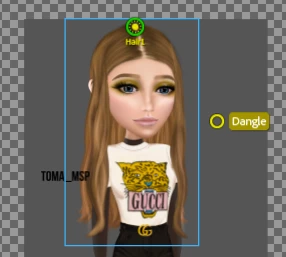
So first off, I manage to get the whole face to work out really fine, both the eyes, brows and mouths all working perfectly.

...

I didn't get the hair to move, I tried but it didn't work out. I used the pen -> had it on form and marked first the "origin" and then the "dangle", but it didn't seem to work sadly. But thats a problem I will look into after I get the body right.

SO this is how my layers are in photoshop:

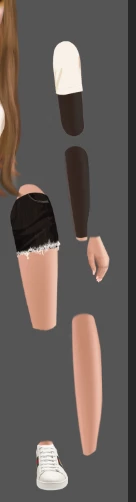
(kropp means body in Norwegian)

So the foot is a layer, the legg is a layer and so it goes on.

I want to make this fit together and work smooth when I want to animate, but I only find answers for how to do it when you have the arm in one layer instead of 3 like me. (upper arm, down arm and wrist/hand).

So my big question is how can I make the body structure when I have more layers than one?

How can I add movement to each body part so when I moved the arm from I to / every layer will be moved in a smooth way, but I can also manage to make a position out of it?
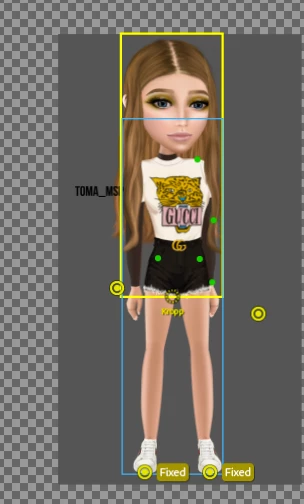
So from this

to this but with animation and a structure of how I can do it

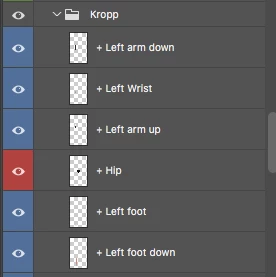
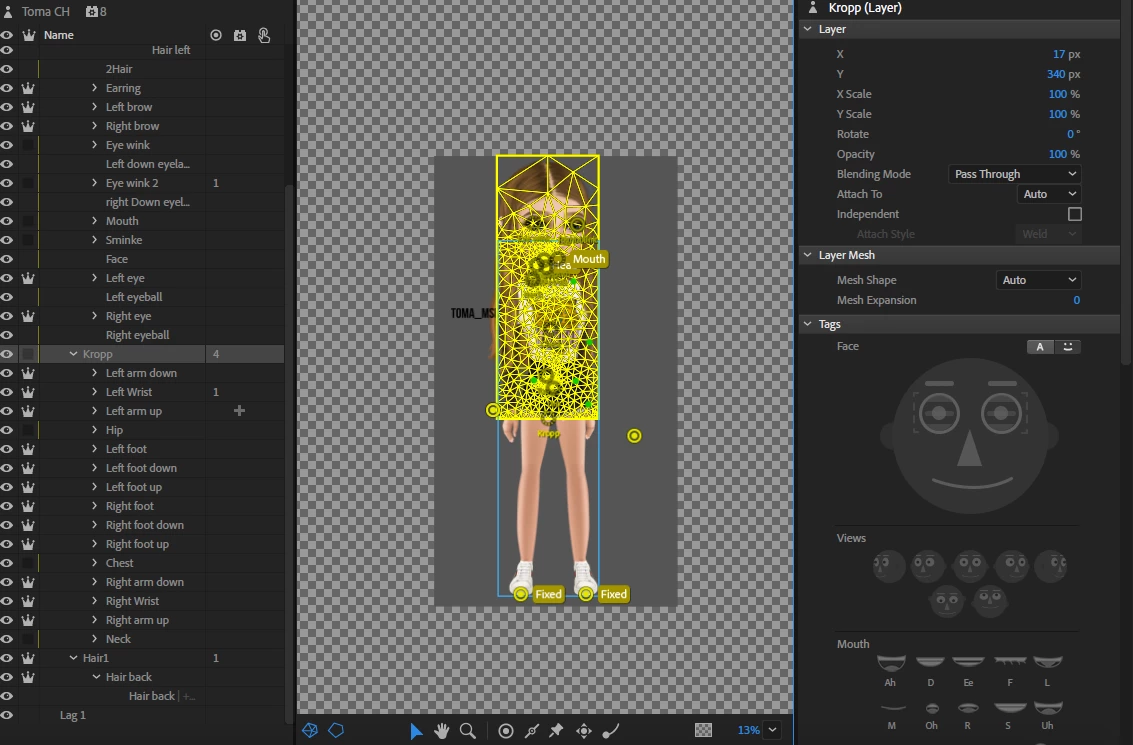
This is how my character animator file looks like:

If you don't understand my question please tell me, also thank you very much for helping me I really do appreciate it. I hope you all get a nice day.

- Emily

This topic has been closed for replies.

14 replies

alank99101739
Legend
March 16, 2019

Oh, the choice of whether to make the feet and legs independent or dependent with sticks is one I suggest you experiment with. The joints will look different. I see no reason for hips to be separate to the chest personally, but it will look different and if you like the look, go with it. That is where the creative side comes in. Just remember they will need a bit of overlap, and nest so things can attach to parents. E.g. legs will attach to hips, so should be nested under the hips mesh if the hips are independent.

E.g. Making the feet independent will make the joint look different. If you like that look, sure, keep them independent. I generally dont, but that is the look I was after.

Question - do you think you are going to want to use the Walk Behavior? If so, you may want to insert a “Front Profile” (or was it Frontal) layer above Everything ready for later. There is Left Profile, Right Profile, and Frontal in the tags - use those layer names. Inserting this layer will need you to redo all the sticks, handles, etc. So inserting the extra layer at the top of the puppet early avoids  rework later.

Emily LKJ
Emily LKJAuthor
Known Participant
March 17, 2019

Question - do you think you are going to want to use the Walk Behavior? If so, you may want to insert a “Front Profile” (or was it Frontal) layer above Everything ready for later. There is Left Profile, Right Profile, and Frontal in the tags - use those layer names. Inserting this layer will need you to redo all the sticks, handles, etc. So inserting the extra layer at the top of the puppet early avoids  rework later.

Well, I thought I would, but that would be for front view walking, walking towards me. But I think I need to get the body fixed first!

Emily LKJ
Emily LKJAuthor
Known Participant
March 17, 2019

Also I use sticks to stop the layer from moving where the stick is, so for instant with the rear hair, to make the hair not move out of the head. Also I noticed adding stick to the back hair made it fly too. So we have rear hair 1 (front left) and rear hair (back hair)

alank99101739
Legend
March 16, 2019

Feel free to do multiple shorter posts! ;-) I am going to respond top to bottom.

The “attach to” is controlled by nesting depth. The order of what is visible on top of other things is controlled by the top-to-bottom view of layers in the tree. You just reorder the siblings. So you can do things like the Left Lower Arm Group before or after the Left Arm Upper Artwork to control layers. The order of siblings does not affect attach-to. So you can get the layers right generally. (There are exceptions where it does not work!)

The arm shots look good, except the upper arm does not have the Green attach to the shoulder right.

Ah, I was going to avoid the “generally” problem above, but you hit it already! It is rear dangling hair. There are threads on this in the forum, its a common problem. Long story short, the only way I know to get long dangly hair going is to put Body, Neck, and Head in the same mesh. None of these three can be independent. The problem with the depth order is it only works with siblings. So if the head is in front of body and independent, you cannot have some hair in front of the body and some hair behind while both being under Head to attach to the head.

So what you have to do is have Head and Body in the same mesh. I normally put the Neck as part of the Body. Head is above Body (siblings) which puts the head artwork in front of the Neck. That leaves the rest dangling hair. It would be logic to put it in the Head group, but it would then be in front of the Body. So instead, you crdate a third group so you have Head, Body, and RearHair as siblings, in that order, none of them independent. You then put the hair behind the body into that new group so its ordered behind the body. The strands of hair you make independent. Because Head is not independent, it is part of the parent mesh, and you can attach to it.

There were long discussions on this topic. Hopefully that made sense. As soon as you want the head and body independent, things get MUCH more complex.

Have you used sticks yet? With the above sticks become important. Independence can control what affects other things and gives a certain look to the puppet. But you will not be able to use it for Head/Body/Rear hair. So I normally put a stick across the shoulders from left to right to stop the shoulder area from warping as much - the neck bends instead. Get the rear hair in the separate group as well. When you click on the Body or Head layer, the mesh outline should show a line around the body, the thin neck, and the head. Thin necks work much better here Because you want the neck to flex. I also usually put sticks along the jaw line of the head near the neck to stop the face from distorting. So you have lots of sticks above and below the neck, but none on the neck. That tells CH to make the neck bend when needed.

I would get the above hair structure sorted first

Oh, you would put dangles on the bottom of the rear hair group as well. Make sure you put the dangles on the right layers! I tend to pick the layer that is the root of the mesh and put all sticks and handles in that layer so I can find them. you should see the yellow outline of the layer - all sticks, dangles, draggers etc should be inside the yellow line. If not, something is wrong.

But looks like you are making good progress! Once you have this sorted you will be an expert (intermediate at least). You use these same principles over and over again. Its the extra behaviors (like collide) that make things harder beyond where you are.

Emily LKJ
Emily LKJAuthor
Known Participant
March 17, 2019

Hello and good day!

Layers in front and behind

"The “attach to” is controlled by nesting depth. The order of what is visible on top of other things is controlled by the top-to-bottom view of layers in the tree. You just reorder the siblings. So you can do things like the Left Lower Arm Group before or after the Left Arm Upper Artwork to control layers. The order of siblings does not affect attach-to. So you can get the layers right generally. (There are exceptions where it does not work!)"

- Question, does the mean I have to move the layers, or is it something I do in Ch, for if so how can I do it? Because I really want the down arm to be over the upper arm, because thats what am used to, and I feel like I can do more when its like that. My layer structure in Photoshop is build up like that, and I usually have the feets over the legg too.

So very strange but all my structure had moved, but I fixed it, and all the attached to had changed from auto to "layer name" But fixed it.

Hair problem:

So what you have to do is have Head and Body in the same mesh. I normally put the Neck as part of the Body. Head is above Body (siblings) which puts the head artwork in front of the Neck. That leaves the rest dangling hair. It would be logic to put it in the Head group, but it would then be in front of the Body. So instead, you crdate a third group so you have Head, Body, and RearHair as siblings, in that order, none of them independent. You then put the hair behind the body into that new group so its ordered behind the body. The strands of hair you make independent. Because Head is not independent, it is part of the parent mesh, and you can attach to it.

- So I take body into my head group like this?

- Head group

- - Neck

- - Body

- - Hair group

- - - hair back

So this is how I did the layers

I honestly don't know what am doing, the body is following the head again hahah. So its like a doll with a body just hanging on it.

So I got the back hair to both work with the animation added to it, but also following the head, but if I add a stick to the left hair it will still fly up.

this is how the outline look around the body.

Question sum up:

- Question, does the mean I have to move the layers, or is it something I do in Ch, for if so how would you do it?

- Did I get the group layers to the body (to fix the hair right) because the hair back works, but the hair in front, hair rear still fly up.

alank99101739
Legend
March 15, 2019

A few things here. I would focus on getting the meshes correct first, then move on to dangles etc. You may have to redo them otherwise..

The arms. Every time you want something to move independently, and want it to attach to something more central, you nest deeper. The toros (chest) is usually the starting point, the center. The belly button is what I normally use. So the next level of nesting should be the upper arm because you want to attach that to the body at the shoulder. Under that should be the lower arm because it wants to attach to the upper arm. Under that is the hand because you want the hand to attach to the lower arm at the wrist. So I think you have the nesting back to front in terms of nesting. Hand should be deeply nested, not hear the top. Just think of each nesting as “this has to attach to its parent and be controlled by the parent” - you can only attach to the immediate Parent, not something 5 levels above. So the nesting matters.

The leading “+” sign on a layer name automatically turns on the crown (independence) icon for you. If the crown icon is on, a new independent mesh is started.

As a newcomer, always set “Attach To” as ”auto”. (Worry about advanced use cases later). The problem is your nesting hierarchy is back to front.

First get the hierarchy right, then move on to the mesh for the arms.

The hand outline is good - see how it hugs the hand outline? The lower arm mesh is not good - see how its a big yellow rectangle? That needs fixing. (But get the herarchy right first - that might be the problem.) A mesh will merge all the bits of artwork in different layers that are a part of the mesh. If there is a gap between bits of artwork, it gives up. This could be just a few pixels which is really annoying. You can set “Mesh” to “Contour” to try and force it - makes a best guess effort. I do resort to this sometimes, but prefer to clean up the artwork if possible. (Sometimes its too hard.) (In your case, the wrong nesting of layers could be confusing it.)

Rectangles is bad, but each independent mesh will get its own rectangle. Well, actually, you are trying to get the yellow line to be the contour of the artwork in the layer. There is a button to turn on a blue bounding box rectangle as well - that is always a rectangle. But yellow rectangles are generally bad. But get the nesting hierarchy right first, then work you way from the main body to the upper arm segment, to the lower arm segment, then hand. If the body is a rectangle, fix that first. Everything else attaches to that.

The other thing to be aware of is if CH does not see a way to move something, it won’t bother putting triangles over it. You might find that when you add a dragger or dangle, a mesh suddenly appears. This is because CH knows it has to do things to the layer now. The triangles are how it warps things.

(Personally, I normally put the upper and lower arms in the same mesh, then put a stick along the uppeR and lower arm segments so they cannot bend. I sometimes do the same for the hands. The result looks different - it is not right and wrong, more you get different results. You can start with them all in the same mesh then add indepdence later, just to compare.)

I avoid calling layer names “origin” and “dangle”, especially at the moment. It puts dangles etc in automatically. I find that a problem at times - I prefer to add those ones manually. As you learn more you can change your mind later, but for the moment never use the word “origin” or “dangle” in a layer name to avoid problems.

You sometimes need to be careful not having too many independent meshes. Each one has to be attached to its parent. Each one has children attached to it. You do need a lot of them, but if you make everything independent you cannot connect the parts together.

If the head is independent to the body (attached, but an independent layer), then moving the head will not move the body. That is what independence does. So you may want the body, neck and head to be all in the same mesh. Just the areas of the hair you want to dangle make independent. A good place to start is to have nothing independent, then make particular parts independent when you find a need. E.g. the arm if drawn out sideways you might not need independent at all. You can put sticks on the body to stop it warping near the shoulders. But independent arms are common as the shoulder can look funny otherwise.

Legs I personally rarely do independent. I notice you have feet etc independent. I would include them all in the torso mesh and only make independent if you need to. Read up on sticks. Basically draw sticks where bones are (e.g. upper leg segment, lower leg segment). Then put a pin on the feet To keep the feet from moving and the body will obey. That is easiest to start with.

All those handles (circles) on the “Hair Back” layer look funny. If you click on one it should turn white (selected) then you can hit the “DEL” key to delete it.

I just noticed the Body layer has independence on. You almost certainly don’t want that. You need something in the upper mesh for other meshes (like the head) to attach to. So make Body dependent on “Toma” (the root of the puppet). Then you can attach the Head to its parent mesh. At the moment, I think the parent mesh to the head is empty, so there is nothing for it to attach to, causing problems.

Note: Head does not need to nest inside Body. Head nests inside Toma. If Body is not independent, the layers become a part of the Toma Mesh. So Head is still a child of the Toma mesh.

The circle with the dotted line is the “origin marker”. Head’s origin marker, if the head is left independent, has to be over the parent layer. You should see the parent content being green, showing what to attach to. Yours is probably empty because you used +Body instead of Body.

The origin marker should be green, indicating good attachment to a parent. The hair for example is not showing this. You wont get any movement if its not attached. Since you have +Hair, you might find +Hair Left is better to put directly under +Head - it makes sense to attach the hair to the head, not to other hair. Again, I think you have too many independent layers here, so the meshes don’t have enough to connect up to.  It may be as simple as turning off independence for “Toma Hair” so that layer joins the “Head” mesh.

Hair Right is strange. I expectedthe yellow line to just be around the right strand of hair. The bounding box is much larger. Try getting the independence stuff right, but I would then check the artwork in that layer tree - you want to get the yellow contour line to be just around that strand of hair, with the origin marker inside the top of the strand of hair on the point of the head where the hair is meant to attach to. The dangle handle should be placed inside the yellow mesh near the bottom of the strand of hair.

One last thing (I have not answered everything, but get the above right first!), the rear hair not moving with the head shows the hair is not attached to the head correctly. That could be too many independence layers again. You might start with the arms first. Get them working. Once you understand the concepts, then move on to the hair. I find the arms a bit easier to understand.

Emily LKJ
Emily LKJAuthor
Known Participant
March 16, 2019

Hello and good morning! Its 12:11 now and I will keep updating this post until am done for today.

So first thing off I will change my layers to the correct way, the only problem is that I want the down arm to be over the top arm, and the hand to be over the down hand, because it looks more front viewed and I've always build my photoshop files like that. But I will change it, and we can rather come back to this if its possible to do anything about.

Actually I edited a littlebit and I think it worked out good, you can see that the upper arm is over the forarm down, but it didn't look that bad I just hadd to edit a little bit. Pictures:

1. Before 2. After Layers:

I followed your layer builder:

-  Body

- -  +Left Upper Arm Group

- - -  Left Upper Arm artwork

- - -  +Left Forearm Group

- - - -  Left Forearm Artwork

- - - -  +Left hand

I will do the same to the rest of the body:

Next step Is to get the mesh right

I just did the mesh again, and to be honest I think I got it right, both the arms and the foots have a yellow line around the layer and not a big square.

I also took every layer on Auto.

Its the same with the foot, I can add pictures, but I will show it later in a video.

The cook is 12:40 and I have already gotten a lot done

Also I did the layers I want to be moved independent. I want the whole legg / feet to have the ability to move, because I know I will make different types of standing positions if not sitting (whole body edits), I probably don't need the feets to me moved so much (not yet) so I made them not independent.

Also I don't need the chest and the hip to have any movement (not for now), but I would like to have movement in the neck because if you move the head you also move the neck a littlest. But I want the neck to both be attacked to the body but also the head, and am not sure how I should do that with the layers.

So this is what I did in the end with the body layers. They are all not independent

The clock is 14:01

So I don't know what to do about the body. Its just standing there and am not sure what do to. So I tried placing both Body and the hair in the head group, just to see if that would work. Conclusion, the body was stiff and just hanged to the head, but I expected that. But the back hair didn't have any movement even tho it was connected to the hair, I don't understand why.

So I went back to having the same layer structure

I can't seem to find out why the body won't move. But I will try to find out of it.

Alsoi went back to the hair, because the hair seems to move correct. The only problem is that if I add a stick to the left hair, anywhere on the workplace, the hair will fly up like this.

This is where I would have had the stick -> So the hair would move past that stick. This is the settings, I have the same on the right hair which it works on:

Its 14:32 and I will try to fix the back hair. But there is one thing I don't understand. The back hair is going to be under body. So it would be easy by just having

- Toma group

- - Head group

- - - Body Group

- - - Hair group

And I tried this but it didn't seem to work. So I went back to what I had since the body was attacked to the head and that seemed to make the body move with the head and made a mess.

But the hair tho, anywhere I have it, nothing seems to work. So with my last try I will add it to the head, over the body like this:

- Toma group

- - Head group

- - - Hair group

- - - Body Group

I will worry about the body being under the hair later.

So the hair moves, but it won't add physic to the hair (movement, <!). So. I will film my screen and add a video with all my problems.

Video:

Questions:

1. What should I do with the body-layers?

2. What can I do with the left hair, flying when I add a stick?

3. What can I do about the hair being in head, but should be behind body?

4. Why won't the back hair have physics?

5. Why don't I have shouders?

I watched your videos, the ones I thinked would help me, but the problem is that I don't know how to do it all, since the body is just standing there, and I think I need to fix the issues with for instant the body and the layers before I can go to the next level B) But you videos was really good, and I really appreciate that you made so many!

alank99101739
Legend
March 14, 2019

Hi! Nice artwork! One of the things about Character Animator is the hierarchy of the layers is important. You need to nest things a lot more than what you would do for a normal Photoshop file, because CH gets meaning from the tree structure of layers.

One concept you need to understand early on is the difference between a layer and a mesh. This relates to “independence”. Think of a mesh like a sheet of transparent rubber that you stick layers on to. The yellow outline of the mesh is like cutting it out. It starts as a rectangle, but you really want it to follow the contour of your artwork to make arms etc bend better. I notice that your screenshots for example have a yellow rectangle. They will not warp well. But I will come back to that.

If you want different pieces of artwork to move independently, you need to create a new mesh. You do this by turning on the independence flag (the crown icon) for a layer. If you start a layer name with a plus symbol, it gets turned on automatically for you (which is convenient).

An indepdently mesh must be attacked to a parent mesh, based on the hierarchy of the puppet. So you can certainly have separate forearms, upper arms, etc. - but it won’t work having them all flat and next to each other. You will need to create a lot more grouping of layers to get this to work. You will need something more like:

-  Body

- -  +Left Upper Arm Group

- - -  Left Upper Arm artwork

- - -  +Left Forearm Group

- - - -  Left Forearm Artwork

- - - -  +Left hand

The ”+Left Hand” is independent, and then attaches to the parent mesh which holds “+Left Forearm Group” and “Left Forearm Artwork”. You then have to attach this left Forearm to the parent “+Left Upper Arm Group” and “Left Upper Arm Artwork” layers (which share another mesh). If you click on a layer in a mesh, you should see the yellow outline line for things in that mesh.

If a mesh as bits of artwork that do not overlap, CH gives up and gives you A rectangle. This is bad - warping of the mesh will be ugly. You need to get this hierarchy right where each mesh yellow outline works out the outline of the artwork in that mesh (group of layers).

To repeat, each time you turn on indenpednence (the crown icon, autoenabled by starting a layer name with a “+” symbol) a new mesh is created.

Back to the hair, independence matters here as well. If your hair is in the same mesh as everything else, it cannot move independently. So you need the hair to be independnet To the head (the parts you want to move anyway). The green circle you have is the anchor point of a child layer attaching to its parent. You would use that for the wrist, elbow, shoulder locations for the different arm parts attaching to the parent part. You need to do the same thing for the hair. The dangling hair needs to be attached to the head, but independent so it can move. Sticks can be used to stop the hair explosing bald patches on the head.

Okay, so I looked at the video closer. You may have the hair being independent already. It is off the top of the screen in your puppet hierarchy. When you click on the hair layer, you should see a yellow line hug the outline of your hair. If you see a rectangle, the mesh distortion will look unnatural at times. Normally you attach the top of the hair by putting the origin marker circle *inside* the yellow mesh outline for the hair and overlapping with the parent layer (the head for hair). That is the connection point between them. Using “Weld” is like putting a bit of glue to stick the two sheets of rubber together. (Hinge is likeputting a pin throug the two layers so they swivel). What you then do is, inside the yelllow outline of the hair, is putt a “Dangle” handle on the tips of the hair. You then make sure the gravity set (in the Physics behavior from memory) is set strong enough. Try fiddling the stretchy ness as well. Tweak these until it looks good.

If you look at the hand screenshot you provided, you can see how the yellow outline hugs the hand Outline. But the hair is a big rectangle. What you might have done is put the left and right hair groups at the front in the one independence layer, but not connected. You might need to create a “+Left Hair Front” and a “+Right Hair Front” layer separately. Then attach them separately to the head (must be a child of the mesh containing the head) and add a Dangle marker on the tips of the hair (not near the origin point).

Sorry, a bit waffly. Hopefully some of that makes sense. Its later hear - I am off to bed!

Emily LKJ
Emily LKJAuthor
Known Participant
March 14, 2019

Thank you so much for using your time to help me, I really do appreciate it!! Im really greatfull and I have no words, you used so much time to help me and it means a lot. I should probably have stated that I started using Character animator yesterday.

So I tried following what you said. So first off I added groups and changed around my layers in the correct order of how I wanted it (I think I understand the group/layer structure (+ left hand over the left arm)

-  Body

- -  +Left arm down (group)

- - -  + Left hand (I wanted this layer to go over the left arm down)

- - - Left arm down artwork

- - - - +Left arm upper (group)

- - - - - Left arm up artwork

almost like yours (under), just how I wanted the layers to be and where

-  Body

- -  +Left Upper Arm Group

- - -  Left Upper Arm artwork

- - -  +Left Forearm Group

- - - -  Left Forearm Artwork

- - - -  +Left hand

Question, by doing this (the grouping of layers "+") does that make the layers have mesh. I did understand your way of explaining it, but am not sure if I did it right, I think I did, but I just want to be 100% sure.

Then I went into CH and checked and checked where they dots where placed and moved them to where I wanted the movement to be.

Should I change auto to "left arm down"? ^

Should I change auto to body? ^

Should I change auto left arm down to auto?

And this is the yellow lines

Also I tried checking the boxes, it seams like the whole arm has a square for each layer, but its a / in every box, is that a good or bad thing?

Also I checked the background at it has a lot of triangles. When I tried adding movement to the hair it said that I should add a "origin" and a "dangle" with the pen and I did. But i can't seem to remove this how much I try, but am not sure if I should remove them at all, so I will let you decide because am really new to this program.

"Øyevipper" is the eyelashes and "sminke" is the makeup .

So for the next thing, hair.

This is how the layers are in the hair, and also the origin and dangle.

SO this is how the layers in CH are looking now after I tried doing what you said

Also I noticed that making every layer independent would make all the triangles disappear.

I also noticed that the things I hadn't given any "animation" or told to do anything will be frozen/standing still. As for all the things in head its moving and I think its because I marked the group head as "face"

Back to the hair

If I move the hair left circle to inside the square it will get all triangled.

So I did a redo with all the layers to match what you did. This is how it looks like now

So next thing up, I will assume what I did earlier (making the structure between the layers in the group) was right, so I will continue with that

Also again thank you for trying to help me, this means a lot and I really appreciated it. I learned a lot!

Also I did that layer thing and connected it as with the first, but the head is the only thing showing movement, and the rest of the body is frozen but I think linked. I will show you

So I don't know what to do now, I will try to google a little bit and see if I can find out how to fix the body and how I can do the movement since I still want the body to move but I don't know how.

Also I don't know why the hair isn't moving, I added the origin and the dangle, so thats strange, but I could have done it wrong

Update!

So. ive been playing around and googling all day to fix the hair and the body and why nothing moves like it should. So I started with the hair. I removed my origin and handle layer in photoshop in all hair layers, and did it manually in CH

like this

And this is the settings I have on both the 3 moveable layers

This is how it looks in Photoshop

This is the yellow lines

And this is a video of the movement

So the issue is that the hair doesn't seem to hang straight down if you turn your head as with gravity (I had it both on 0 and 20 and 100, nothing changed). So am wondering what could be the issue here.

Also the body is still not moving and this is how the layers look