Inspiring
June 15, 2018
Answered

Cross-Reference to a Figure

  • June 15, 2018
  • 2 replies
  • 6219 views

I looked at the content at Insert and manage cross-references in InDesign, but am having difficulty with the workflow. I can find Window | Type and Tables | Cross References, without any trouble. Next, I need to link an existing figure number with a reference in the document text, and am not finding the workflow for doing that.

Any assistance appreciated, as always,

jwc

    This topic has been closed for replies.
    Correct answer Barb Binder

    OK, my document again finally(!) has sequentially numbered figure captions. Now I would like to create cross-references to three of them, and to store this technique away for future use.

    I easily followed all of your well-illustrated steps. My figure caption reads, "Figure 41. Hydrogen Atom." I would like the cross reference to read, "(Figure 1)", or "(see Figure 1)", but I cannot reduce the 'complete paragraph' to that degree. I'm getting an 'all or nothing' situation.

    Best,

    jwc


    HI Jack:

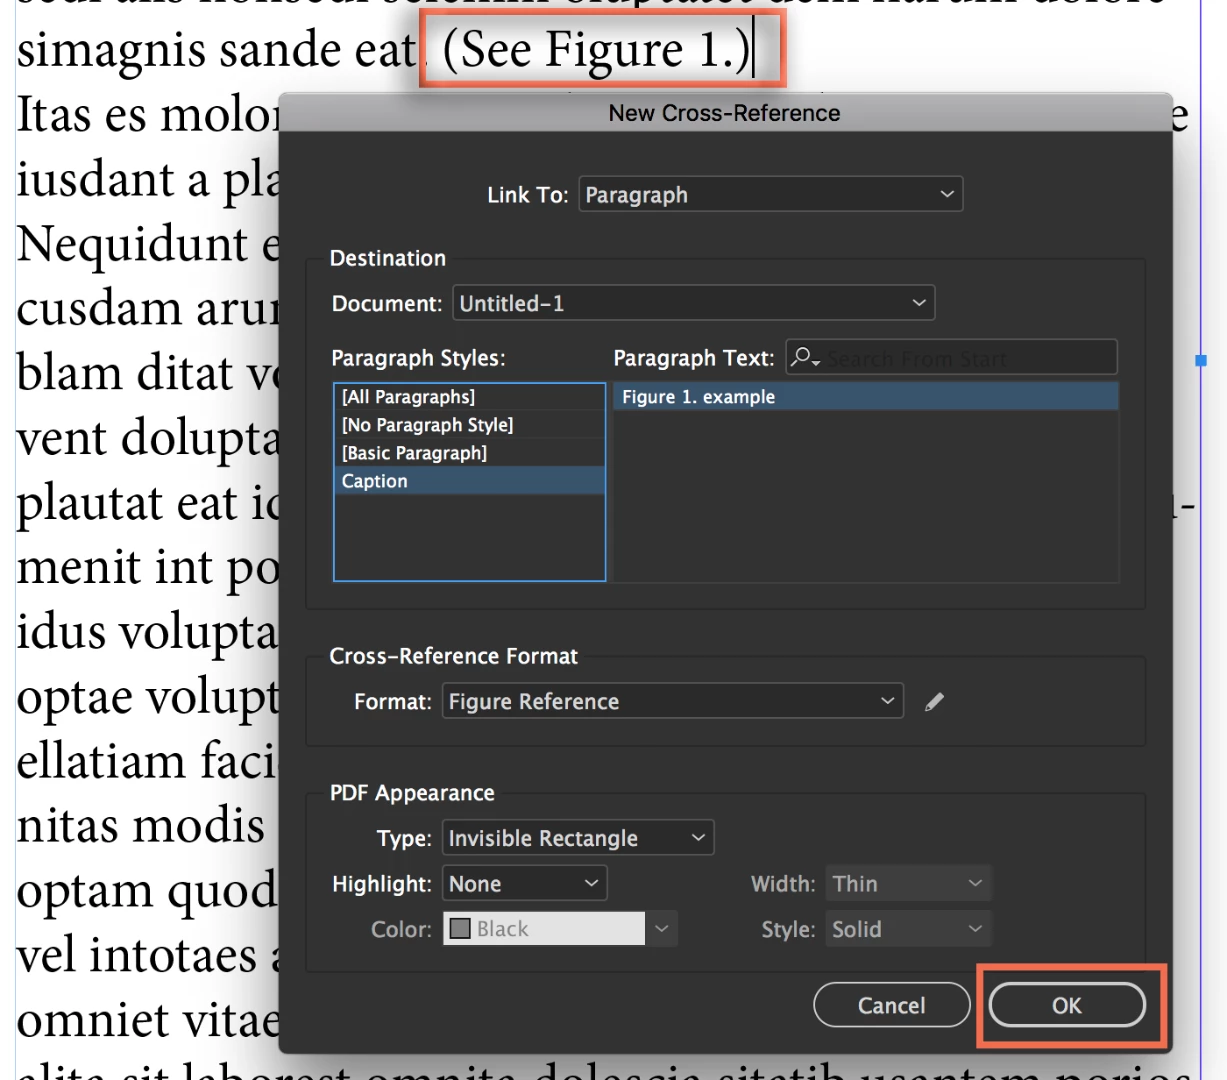
    When you add an x-ref, you can see the current wording on the page. If you don't like it, click the pencil button next to the current Cross-Reference Format list.

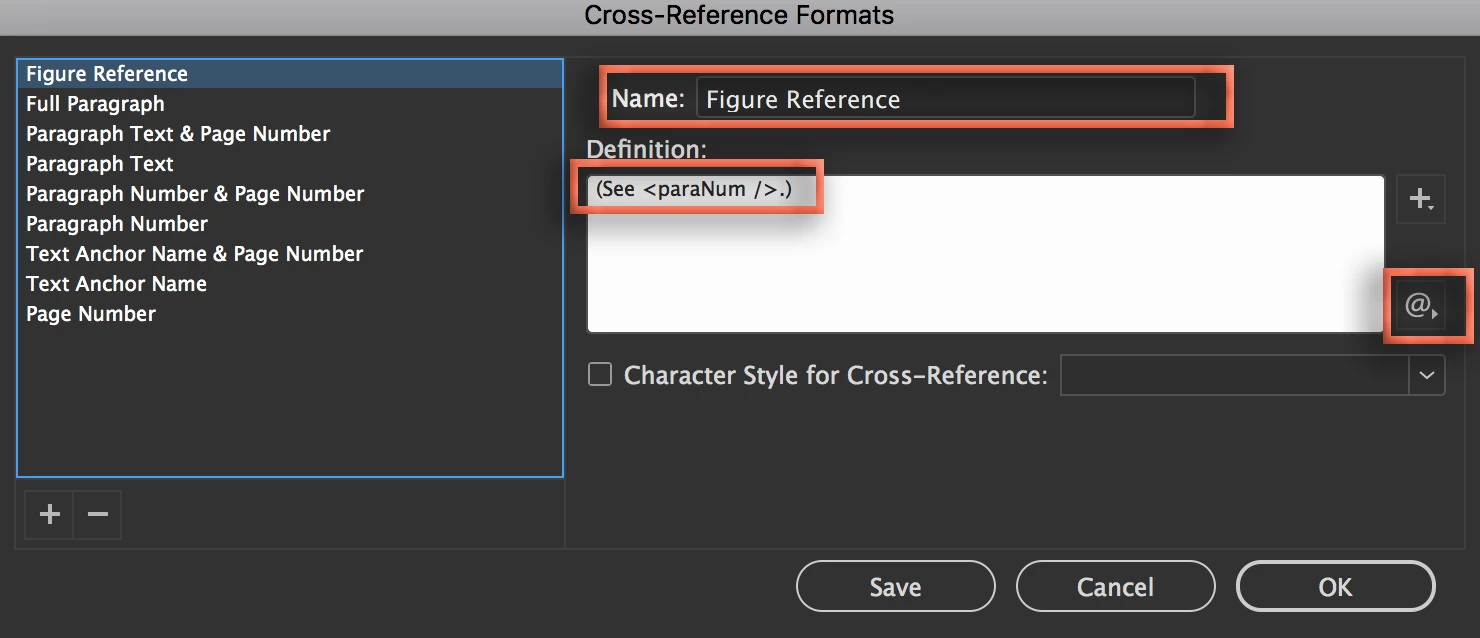
    Pick any existing x-ref, delete the definition and add your own. You will see the building blocks by clicking the @ menu. I used (See <paraNum/>.) so that InDesign will reference the auto-number.

    When it looks the way you want, click on OK.

    All that you need to know about working with cross-references is in this file: Insert and manage cross-references in InDesign​. Be sure to work through it as you get up to speed on using x-refs effectively.

    ~Barb

    2 replies

    Barb Binder
    Community Expert
    Community Expert
    June 18, 2018

    Hi Jack:

    I need to link an existing figure number with a reference in the document text

    Here are the steps to cross-reference your figure captions:

    1. Make sure you have assigned a paragraph style with auto-numbering to your caption text.
    2. Click an insertion point in the text, where you want the X-ref to appear. Open the Cross-Reference panel, and click the Create a New Cross-Reference icon at the bottom of the panel.
    3. Start by setting Link To to Paragraph, select your caption style in the left column, and then pick the paragraph you want to reference in the right column. Now on to refining the wording of the x-ref: choose the desired Cross-Reference Format from the list at the bottom. You can see the x-ref on the page—if the wording isn't to your liking, try out the other defaults in the Cross-Reference Format list. If you don't like any of them, click the Pencil button to edit the one that is closest to what you want.
    4. You can edit an x-ref to look exactly the way you want.
    5. When you are done, click OK to see the x-ref.

    Once you get the first one working, repeat the steps for the other x-refs.

    ~Barb

    ~Barb at Rocky Mountain Training
    JackAuthor
    Inspiring
    June 15, 2018

    I have just managed to create my first _destination_ for cross-reference. However, I still lack the means to insert a _reference in my text_, to that destination.

    Bevi Chagnon - PubCom.com
    Legend
    June 18, 2018

    It depends upon how you placed and anchored the graphic in the layout, or if it's anchored at all!

    Background:

    In order to create a hyperlinked cross-reference or a conventional hyperlink, you must first have a destination. InDesign has only 3 choices for a destination:

    • A Page (not a particular point on the page, but just the top of the page)
    • A URL
    • A Destination Anchor that is in text.

    To hyperlink to your graphic:

    1. Anchor the graphic somewhere in the text (either inline or custom).
    2. Insert a new Destination Anchor in the text, just in front of the graphic's anchor marker (which looks like a blue Japanese Yen symbol)
    3. Then create the hyperlink/cross-reference to the Destination Anchor.

    For more information about anchoring objects in InDesign, see Work with anchored objects in InDesign

    For more information about inserting Destination Anchors, see  Insert and manage cross-references in InDesign  and Learn how to create, manage, and edit hyperlinks in InDesign  (scroll down to the section Create a hyperlink destination)

    |&nbsp;&nbsp;&nbsp;&nbsp;Bevi Chagnon &nbsp;&nbsp;|&nbsp;&nbsp;Designer, Trainer, &amp; Technologist for Accessible Documents ||&nbsp;&nbsp;&nbsp;&nbsp;PubCom |&nbsp;&nbsp;&nbsp;&nbsp;Classes &amp; Books for Accessible InDesign, PDFs &amp; MS Office |
    Community Expert
    June 18, 2018

    https://forums.adobe.com/people/Bevi+Chagnon+%7C+PubCom  wrote

    To hyperlink to your graphic:
    1. Anchor the graphic somewhere in the text (either inline or custom).
    2. Insert a new Destination Anchor in the text, just in front of the graphic's anchor marker (which looks like a blue Japanese Yen symbol)
    3. Then create the hyperlink/cross-reference to the Destination Anchor.

    As addition to what Bevi said:
    You can also select the character that constitutes the graphic frame in the text frame and add a hyperlink destination.

    From my German InDesign. "New Hyperlink Destination" > Text Anchor ( is selected special character in the text frame ).

    That is leading to a hyperlink that has the area* of the graphic frame that holds your image.

    That is also working for anchored groups.

    *The shape of the "hot spot" of that hyperlink is always a rectangle in this case.

    Even if you are anchoring a different shape like a circle or an arbitrary shape like I did in my screenshot above.

    Regards,
    Uwe