Inspiring
January 22, 2012
Answered

Drawing a triangle shape thru a script, reading a selection bounds and mouse pointer?

  • January 22, 2012
  • 2 replies
  • 7109 views

Hello...

This is a bit trickier I assume...

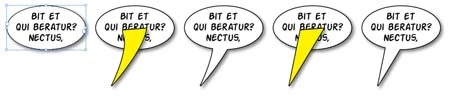
I am looking for a way to automate some of the work I do for a manga magazine - comics or whatever they are called... So I have a dialog in an oval shape already formated with an object style to look like the oval in the left part of my image. I would like the script to read the mouse pointer‘s position - I would run the script having selected the oval and with the mouse hovering the place where the oval should point... (So in the image you can imagine my mouse pointer somewhere in the lower left part of the image, where in the second part of the image is the corner of the triangle) I imagined this operation in at least two steps, the triangle (arrow) of the oval is a separate object (I would join the two shapes later). The triangle can be with streight lines or maybe a little bent, for a more desirable look. I have no ideea where to start, at the moment I am creating the ovals and duplicate the triangle from an old one, and position it (+rotate) until I am happy, after that I would join them. I Hope the picture can explain better what I am looking for.

I know this is a difficult job - I would think that it can be helpful for others, as well as it would be a good challange for the very smart scripters of this forum...

Thank you..

This topic has been closed for replies.
Correct answer Marc Autret

Maybe you could use a simple line to indicate the direction and the place you need to point to.

I made Speeech.js to illustrate that approach:

http://www.indiscripts.com/post/2012/01/speeech

@+

Marc

2 replies

Marc Autret
Marc AutretCorrect answer
Legend
January 27, 2012

Maybe you could use a simple line to indicate the direction and the place you need to point to.

I made Speeech.js to illustrate that approach:

http://www.indiscripts.com/post/2012/01/speeech

@+

Marc

John Hawkinson
Inspiring
January 27, 2012

Yup, that's what I meant!

Jongware
Community Expert
Community Expert
January 23, 2012

Nice little challenge!

No, a script cannot "see" where the mouse pointer is -- but it's possible to work around that. Below is a Javascript (so save as "WhoSaidThat.jsx" in your User Script folder) that works on your selection. If you draw an oval -- or just about anything else --, select it and then run this script, it will add a default "who said that" triangle at the bottom.

It does so by temporarily adding a path to the selection, releasing the compound path, and then using the Pathfinder to make it whole again.

Warning: it does not work correctly with text frames! For some reason, the pathfinder fails on this. If you are using the same ovals to type your text in, I'll try and see if there is a way around that.

Here is the script:

// Make sure there is something appropriate selected

if (app.documents.length && app.selection.length == 1 && app.selection[0].hasOwnProperty("paths"))

{

  app.doScript(whoSaidThat, ScriptLanguage.JAVASCRIPT, app.selection[0], UndoModes.ENTIRE_SCRIPT, "Who Said That!?");

} else

{

  alert ("No valid selection.\nPlease select one single object with the black arrow before running this script.");

}

function whoSaidThat (baseObject)

{

//  Set units temporarily to points

  hmmu = app.activeDocument.viewPreferences.horizontalMeasurementUnits;

  vmmu = app.activeDocument.viewPreferences.verticalMeasurementUnits;

  app.activeDocument.viewPreferences.horizontalMeasurementUnits = MeasurementUnits.POINTS;

  app.activeDocument.viewPreferences.verticalMeasurementUnits = MeasurementUnits.POINTS;

  // use "try" in case anything goes wrong

  try

  {

    // you got this selected

    oval = app.selection[0];

    // this is the center bottom position to attach the triangle to

    x = (oval.geometricBounds[1] + oval.geometricBounds[3])/2;

    y = oval.geometricBounds[2];

    // glue the new path to this one

    oval.paths.add({entirePath:[ [x-7, y-2], [[x-6,y+4], [x-10,y+14],[x-13,y+20]], [x-14,y+22], [[x+1,y+7],[x+4,y-2], [x+7,y-10]] ] });

    // break apart this new compound path

    objects = oval.releaseCompoundPath();

    // .. and make it into one solid object

    oval.addPath(objects);

  } catch (_)

  {

  }

  // reset your original units

  app.activeDocument.viewPreferences.horizontalMeasurementUnits = hmmu;

  app.activeDocument.viewPreferences.verticalMeasurementUnits = vmmu;

}

... and here is the proof it actually works:

cotcodacAuthor
Inspiring
January 23, 2012

We dont need proof from you, Jongware....

The thing is... I almost never need the arrow pointing down, from the same position of the oval. When you have a complicated background, I need to avoid covering something important and I would put the text somewhere convenient and stretch the arrow a bit, coming from left baybe, of top... That's why I mentioned the mouse pointer, it would have made a simple way to indicate where the aarow should point starting from the center of the selection.

The workaround whould be to have like 10 scripts each for a different position, and maybe I can figure out a solution to work with the selection even if I already made an arrow, if I dont like it I can run it again (or a different version, different position for the arrow).

Jongware
Community Expert
Community Expert
January 23, 2012

Ahh right. Well, scripting doesn't support freely moving the mouse around, but perhaps you can think of another way to indicate the starting position. Remember, InDesign also needs to "see" the oval to connect to. Just an idea: what if you move the (0,0) ruler point to the position where the caption arrow is to start, then select the oval, and then run a script? (At some point getting to the right initial setup will outweigh the convenience ...)

Anyway, below is a little helper script so you can copy the line parameters for your own custom connectors into my script. Draw a triangle connector as a single path and drag the (0,0) ruler point to where it should connect (make it slightly overlapping) to the oval.

Select just this new path and run the following script -- it will put the coordinates of the path in a friendly format on the clipboard. These values should be pasted into the line in the original script right after the line that contains "entirePath:", like this:

    oval.paths.add({entirePath: HERE COMES THE COPIED STRING });

It should start with a '[' and end with an ']'. Then save the adjusted script under a convenient name.

if (app.documents.length && app.selection.length == 1 && app.selection[0].hasOwnProperty("paths") && app.selection[0].paths.length == 1)
{
sel_path = app.selection[0].paths[0].entirePath;

hmmu = app.activeDocument.viewPreferences.horizontalMeasurementUnits;
vmmu = app.activeDocument.viewPreferences.verticalMeasurementUnits;
app.activeDocument.viewPreferences.horizontalMeasurementUnits = MeasurementUnits.POINTS;
app.activeDocument.viewPreferences.verticalMeasurementUnits = MeasurementUnits.POINTS;

result = [];

for (i=0; i<sel_path.length; i++)
{
  if (sel_path.length == 2)
  {
   sel_path[0] = "x+"+Math.round(sel_path[0]);
   sel_path[1] = "y+"+Math.round(sel_path[1]);
   sel_path = "[+"+sel_path.join(",")+"]";
  } else
  {
   for (j=0; j<sel_path.length; j++)
   {
    sel_path[0] = "x+"+Math.round(sel_path[0]);
    sel_path[1] = "y+"+Math.round(sel_path[1]);
    sel_path = "["+sel_path.join(",")+"]";
   }
   sel_path = "["+sel_path.join(",")+"]";
  }
 
  result.push (sel_path);
}
result = "[ "+result.join(", ")+" ]";

tempframe = app.activeDocument.textFrames.add({contents:result});
app.select (tempframe.parentStory.texts[0]);
app.copy();
tempframe.remove();

// reset your original units
app.activeDocument.viewPreferences.horizontalMeasurementUnits = hmmu;
app.activeDocument.viewPreferences.verticalMeasurementUnits = vmmu;

} else
alert ("Invalid selection or something like that. Please re-do");