PuraSoza
Participant
June 21, 2021
Answered

Seeking inDesign/Photoshop Help - Total Ink Coverage

  • June 21, 2021
  • 2 replies
  • 1656 views

Hello,


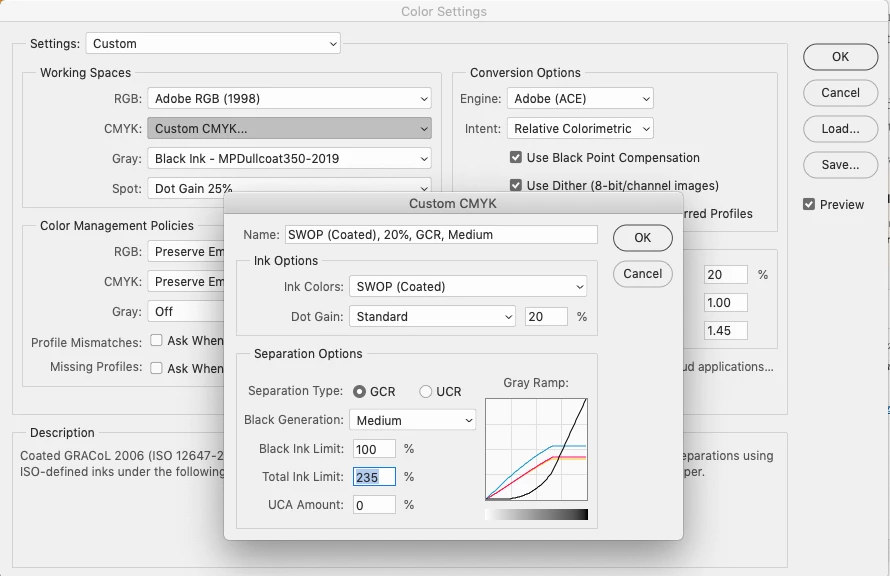
I am seeking help as I try to get the total ink coverage of a document below 240%. 


I have viewed the document using color separation in inDesign to determine where there it is over ink by 241%.


I have opened the art assets in Photoshop, and used Convert to Profile to create a custom CYMK profile that is set to 235% total ink. Then set mode to RGB and back to CYMK to apply the profile. All my art is either .psd, .tiff, or .jpg (I believe they all can embed color profiles).


Upon updating that art in inDesign, the art still appears over ink. I have inDesign set to preserve embedded color profiles.


I can't see to get the total ink changes in Photoshop to be reflected in inDesign. Any tips?


Thank you!

Correct answer rob day

I have opened the art assets in Photoshop, and used Convert to Profile to create a custom CYMK profile that is set to 235% total ink


Hi @PuraSoza, how exactly did you do that? Convert to Profile desn’t let you make custom profiles. Can you show a screen capture of the Convert to Profile settings you used to make the conversion?


Photshop’s Color Settings>Working Spaces>CMYK>Custom lets you create and save .icc profiles using the legacy CMYK setup dialog. That could solve your total ink problem, but it wouldn’t likely be an accurate color profile of the press—there is more to a profile than total ink limits.


2 replies

rob day
Community Expert
Community Expert
June 21, 2021

Is your InDesign document’s assigned profile Edit>Assign Profiles... also your custom profile? If you embed the profile with the image and it conflicts with the document’s CMYK profile, the output numbers you see in Separation Preview would be the conversion from the embedded profile to the document profile. If the document’s assigned profile is the default US Web Coated SWOP it allows 300%

Legend
June 21, 2021

Hello,


In your situation where you know that the steps for correcting TAC using GCR were followed exactly and it appears that the file was not corrected in Indesign. Below are some troubleshooting steps that will help you correct the file.


1. In the InDesign file, make sure the new “Fixed” image is linked.

2. Select the image in InDesign.

3. Right-click on the image, and select “Graphics” in the pop-up menu.

4. Then select “Image Color Settings”

In the “Image Color Settings” window, make sure that the Profile is set to “Use Document Default” or “U.S. Web Coated (SWOP)v2” or what ever your default document settings needs to be. If it is not, change it to be one of these profiles.


Regards,

Mike

PuraSoza
PuraSozaAuthor
Participant
June 21, 2021

Thank you for the response. I checked my artwork and all assets are set to "Use Document Default". In my Color Settings, my CYMK Working Space is using "U.S. Web Coated (SWOP) v2). My Color Management Policies for CYMK is set to Preserve Embeded Profiles.


I also checked the over ink in Acrobat after exporting using the Output Preview and it also shows over ink when set to 241%.

rob day
Community Expert
rob dayCommunity ExpertCorrect answer
Community Expert
June 21, 2021

I have opened the art assets in Photoshop, and used Convert to Profile to create a custom CYMK profile that is set to 235% total ink


Hi @PuraSoza, how exactly did you do that? Convert to Profile desn’t let you make custom profiles. Can you show a screen capture of the Convert to Profile settings you used to make the conversion?


Photshop’s Color Settings>Working Spaces>CMYK>Custom lets you create and save .icc profiles using the legacy CMYK setup dialog. That could solve your total ink problem, but it wouldn’t likely be an accurate color profile of the press—there is more to a profile than total ink limits.