September 29, 2019
Answered

Set various image resolutions

  • September 29, 2019
  • 3 replies
  • 6245 views

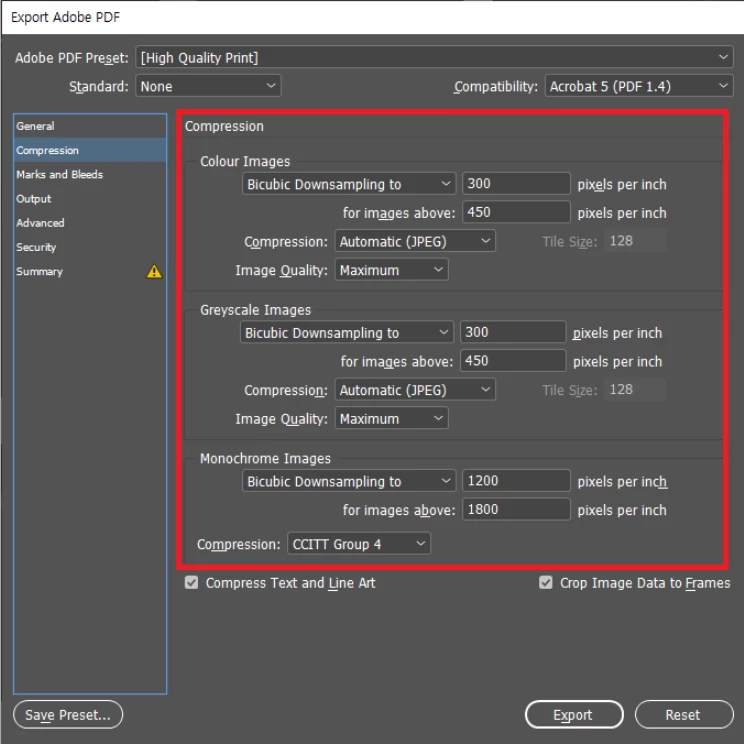
The functions in the picture are done Indesign. Or is it a photoshop?


What's the function in the picture below?


Please help me. ᅲ.ᅲ

This topic has been closed for replies.
Correct answer Randy Hagan

Actually, they're different settings for reducing the size of overly large images. And only one set applies to monochrome images.


Since InDesign allows users to "scale" pixel images, it can create innate problems in outputting files. That's because InDesign really can't scale files, per se. Resolutions are locked into the pixel images upon creation, and reducing the amount of space — in height and width terms — artificially increases the resolution. So reducing, say, a 400 pixel per inch image to 10% of its original space within InDesign creates an effective ppi of 4000 pixels per inch. That's enough to crash most any commercial imagesetter.


So InDesign allows users to reduce those resolutions when creating PDF output files to reproduce the files easily.


What resolutions should you set? That depends on the final use of the PDF file. The generally-accepted rule for adjusting color and grayscale images is two times linescreen, expressed as lpi, for your final use. So if you're producing newspaper ads to reproduce at 85 lpi, you'd want to reduce the color and grayscale resolutions to 170 ppi. If you're producing fancy corporate annual reports at 175 lpi, you'd want to reduce the resolution for grayscale and color images to 350 ppi.


As for the settings you requested for monochrome — Honest to God black output dots or not, with no shades of grey in-between — you'd want to set it to the maximum resolution of your final output device. So if you're outputting your film/plates to print that fancy report on a 2400 dpi image or platesetter, that's the setting you'd want to reduce monochrome images to 2400 ppi. Though as a practical matter, anything finer that 1000 to 1200 ppi is effectively invisible to the naked eye.


Hope this helps,


Randy

3 replies

Randy Hagan
Community Expert
Randy HaganCommunity ExpertCorrect answer
Community Expert
September 29, 2019

Actually, they're different settings for reducing the size of overly large images. And only one set applies to monochrome images.


Since InDesign allows users to "scale" pixel images, it can create innate problems in outputting files. That's because InDesign really can't scale files, per se. Resolutions are locked into the pixel images upon creation, and reducing the amount of space — in height and width terms — artificially increases the resolution. So reducing, say, a 400 pixel per inch image to 10% of its original space within InDesign creates an effective ppi of 4000 pixels per inch. That's enough to crash most any commercial imagesetter.


So InDesign allows users to reduce those resolutions when creating PDF output files to reproduce the files easily.


What resolutions should you set? That depends on the final use of the PDF file. The generally-accepted rule for adjusting color and grayscale images is two times linescreen, expressed as lpi, for your final use. So if you're producing newspaper ads to reproduce at 85 lpi, you'd want to reduce the color and grayscale resolutions to 170 ppi. If you're producing fancy corporate annual reports at 175 lpi, you'd want to reduce the resolution for grayscale and color images to 350 ppi.


As for the settings you requested for monochrome — Honest to God black output dots or not, with no shades of grey in-between — you'd want to set it to the maximum resolution of your final output device. So if you're outputting your film/plates to print that fancy report on a 2400 dpi image or platesetter, that's the setting you'd want to reduce monochrome images to 2400 ppi. Though as a practical matter, anything finer that 1000 to 1200 ppi is effectively invisible to the naked eye.


Hope this helps,


Randy

September 29, 2019
You were a huge help. Thank you!
Randy Hagan
Community Expert
Community Expert
September 29, 2019
Can I ask a favor of you and ask you to mark this question as answered, with whatever response helped you. That way the moderators can archive this question and help other users with similar problems.
Anna Lander
Inspiring
September 29, 2019

This window is from InDesign PDF Export module. It defines what to do with images that are bigger than is needed for the final product and depends on PDF type. Your screen shows the common setiings for polygraphy.

What's your problem? Are the settings in your text got from printing house?

What image types do you use in your project?

If there are the printing house's settings, check your images properties and, if needed, change resolution in Photoshop according to these requirements.

September 29, 2019
Actually, it's not a print shop, it's a test problem. It's hard to study alone. Thanks for your help.
Derek Cross
Community Expert
Community Expert
September 29, 2019

When you export an InDesign document to PDF you get the dialogue box you've illustrated.

You can create a PDF for print or an Interactive PDF.

For print I suggest you select – unless you've been given a differnt spec by your commercial printer – PDF/X-4 (you get this from the Adobe PDF Presets). Accept the defaults and select single pages (not spreads) and tick Crop Marks and tick Use Document Bleed Settings.

September 29, 2019
Thank you for letting me know! 🙂