Known Participant
September 16, 2017
Question

!!?? tables rounded rows & columns ??!!

  • September 16, 2017
  • 5 replies
  • 5016 views

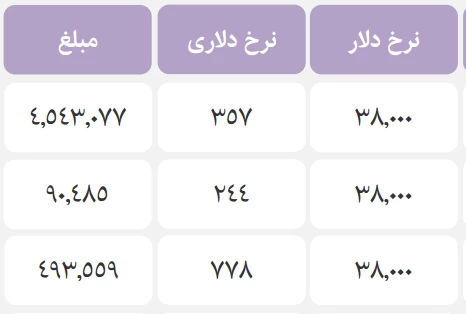
How can I make a table like this one ?

This topic has been closed for replies.

5 replies

Known Participant
September 25, 2017

Please send the script or template for this document

Obi-wan Kenobi
Legend
October 4, 2017

News! … 

True InDesign [no plugin] tables in the current text-flow [not inserted in a text frame, itself anchored in the flow] and rounded corners cells without anchored "corner" frame, transparency fill color [not text], no stroke [image background!]!

[of course, corner size modifiable!]

… just in 1 click! 

(^/)  [by script]

amaarora
Community Manager
Community Manager
October 11, 2017

Hi,

Uhmm check this out...[Not by script, and not as good as yours expecially not with transparency]

-Aman

Inspiring
September 18, 2017

Hello,

Another alternative solution is:

1) draw a simple text frame > fill it with a certain colour and round corners

2) Draw a bigger text frame and set the inset to a certain space

3) Important: set your text leading to Auto in the main text frame

4) Copy and paste that frame (from step 1) previously created as a anchored text frame.

3) The anchored frame is like a single characters; you can justify them abroad margins.

PS: It's very useful to make an object style of step 1, so you can adjust the roundness of the frame.

PS 2: Every single row and column has as to be a multiple of the header or the first row/column.

Good luck.

Patrick

Inspiring
September 17, 2017

A simple, and free, way is to just use a paragraph style for the text that has a thick, rounded cap rule style with the rule offset to sit behind the text.

Or you could achieve much the same thing with a character style that uses a thick, rounded cap underline style.

Both very easy!

Obi-wan Kenobi
Legend
September 17, 2017

Funny! I let you show us! … with screenshots and for free of course!

(^/)  

Inspiring
September 19, 2017

OK Obi-wan - here is my version.

First the VERY simple option. Use a paragraph rule or underline in your paragraph style - one click and you're done.

But, it doesn't give you the ability to have smaller radius rounded corners.

But, if you combine the two - paragraph rules and underline - then you can achieve the effect that the OP asked for, for free, and still just with one click of a paragraph style.

The trick to getting the underline to fill the column width is to add a flush space at either end of the text. Not ideal, but fairly easily added with GREP. There are still limitations as although it will expand to the width of the cell automatically, the height of the rules will not automatically expand the height of the cell, in my testing at least.

If the table cells are all a uniform height though then with a little work up front it will work perfectly, for free, and I got to have fun playing around with this.

Known Participant
September 16, 2017

Doesn't anyone have any other way?  

Obi-wan Kenobi
Legend
September 16, 2017

Yeap!

1 click to treat all the doc (or a story or a text frame or a text selection including table(s) or just a selected table)!

If a tables layout moves or just for a particular one, just launch the script again, it will treat again only the selection!

That's the good news!

The bad news: by script and not for free!

FI, I don't use Aman's method!

(^/) 

Known Participant
September 17, 2017

Do you have this script?

amaarora
Community Manager
Community Manager
September 16, 2017

Hi,

I know of only one way that is little time consuming and not at all efficient.

Am sure people here can suggest you simpler and better ways or maybe scripts to achieve the desired look.

So what i did was to write the text of the table cells in separate text frames. Rounded those text frames and then pasted them into the table cells. You can then adjust the row width and height for suitable spacing.

As you can see here each cell has a text frame inside it as an anchored frame. You will need to adjust the spacing between cells to achieve the desired look.

Or aother way to do this will be to first create a table and have a cell stroke set to each cell for the purpose of spacing. Convert each cell to graphic cell.

Now the text you need in each cell needs to be added in a separate text frame and then placed inside these graphics frames.

As you can see above i have placed the image separately in each cell of the text frame. This will give you somewhat easier adjustment of cell spacing.

-Aman