January 9, 2026
Answered

Custom wb in extreme artificial light

  • January 9, 2026
  • 1 reply
  • 186 views

I've been shooting in some grow rooms which had a heavy pink cast.  I was able to do a custom wb in the room at the time and get satisfactory colours in camera, however on import I'm unable to use the colour picker or reference wb shots to set the wb as it's so extreme it remains heavy pink  Is there any way to import the settings used in camera and apply to RAW files?   

A couple of photos of my screen as the jpeg previews went from in camera jpeg to RAW smart previews. 

shot on Canon R52, custom wb. 

IMG_6734.jpeg

IMG_6735.jpeg

Correct answer johnrellis

Thanks @johnrellis  I've attached a dropbox link below.  I have managed a work around which is to convert the files to JPEG, which retains the custom WB data, which gives me something to work with, however I'd prefer to be working with RAW files if I could. 

Many thanks

Craig

Dropbox link 


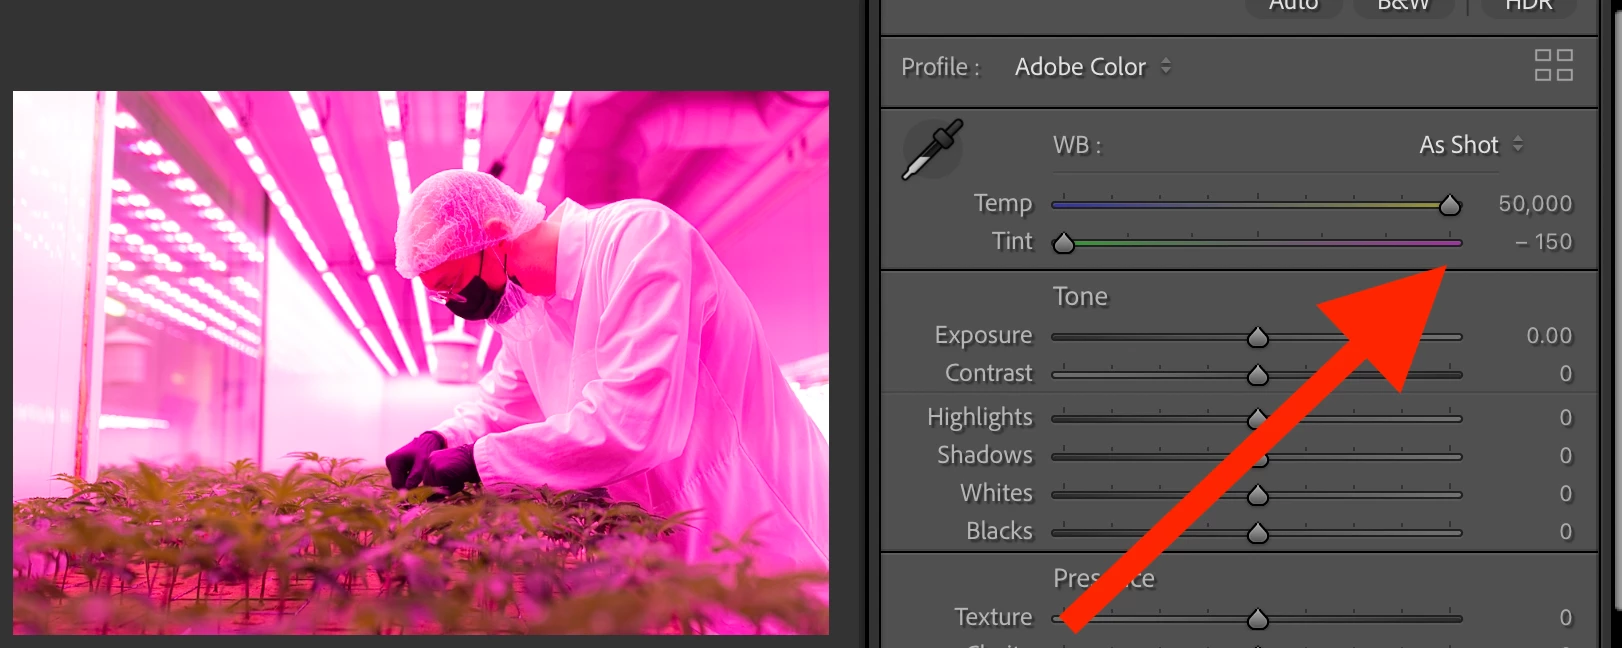
Your samples show what's going on in LR: To get a neutral color balance, LR / Camera Raw would have to set values for the Temp and or Tint sliders that exceeds the minimum / maximum values allowed by the Camera Raw engine:


johnrellis_0-1768058844066.png


Users with infrared cameras have faced the problem. Many of them solved the issue by making custom camera profiles:

https://community.adobe.com/t5/lightroom-classic-discussions/request-wider-white-balance-range-for-editing-photos-shot-on-infrared-converted-cameras/m-p/11760843


That post references a feature request to increase the range of the Temp and Tint sliders, but it appears that Adobe discarded that feature request when moving to the current forum platform.  Here's another thread requesting an increase of the slider range for infrared photos:

https://community.adobe.com/t5/camera-raw-ideas/p-color-temperature-below-2000k/idi-p/12221221


Making a custom camera profile is way overkill for a one-off adjustment of a particular scene, as in your case.


Some have mentioned editing with Canon's DPP app or Capture One, which allows for a wider range. 


You observed that "converting" the phtoos to JPEG produced visually pleasing result.  Depending on the app you used for the conversion, it's simply using the full-resolution JPEG preview embedded in the raw file by the camera, which is what LR first displays when you import a photo before it applies its own rendering.  Using the JPEGs may be the most expedient solution.


1 reply

Sameer K
Community Manager
Community Manager
January 9, 2026

Hey, @Craigfltv. Welcome to the Lightroom Classic Community. I'll help you figure this out.


In the Develop module, you can use the As Shot preset to maintain the white balance as set by the Camera. There are marginal differences as explained here: https://adobe.ly/4aQr5kr


Let me know if this helps. Thanks!

Sameer K
(Type '@' and type my name to mention me when you reply)

CraigfltvAuthor
January 9, 2026

Thank you @Sameer K.   I am using the 'as shot' wb, however as you can see in the attached the pics the differences are far from 'marginal'.  I am in the process of trying to colour correct manually with the HSL sliders, however it is time consuming as I have several rooms to get through. 

johnrellis
Legend
January 10, 2026

Share a couple of the problem raws here. If the forum won't let you attach the files here, upload them to Wetransfer, Dropbox, Google Drive or similar free service and post the sharing link here. We can see if the issue is specific to your computer or occurs on other installations.