It will probably help to compare how tone mapping works in Photoshop vs Lightroom/Camera Raw.
Photoshop tone mapping, in the HDR Toning dialog box, goes back many years. It works OK…
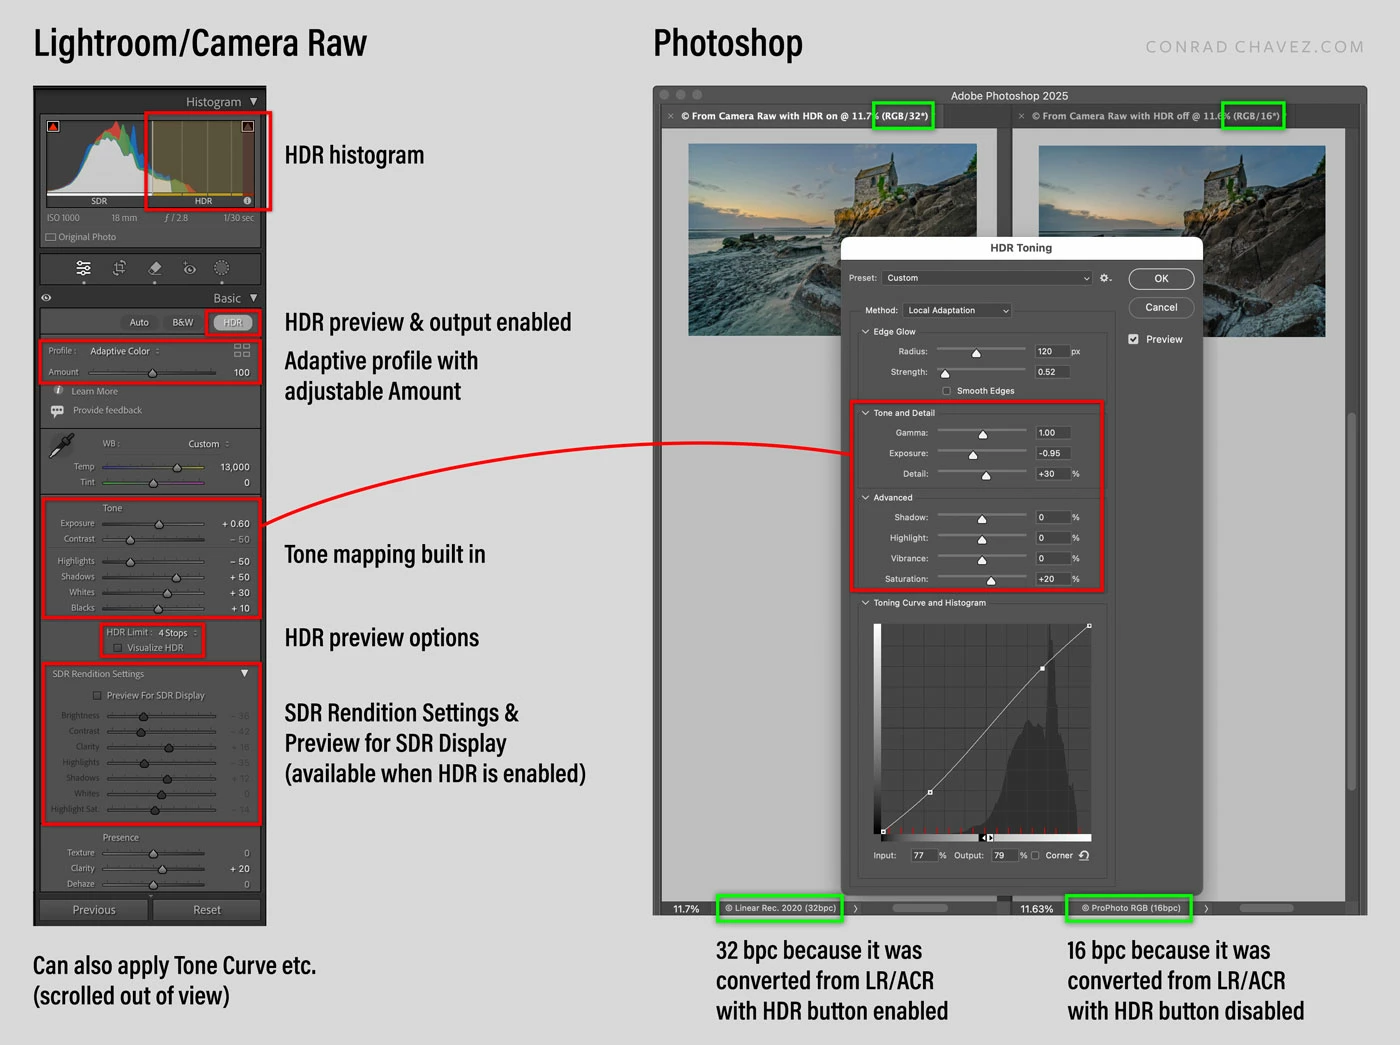
When Adobe introduced Process Version 3 (2012) to Lightroom and Camera Raw, the Basic panel options were completely overhauled. This is when Recovery and Fill Light were replaced by the more advanced Highlights and Shadows options, respectively. A major advance of Process Version 3 was making the Basic panel options work very well with both SDR and HDR images. In other words, in Process Version 3 and later you can use the Basic panel (especially Highlights and Shadows) to do your tone mapping. One of the key technologies Adobe helped research to make this possible is Local Laplacian Filters (which can do things like auto-mask edits to specfic tonal ranges such as shadows), so that Highlights and Shadows now do tone mapping with what many think is higher image quality and more immediately satisfying results than Photoshop HDR Toning.
To fully answer your question, it’s also important to understand newer advances in HDR processing that Adobe did. This is the complete HDR workflow that Adobe offers now in Lightroom/Camera Raw:
Basic + Curves. Start with the Basic panel. Its options are optimized for both regular SDR editing and HDR tone mapping. You can also use the Curves panel. This workflow is suitable for SDR output because even though you may start with an HDR image and tone-map it, you will only be able to preview and output in SDR.
HDR editing. If you need true HDR output (that is, export to an HDR-capable file format), enable the HDR option that Adobe added in 2023. If you have a display that meets Adobe HDR requirements, you can now edit, preview, and output using HDR dynamic range, up to 4 stops beyond SDR. The histogram changes to clearly indicate the HDR range, and how your image tones and your display’s capabilities match up with that range. When you export a copy, this will also enable HDR-compatible export formats and settings. Read about how that works at this link:
High Dynamic Range Explained (Adobe engineering blog post)
HDR editing with both HDR output and tone mapping to SDR output. For this, enable HDR and output to HDR, but also use the SDR Rendition Settings and Preview for SDR Display so that you can control and preview how the HDR tones are compressed and mapped when you want to export an SDR version of the image. This means you can store both a pure HDR edit and a tone map/gain map for SDR export (such as the 8bpc JPEG image you asked about) in the same image. This is all explained in the blog post linked above.
Adaptive profiles. Adobe recently introduced the Adaptive Color and Adaptive Monochrome profiles. Unlike older profiles that apply the same change to any image, the Adaptive profiles analyze each image and generate image-specific, content-aware, auto-masked adjustments to create a better starting point for editing. One of its features is that those masked adjustments try to create a reasonable initial tone mapping of HDR images. In many cases, Adaptive profiles greatly reduce the amount of manual tone mapping you have to do. Read about how that works here:
The Adobe Adaptive Profile (Adobe engineering blog post)
When you put all of these advances together, I think Lightroom/Camera Raw provide HDR to SDR editing/tone mapping that is now much more powerful, adaptable, and controllable than the Photoshop tone mapping that hasn’t changed. Tone mapping is built in to the base editing controls, not an afterthought in an extra dialog box. If I’m right about all this, how Photoshop does HDR tone mapping is now rather primitive and clunky compared to what Lightroom/Camera Raw can do. I don’t think Adobe has touched the Photoshop HDR Toning code in many years.
One last fun fact in the image below. I added the green boxes to point out a workflow difference: If you start tone mapping a raw file in Lightroom/Camera Raw with the HDR button enabled, then convert that to Photoshop for further editing, Lightroom/Camera Raw sends a 32 bits/channel image to Photoshop for optimal HDR editing. If the HDR button is disabled, Lightroom/Camera Raw sends a 16 bits/channel image to Photoshop.
If you want to see detailed video demos of the Adobe raw HDR edit-to-export workflow, watch Greg Benz’s videos on YouTube, they are excellent.
Greg Benz HDR playlist on YouTube