Sometimes when I resize image with mask, there is slightly visible border caused by feathering border of mask and it could be printed if not carefully reviewed.
I still don't know why it happens, because it doesn't happen in every image.
Does anyone know how do I prevent this? What is the reason?
Correct answer Conrad_C
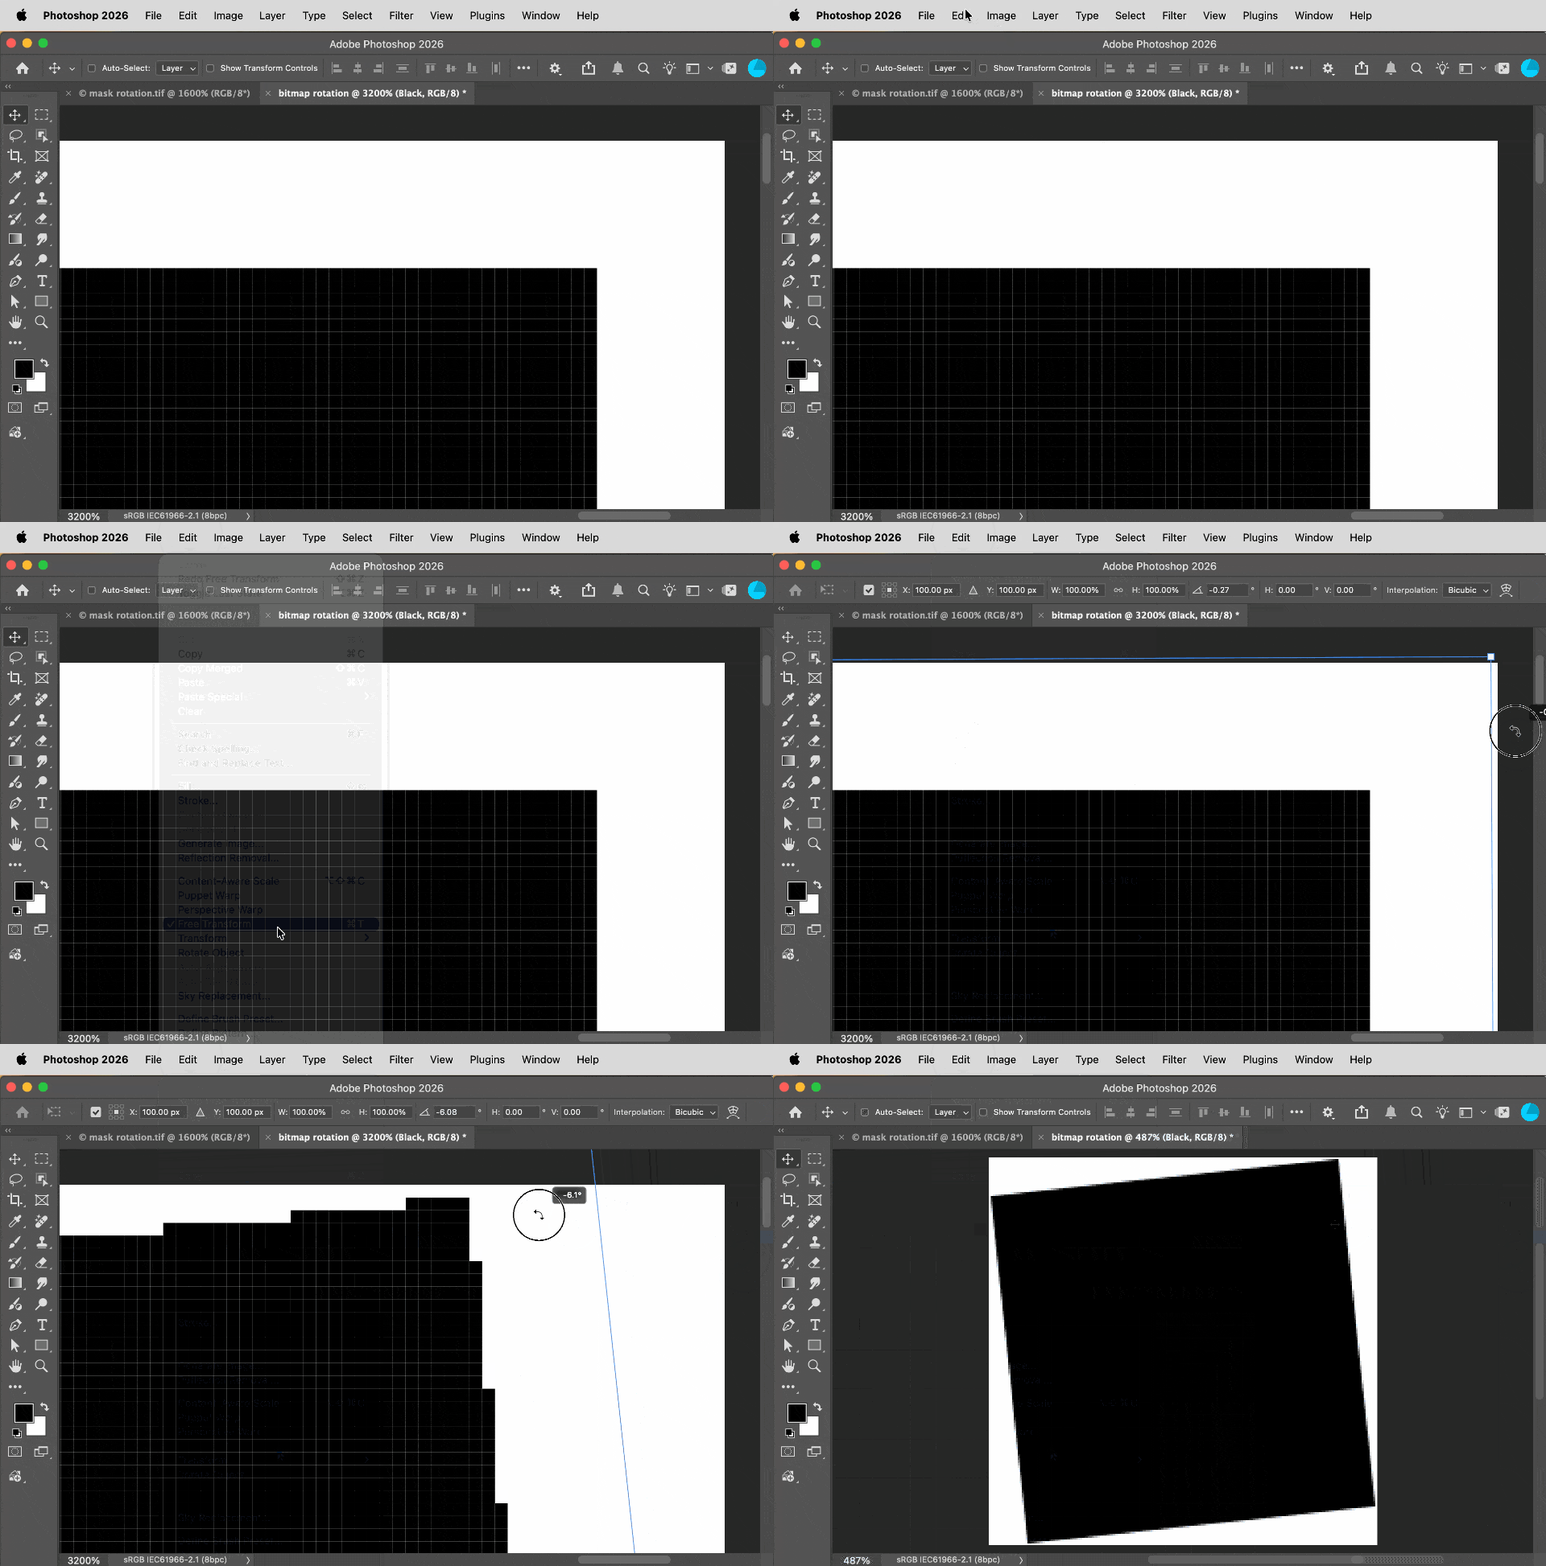
What happens is not really feathering, but anti-aliasing. The pixel grid is perfectly horizontal and vertical, but the mask is slightly rotated, so the non-level row of pixels has to somehow be reconciled with the pixel grid. If done with solid black and white pixels, it will appear jagged (aliased), so the edge is anti-aliased with intermediate gray tones to help the eye think it’s a smooth line.
Below you see a pixel grid magnified while rotated. You can see how the pixels can’t be both diagonal and a smooth line (think of drawing a diagonal line with Lego bricks) so when Free Transform is committed, Photoshop anti-aliases it so it looks smoother. All photo editing software works this way.
Your screen shot is zoomed in. This aliasing is only a problem if it’s visible at a normal viewing distance at its final size and medium. If it too fine to be seen under those conditions, you don’t worry about it any further. It’s only obvious in my demo above because I made the document only 200 x 200 px.
If individual pixels are visible at the final size and medium, then I think the only real solution is to edit the document at a greater width and height in pixels, so that the document has more pixels. For example, rescan it at a higher resolution, or scale it up in Image Size with Resample enabled, or maybe use Generative Upscale. The same mask will then be at a higher resolution so that the aliasing is less visible.
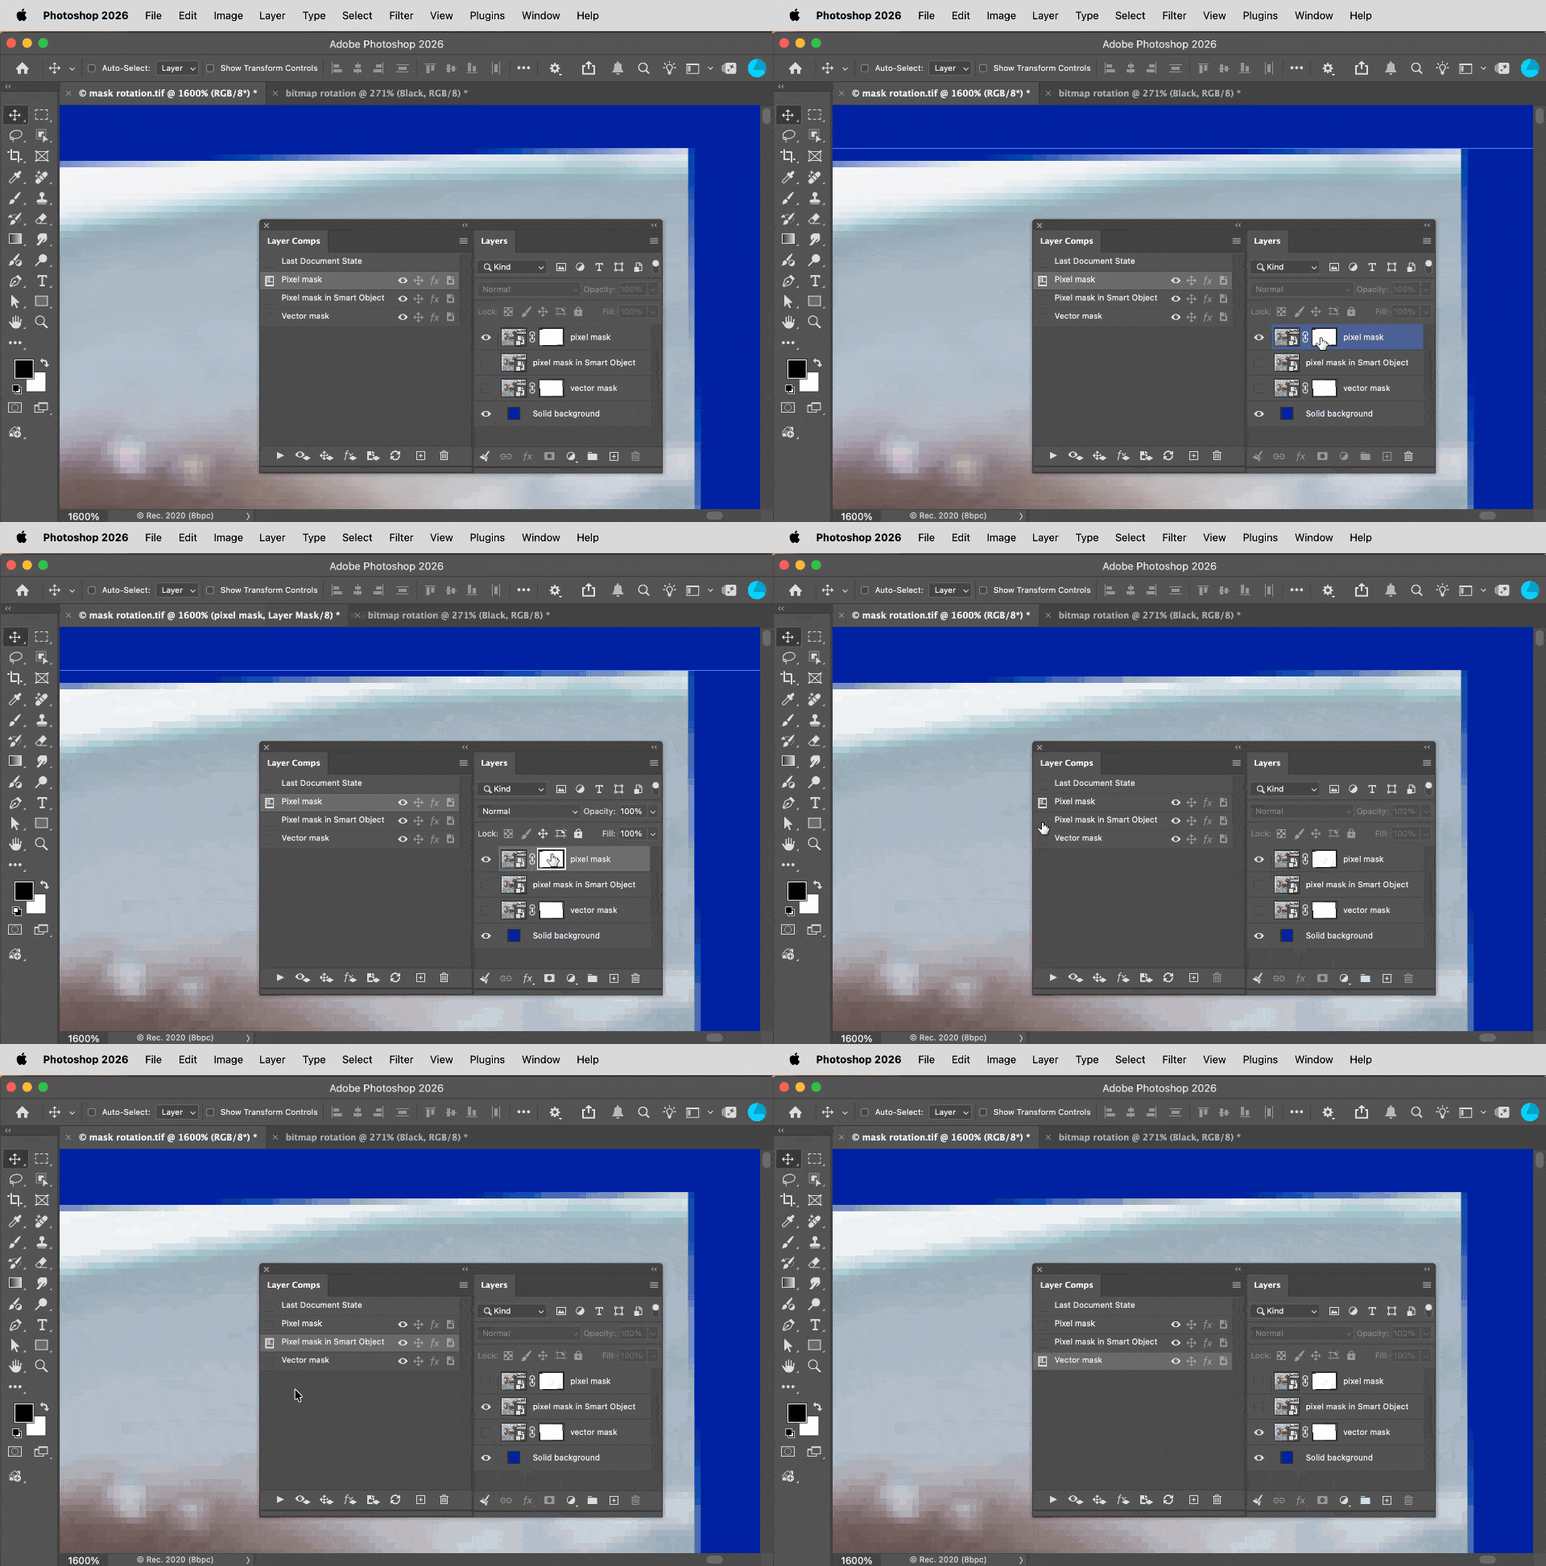
I decided to test a non-level rectangular mask in three different ways:
Pixel mask
Pixel mask in a Smart Object
Vector mask
I applied the mask and then rotate all three versions the same amount. And I actually don’t see any difference in the edge quality, the anti-aliasing always happens as shown in the demo below. I’m curious if anyone spots a flaw in how I did this comparison, but I think the reason there’s no difference is that regardless of how you do it, the rotated rectangle must always be reconciled with the document’s fixed-resolution pixel grid. Even a resolution-independent vector mask must ultimately be rendered down to the number of pixels in the Photoshop document.
If you want the document itself to be resolution-independent, don’t use Photoshop…mask the images in something like Adobe InDesign or Illustrator.
What happens is not really feathering, but anti-aliasing. The pixel grid is perfectly horizontal and vertical, but the mask is slightly rotated, so the non-level row of pixels has to somehow be reconciled with the pixel grid. If done with solid black and white pixels, it will appear jagged (aliased), so the edge is anti-aliased with intermediate gray tones to help the eye think it’s a smooth line.
Below you see a pixel grid magnified while rotated. You can see how the pixels can’t be both diagonal and a smooth line (think of drawing a diagonal line with Lego bricks) so when Free Transform is committed, Photoshop anti-aliases it so it looks smoother. All photo editing software works this way.
Your screen shot is zoomed in. This aliasing is only a problem if it’s visible at a normal viewing distance at its final size and medium. If it too fine to be seen under those conditions, you don’t worry about it any further. It’s only obvious in my demo above because I made the document only 200 x 200 px.
If individual pixels are visible at the final size and medium, then I think the only real solution is to edit the document at a greater width and height in pixels, so that the document has more pixels. For example, rescan it at a higher resolution, or scale it up in Image Size with Resample enabled, or maybe use Generative Upscale. The same mask will then be at a higher resolution so that the aliasing is less visible.
I decided to test a non-level rectangular mask in three different ways:
Pixel mask
Pixel mask in a Smart Object
Vector mask
I applied the mask and then rotate all three versions the same amount. And I actually don’t see any difference in the edge quality, the anti-aliasing always happens as shown in the demo below. I’m curious if anyone spots a flaw in how I did this comparison, but I think the reason there’s no difference is that regardless of how you do it, the rotated rectangle must always be reconciled with the document’s fixed-resolution pixel grid. Even a resolution-independent vector mask must ultimately be rendered down to the number of pixels in the Photoshop document.
If you want the document itself to be resolution-independent, don’t use Photoshop…mask the images in something like Adobe InDesign or Illustrator.
I know what is aliasing, and what is conseguence of rotating.
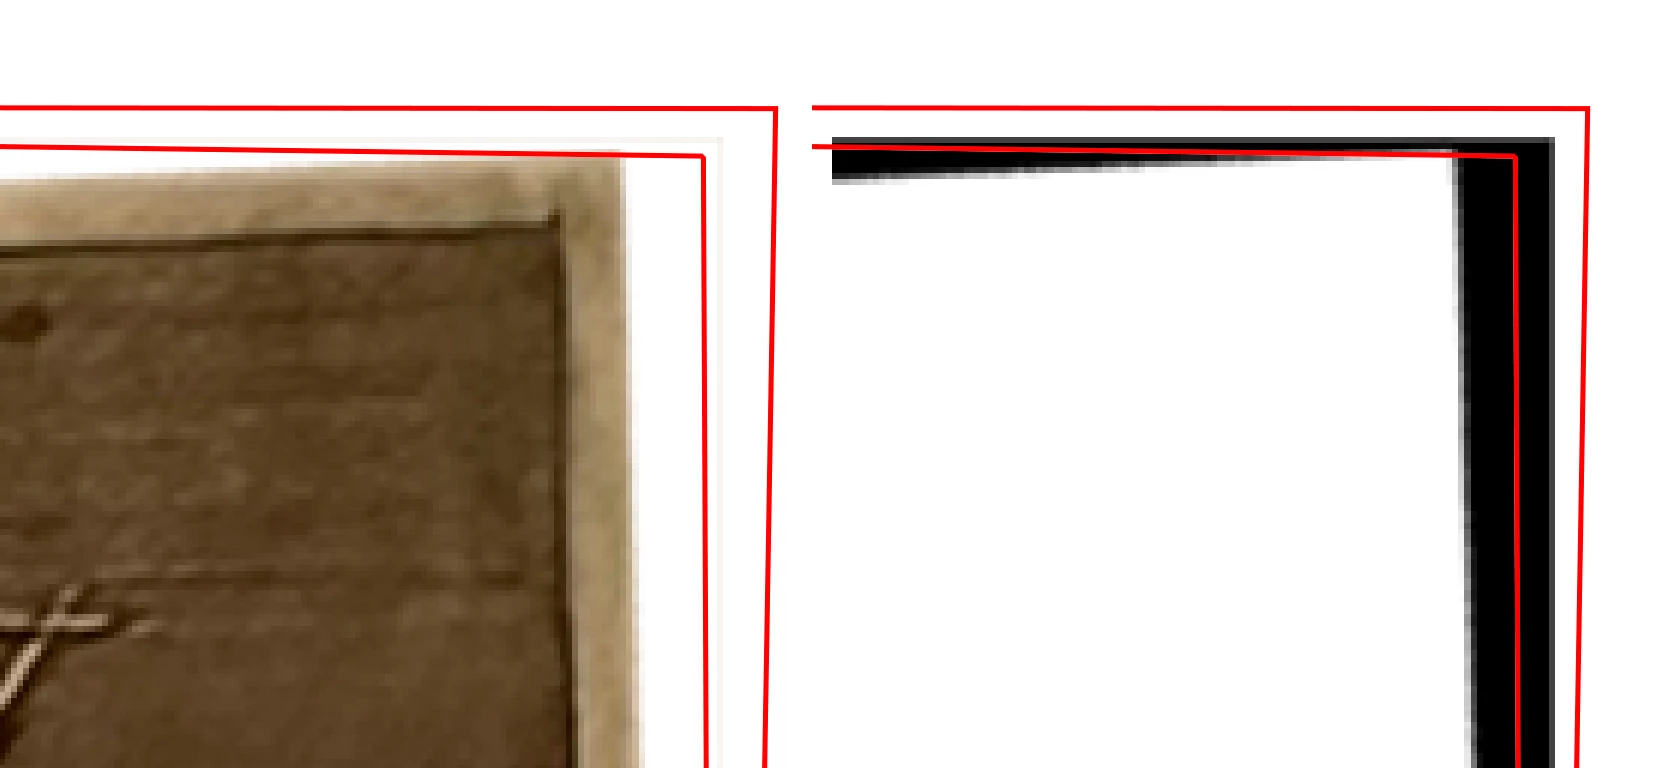
But I’m not talking about masked image edge, but little different thing. I’m talking about mask edge on canvas border (marked in red lines on my screenshots), which is always vertical and horizontal.
You seem to have created the Mask with white all around (basically a »Reveall All«-mask with some black instead of a »Hide All«-mask with some white), so resampling it with methods other than Nearest Neighbour will result in the anti-aliased borders.
The Smart Object approach @Spas K. mentioned would be preferable for transforming anyway, but you could also improve the Mask to remove white space by intersecting it as a Selection with a new Selection and replacing the faulty Layer Mask.
Ideally no Layer Mask should contain pointless white pixels.
It's due to anti-aliasing when the edge happens to be in the middle of a pixel. If it's an option - you can convert the layer to a smart-object before transforming which normally doesn't cause the issue. Otherwise you will likely need to modify the mask post-transform to fix it.



 AdChoices