Known Participant
October 6, 2026
Answered

Gradient Map does not work on letters

  • October 6, 2026
  • 2 replies
  • 30 views

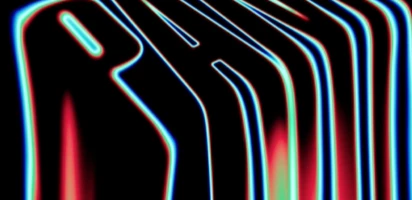
I have attempted ot d a gradient map on letters that were made into a smart object and liquified. The gradient map does not spread the colors out at all, when I reset everything and started it over, it only did the edges. I have the map in smooth. I am going for this look.


    Correct answer CORCTON34033231

    Hi 🙂 This is expected behaviour for a Gradient Map — it's not broken.


    A Gradient Map doesn't spread its colors across the image from left to right. It recolors pixels according to their brightness: shadows get the left end of your gradient, highlights get the right end, and midtones get the colors in between. (Adobe explains it here: https://helpx.adobe.com/photoshop/using/applying-special-color-effects-images.html — see “Apply a gradient map to an image”.)


    Your letters are one flat, solid tone, so the whole letter has a single brightness value and gets a single color. The only places with a range of brightness values are the soft, anti-aliased edges (and where Liquify blended them), which is exactly why you only see the gradient colors on the edges.


    To get the colors flowing across the letters like in your example:


    1. First give the letters a brightness range: put a black-to-white gradient through the letter shapes (for example, a Gradient Fill layer masked/clipped to the letters, going black on one side and white on the other).

    2. Then put the Gradient Map adjustment layer above that gradient.


    Now the letters contain every brightness value from black to white, so the Gradient Map can assign its full range of colors across them. The angle of your black-to-white gradient controls the direction the colors flow, and liquifying the gradient-filled letters will bend the colors with the shapes.


    Hope that helps!

    2 replies

    Known Participant
    October 7, 2026

    That was is it, thanks!

    CORCTON34033231
    Community Expert
    CORCTON34033231Community ExpertCorrect answer
    Community Expert
    October 7, 2026

    Hi 🙂 This is expected behaviour for a Gradient Map — it's not broken.


    A Gradient Map doesn't spread its colors across the image from left to right. It recolors pixels according to their brightness: shadows get the left end of your gradient, highlights get the right end, and midtones get the colors in between. (Adobe explains it here: https://helpx.adobe.com/photoshop/using/applying-special-color-effects-images.html — see “Apply a gradient map to an image”.)


    Your letters are one flat, solid tone, so the whole letter has a single brightness value and gets a single color. The only places with a range of brightness values are the soft, anti-aliased edges (and where Liquify blended them), which is exactly why you only see the gradient colors on the edges.


    To get the colors flowing across the letters like in your example:


    1. First give the letters a brightness range: put a black-to-white gradient through the letter shapes (for example, a Gradient Fill layer masked/clipped to the letters, going black on one side and white on the other).

    2. Then put the Gradient Map adjustment layer above that gradient.


    Now the letters contain every brightness value from black to white, so the Gradient Map can assign its full range of colors across them. The angle of your black-to-white gradient controls the direction the colors flow, and liquifying the gradient-filled letters will bend the colors with the shapes.


    Hope that helps!