
Known Participant
August 8, 2026
Answered

How to create and modify a double-ellipse

  • August 8, 2026
  • 4 replies
  • 57 views

I’m using Photoshop CS6.

Someone else created a lovely intersecting double ellipse in Photoshop to use as a banner border, which I “stole” from one of their PSD files - but I can’t work out how they created it - or how to modify it, other than by using the transform tool.

I’ve uploaded it to double ellipse.psd. Their banner is visible when you open the file, and is in the layer group “Elipse Banner”. My attempt is in the hidden layer group “My attempt”. If you hide the “Elipse Banner” group and unhide the other group, you’ll see my attempt.

  1. How can I create a double ellipse banner like theirs from scratch? Theirs has an almost rectangular shape (but with smooth curves, not straight lines), whereas my attempt is much more elliptical. I managed to make the tops of my ellipses meet, like theirs does, using the direct selection tool - but I can’t work out for the life of me how to get that almost rectangular shape, wihich is vital in a mult-line banner, as otherwise the text will overlap the banner. I don’t want any straight lines and I don’t want to lose the symmetry..
     
  2. I would like to increase the gaps between the two ellipses in their banner, without losing the nice symmetry. Is this possible and if so, how can I do it?

Many thanks

Dave
 

    Correct answer Conrad_C

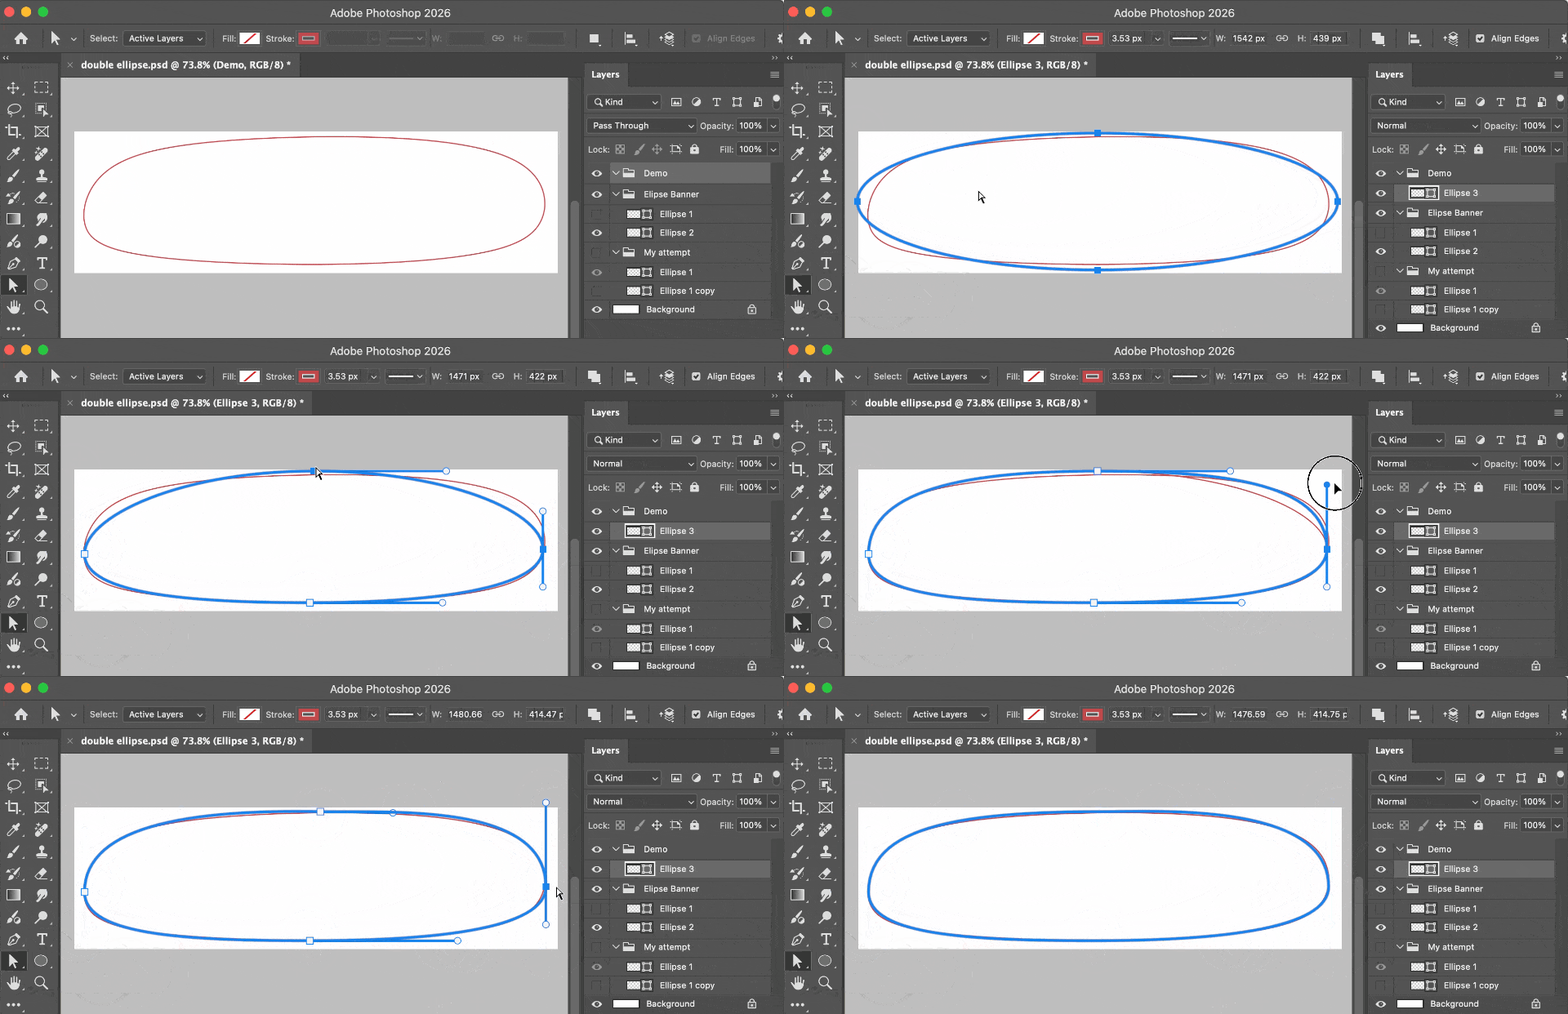
    To get the “almost rectangular shape” you can either draw an ellipse and adjust it to be more like a rectangle, or you can draw a rectangle with rounded corners and adjust that. In the demo below, I match one of the examples starting from an ellipse shape.

    In the demo, notice that to match the subtle curves I only do two things to the four default points on the ellipse, using the Direct Selection tool:

    • Reposition the path’s anchor points.
    • Adjust each point’s control handles.


    For someone new to this, it can be difficult to understand the details about how to make the right adjustments. What makes it easy is training in editing vector paths. That skill originated outside of and before Photoshop, in vector drawing applications such as Adobe Illustrator which was originally released in 1987. So you may want to review videos or books about how to edit anchor points and handles on a Bézier curve. Those lessons are often titled something about “using the Pen tool.”

    One of the most important lessons from having that training is that subtle curves are easier to control with fewer points. The interesting thing about the example you’re using is that they used probably a lot more points than they needed to. As I show in the demo, the shape they did is achievable with just the four original ellipse points, as long as the points and control handles are adjusted optimally.


    4 replies

    DaveRadoAuthor
    Known Participant
    August 9, 2026

    Thanks ​@Conrad_C, that’s a great help.
     

    1. I don’t understand how you got the anchor points and handles to look so clear in your video though. In my copy of Photoshop, I can’t see all the anchor points on the ellipse simultaneously, only one or two near wherever I click on the shape; and the anchor points and handles aren’t thick and coloured as they are in your video they are extremely thin and black, so are very hard to see. Is there a Photoshop setting that makes the anchor points and handles look as they do in your video?
       
    2. I’ve now managed to trace the orginal Ellipse 1 in the same way you did. Ellipse 1 isn’t symmetrical - as you’ll have realised - but I found that if I flipped it horizontally, it was an exact match for the original Ellipse 2, and that my 2-ellipse group was then an exact match for the orginal one - and the double-ellipse does look symmetrical.

      And I then found that by dragging the bezier handles of both new ellipses, I could make the gaps between the curves bigger (point 2 of my original question, which you didn’t address).

      I found it impossible to get the gaps between the ellipses to look quite symetrical when I did this, but I found a workaround, which was that once my new double-ellipse looked more or less as I wanted apart from not looking quite symmetrical, I then deleted my new Ellipse 2, duplicated my Ellipse 1, renamed the duplicate Ellipse 2, flipped that horizontally, and all then looked perfect - see  double ellipse.psd, now with 3 layer groups, “Elipse Banner” - the original one I stole, “My 1st attempt”, which you’ve already seen, and “My 2nd attempt”, which is the only visible group when you open the PSD.

      Is that how you’d have gone about it or is there an easier way?

    Thanks again.

    Dave

    Conrad_C
    Community Expert
    Community Expert
    August 9, 2026

    To make the path and controls clearer, I used a feature that was added to Photoshop relatively recently. When using a path drawing tool (such as the Pen or Ellipse), look for a gear icon in the options bar at the top. The gear lets you customize how the path looks…not its final appearance, but the bare path and controls, as shown in the demo below. This way you can make the path and controls easier to see even if the path has no fill and a very thin stroke or light color.

    The reason I changed those settings was to make it easier to see what was happening to the path in a low-resolution screen demo.


    For the second part of your question, it sounds like you found a good solution to making it symmetrical. Duplicating and flipping is, of course, much faster and easier than drawing the second one from scratch and hoping it’s just like the first.

    Conrad_C
    Community Expert
    Conrad_CCommunity ExpertCorrect answer
    Community Expert
    August 8, 2026

    To get the “almost rectangular shape” you can either draw an ellipse and adjust it to be more like a rectangle, or you can draw a rectangle with rounded corners and adjust that. In the demo below, I match one of the examples starting from an ellipse shape.

    In the demo, notice that to match the subtle curves I only do two things to the four default points on the ellipse, using the Direct Selection tool:

    • Reposition the path’s anchor points.
    • Adjust each point’s control handles.


    For someone new to this, it can be difficult to understand the details about how to make the right adjustments. What makes it easy is training in editing vector paths. That skill originated outside of and before Photoshop, in vector drawing applications such as Adobe Illustrator which was originally released in 1987. So you may want to review videos or books about how to edit anchor points and handles on a Bézier curve. Those lessons are often titled something about “using the Pen tool.”

    One of the most important lessons from having that training is that subtle curves are easier to control with fewer points. The interesting thing about the example you’re using is that they used probably a lot more points than they needed to. As I show in the demo, the shape they did is achievable with just the four original ellipse points, as long as the points and control handles are adjusted optimally.


    DaveRadoAuthor
    Known Participant
    August 9, 2026

    PS - I seem to have accidentally replied to my original post instead of to yours, which means my reply appears above your post instead of below it. There doesn’t see to be any way of fixing that, unfortunately, as I can’t see any way to delete my reply so that I can repost it in the right place.