I once encountered a situation where the original JPG image was very clear, but after one modification, I directly pressed the shortcut key, Ctrl+S, There is no prompt for cooperation.
But after the book was printed, it was found that the image was very blurry, and the ultimate reason may be that the default option for storage was "quality 5" or below, but there was no warning about this. You may not believe it, but sometimes when you save a JPG, the default "quality" pop-up may not necessarily be the highest 12, it could be 8 or lower.
This is terrible
. Is there a way to make the default Ctrl+S save JPG with "quality" set to 12 and "format" set to baseline ("standard")?
Correct answer Stephen Marsh
If the image has been saved with the appropriate Photoshop metadata, then the Save quality is known and will be used again when saving.
If the JPEG was created by another app or if this metadata has been removed, then using Save should bring up the JPEG Options dialog so that you can specify the required options. Subsequent saves will silently save without the JPEG Options dialog. If you Save As then the JPEG Options dialog will be presented with the known options prefilled.
You can setup Quick Export As JPEG, however, this will remove the embedded ICC profile and other metadata as it's intended for device/screen use.
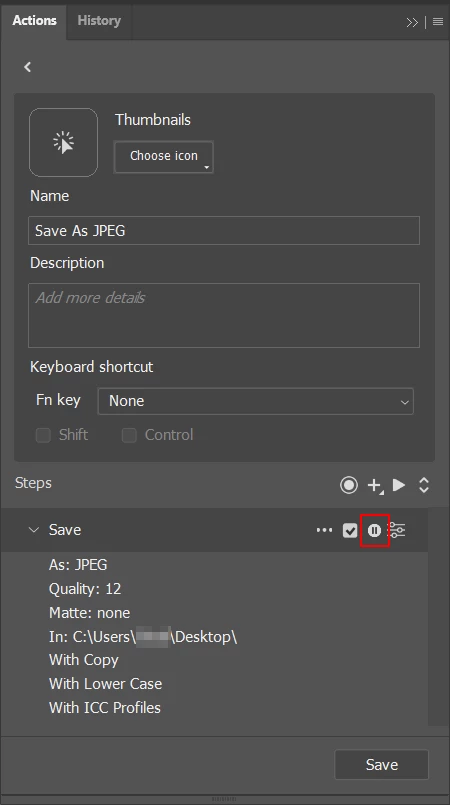
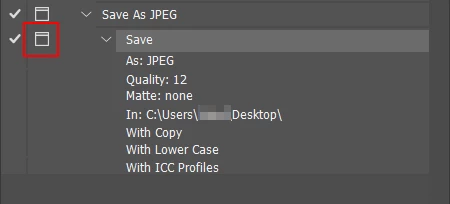
So you are then left with creating an action and setting it with the "modal” control so that it's interactive:
Or you can use a script:
/*
Default JPEG Save to Baseline Standard.jsx
https://community.adobe.com/t5/photoshop-ecosystem-discussions/save-as-jpeg-again/td-p/12650865
Stephen Marsh, 12th January 2022 - v1.0
Info: Uses the standard Photoshop interface with preset JPEG options
*/

#target photoshop

if (app.documents.length > 0) {
    var docName = app.activeDocument.name.replace(/\.[^\.]+$/, '');
    try {
        // Use the previously saved path
        var docPath = app.activeDocument.path;
    } catch (e) {
        // If unsaved, prompt for save directory
        var docPath = Folder.selectDialog("Unsaved base file, select the output folder:");
    }
    saveJPEG(12);
} else {
    alert("You must have a document open!");
}

function saveJPEG(compValue) {
    // Using the standard Photoshop dialog windows
    var ID = function (s) {
        return app.stringIDToTypeID(s);
    };
    var AD = new ActionDescriptor();
    AD.putInteger(ID("extendedQuality"), compValue);
    AD.putEnumerated(ID("matteColor"), ID("matteColor"), ID("none"));
    AD.putObject(ID("as"), ID("JPEG"), AD);
    AD.putPath(ID("in"), new File(docPath + "/" + docName + ".jpg"));
    executeAction(ID("save"), AD, DialogModes.ALL);
}
Copy the code text to the clipboard
Open a new blank file in a plain-text editor (not in a word processor)
Paste the code in
Save as a plain text format file – .txt
Rename the saved file extension from .txt to .jsx
Install or browse to the .jsx file to run (see below)
If you’re not getting that save dialogue to choose the quality/compression slider, then in order to see what the last save setting was, select “save as” and PS will default to the same compression as the last jpg save and you can see what compression was used.
However, once a jpg has been saved at quality 5, for example, simply saving it as a tiff or jpg with lower compression won’t fix that compression. You’re stuck with that quality at that point.
jpg damage is cumulative, so one should ideally not save a jpg after editing but save in a file format that does not employ lossy compression. (psd, psb or tif for example)
In many commercial scenarios the ultimate output in pdf from a page layout application like Indesign will most likely employ jpg, too, but damaging the image twice is still better than damaging it three times.
If the image has been saved with the appropriate Photoshop metadata, then the Save quality is known and will be used again when saving.
If the JPEG was created by another app or if this metadata has been removed, then using Save should bring up the JPEG Options dialog so that you can specify the required options. Subsequent saves will silently save without the JPEG Options dialog. If you Save As then the JPEG Options dialog will be presented with the known options prefilled.
You can setup Quick Export As JPEG, however, this will remove the embedded ICC profile and other metadata as it's intended for device/screen use.
So you are then left with creating an action and setting it with the "modal” control so that it's interactive:
Or you can use a script:
/*
Default JPEG Save to Baseline Standard.jsx
https://community.adobe.com/t5/photoshop-ecosystem-discussions/save-as-jpeg-again/td-p/12650865
Stephen Marsh, 12th January 2022 - v1.0
Info: Uses the standard Photoshop interface with preset JPEG options
*/

#target photoshop

if (app.documents.length > 0) {
    var docName = app.activeDocument.name.replace(/\.[^\.]+$/, '');
    try {
        // Use the previously saved path
        var docPath = app.activeDocument.path;
    } catch (e) {
        // If unsaved, prompt for save directory
        var docPath = Folder.selectDialog("Unsaved base file, select the output folder:");
    }
    saveJPEG(12);
} else {
    alert("You must have a document open!");
}

function saveJPEG(compValue) {
    // Using the standard Photoshop dialog windows
    var ID = function (s) {
        return app.stringIDToTypeID(s);
    };
    var AD = new ActionDescriptor();
    AD.putInteger(ID("extendedQuality"), compValue);
    AD.putEnumerated(ID("matteColor"), ID("matteColor"), ID("none"));
    AD.putObject(ID("as"), ID("JPEG"), AD);
    AD.putPath(ID("in"), new File(docPath + "/" + docName + ".jpg"));
    executeAction(ID("save"), AD, DialogModes.ALL);
}
Copy the code text to the clipboard
Open a new blank file in a plain-text editor (not in a word processor)
Paste the code in
Save as a plain text format file – .txt
Rename the saved file extension from .txt to .jsx
Install or browse to the .jsx file to run (see below)