Participant
September 18, 2020
Question

Photo Collage Toolkit - How to Create Cutout or Create Transparency around Inset Images

  • September 18, 2020
  • 2 replies
  • 2765 views

I am using @JJMacks Photo Collage Toolkit, hope he or someone else can provide some direction.


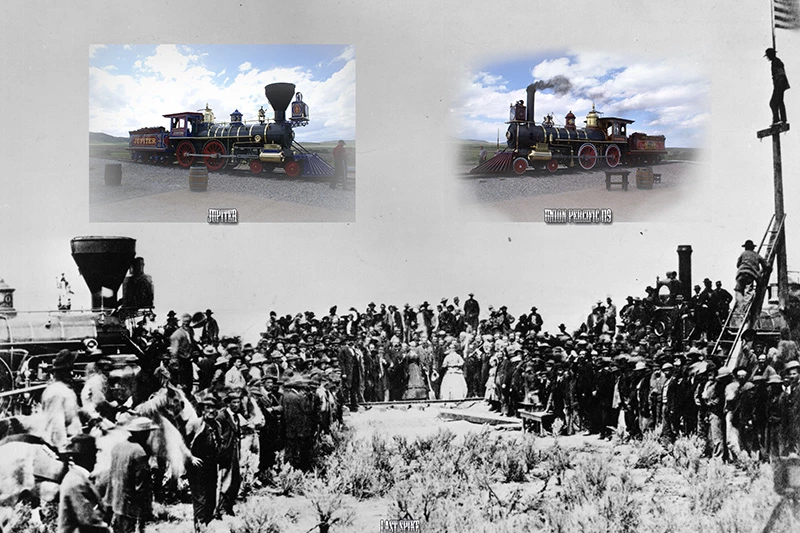
This toolkit is pretty great, thank you for providing it. I made a template, but am having trouble getting the background to show through like in the example images. I've watched all your videos on the mouseprints site, but haven't seen how it's accomplished.

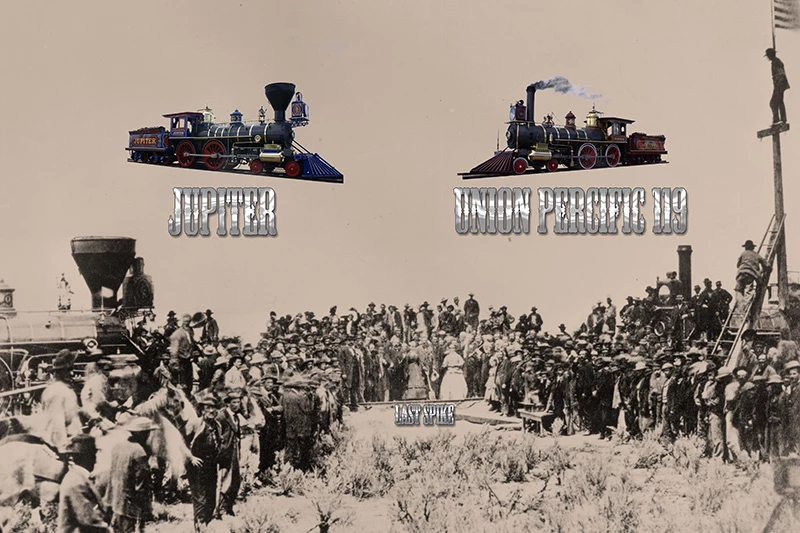
How do I do this:

"I turned on their image layer's layer mask and a clone layer in one and saved them so Photoshop would update the smart object layers."

to get from the first image to the second image, with the clouds and ground removed from the inset images and the background image showing through(floating effect)?  Does this require manually drawing the mask layer or is there some other quicker way?


The same technique is used on the airplanes on the New Zealand landscape/airplanes example.  If you could point me to a video, forum topic, or just point me in the right direction, I would greatly appreciate it.  Thanks.
This topic has been closed for replies.

2 replies

Participant
December 17, 2024

Hi, did you ever download the collage templates? Would love to access them. Unfortunately, JJMack's website is down, I expect that he passed away 😞 RIP

JJMack
Community Expert
Community Expert
September 18, 2020

If you post the Template PSD file you created I can help you with it.


Collage Template are very easy to create and the Collage populating scripts have more options then the Mockup populating scripts. My Collage template design is simple but some what limited. Only support  to 53 image in a collage template and image transformation  like rotation, perspective distortion, warping is not possibly. These effect would need to be added manually to to populated PSD collages. 


 Mockup Templates require the use of Smart Object layer  that will have their content replace by my Mockup Populating scripts.  So Rotation, perspective, distortion and Warping is possible. More then 53 image can be supported, The only big requirement is the Smart object that need to be populated template must be on the top of the PSD template's layer stack.  These do not have  to be visible in the Mockup. Lower smart object layer that  share  the object in the smart object layer can show  object in the mockup. Rotation sizing, perspective distortion and warping are all possible in  mockup templates.


Your Collage and Mockup templates  need to comply  with my four template rules.  That  I document four rules to follow for Collage Templates and four rules for  mockup templates. 


Post your Template PSD I'm sure I can help  you make it comply withe either my four templates rules.

JJMack
JJMack
Community Expert
Community Expert
September 18, 2020

The Four Collage Template Rules:

  1. Size the photo collage templates for the print size you want - width, height and print DPI resolution.
  2. Photo collage templates must have a Photoshop background layer. The contents of this layer can be anything.
  3. Photo collage templates must have alpha channels named "Image 1", "Image 2", ... "Image n". These map your images Location Position, Shape and size.
  4. Photo collage templates layers above the background layers must provide transparent areas to let the images that will be placed below them show through.


The Four Simple Mockup Template Rules

  1. Simple Mockup Templates Only the Smart Object Layer on the top of the Template layers stack will be updated then a Jpeg file saved.
  2. Only Photoshop Objects are support in the top smart objects layers. That is they can not be Object File that are not supported by Photoshop like Camera RAW Files or Illustrator file like .ai, .svg.
    I suggest these objects should be PSD or PSB the Photoshop creates. Avoid using PNG objects in Mockup template use replace content to replace .png objects with a .psd which has your png's content.
  3. The first None Smart Object Layer near the top of the layer stack Marks the end of Smart Object Layers the will be updated. Lower Smart Object Layers only update if they share top layers objects.
  4. The Replacement Image Collection need to be in sub folders named obj0, obj1, obj2, .... objN. Each folder must contains the same number of replacement Image files.


Post your Template PSD I'm sure I can help  you make it comply withe either my four templates rules.

JJMack
Participant
September 18, 2020

Hello JJ, thanks for your reply.  I don't see a way to upload my psd collage template file I made with the script in your toolkit, so I'm hosting it here:

https://drive.google.com/file/d/17rJGU-sxLEiBQ87uiIQrrioKc1s8wwLW/view?usp=sharing


The effect of revealing the background image is clearer on your NZ example below.  Is masking the non-plane parts of the inset images a quick process or does it have to be done manually?


I'm thinking that Rule 4 is the one I need to work on in addition to the above masking issue.