When I set an action top open a raw image in one folder, The raw process opens, I click apply AUTO as a general setting, then OPEN the image and set a SAVE AS then close.
The action record stops.
All fine and dandy, however when I try to run the action, the only thing that happens is that the image opens in Photoshop RAW and that is it, the Set to AUTO does not happen, it just hangs until I cancel. What am I missing?
I had this working before but when I ran it, it did what my new recording does, so I deleted it and saved a new one, no luck.
Correct answer Conrad_C
You could also do this more simply with Adobe Bridge and Camera Raw, without having to build an action, and possibly with higher image quality and faster performance:
In Adobe Bridge, select as many images as you want in the Content panel, even an entire folder. (If you’re looking at them on the desktop, you can drop the folder on the Bridge application icon to start Bridge with that folder in the Content panel, at least that works on macOS.)
Choose the command File > Open in Camera Raw, or press the command’s keyboard shortcut. Camera Raw loads all selected images. If the Camera Raw defaults are set the way you want (it sounds like you just use the Adobe defaults instead of improving the raw image), Auto will already be applied. (However, there may be a better way, see my notes below.)
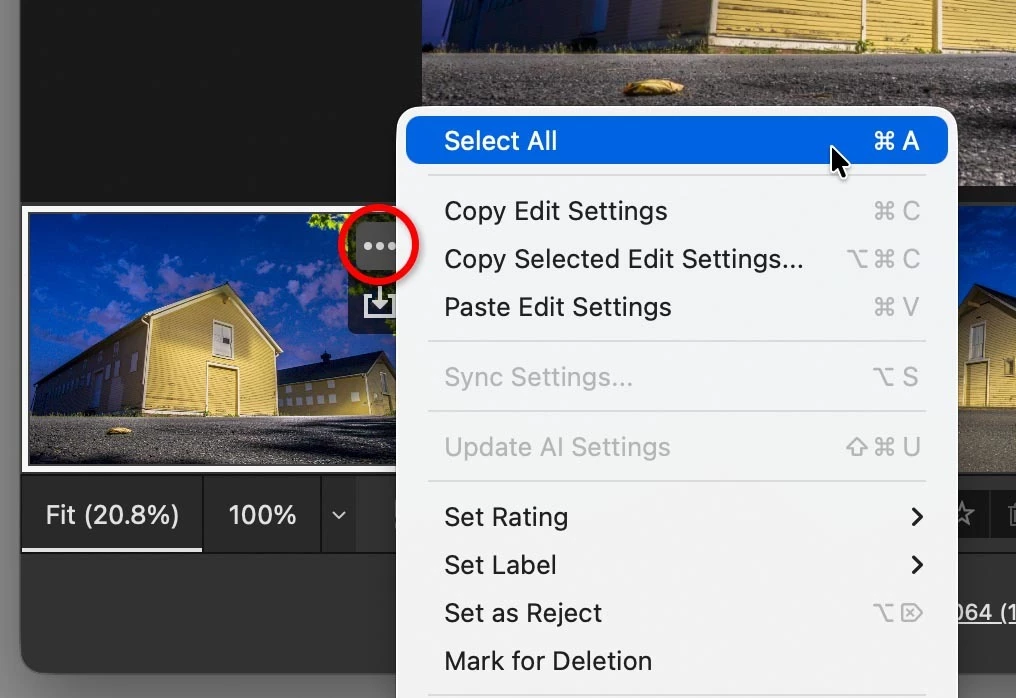
Select all images in the filmstrip using the Select All command or keyboard shortcut.
Click Done, or Open (in Photoshop). If you click Done, notice that you got all this done without even having to open Photoshop.
That may sound like a lot, but in practice, if your defaults and presets are set up properly, you can reduce that to:
Open folder in Bridge, select all images in folder, press Open in Camera Raw keyboard shortcut, select all images in filmstrip, click Done or Open.
Some notes and suggestions about the workflow you’re asking about:
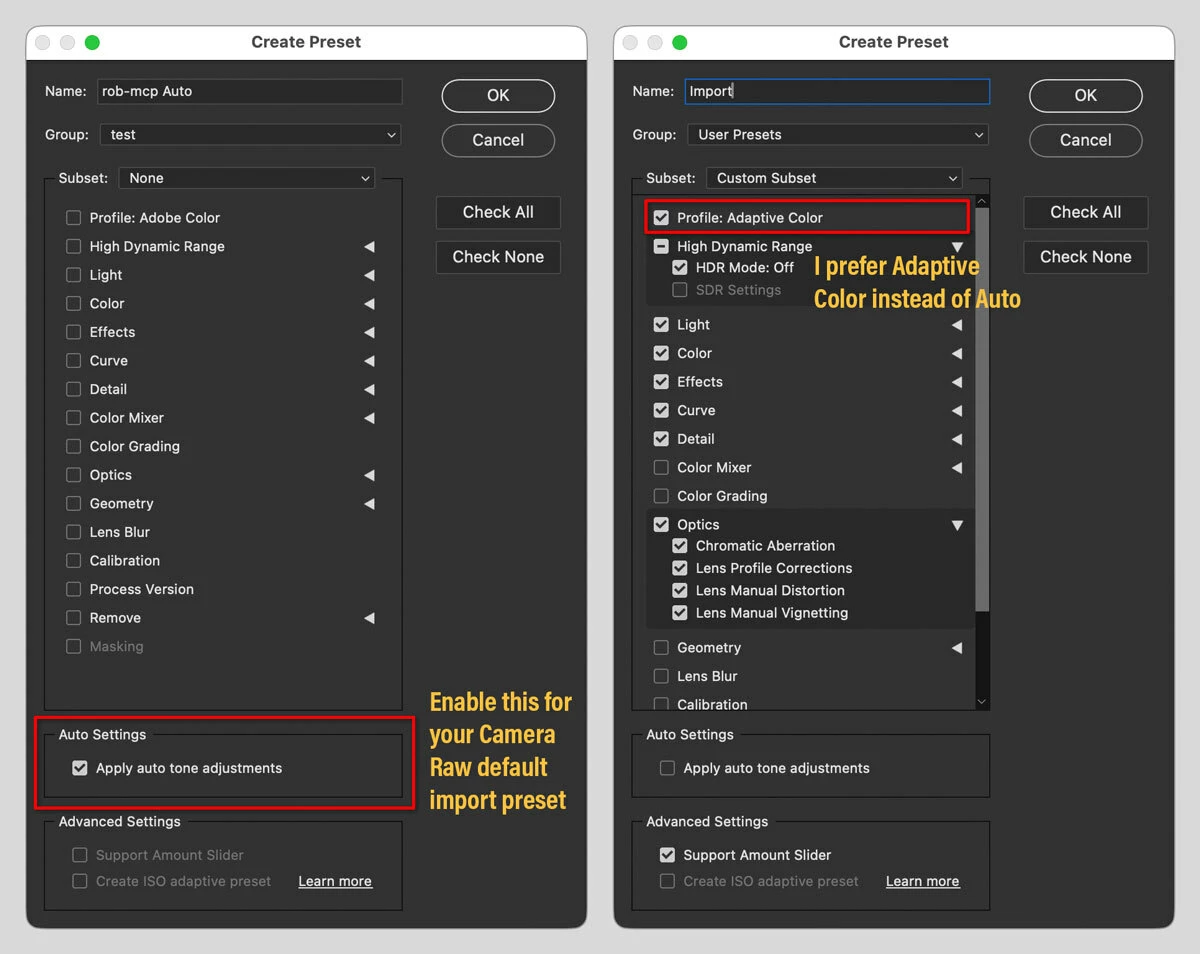
Why don’t I mention applying Auto? I left it out because you should customize your default Camera Raw preset to apply Auto on load (as in the picture below), so that you don’t have to apply it manually, it’s always already done for you.
Auto might not be the best default. Although Adobe did improve how Auto works, you might want to also test how your images look with the Adaptive Color profile instead, they might look better and could reduce the need for more edits in Photoshop. This is especially important because you’re converting straight out of raw without taking advantage of editing at the raw stage (like, why even shoot raw then?). Photoshop doesn’t have anything like the raw-level Adaptive profiles.
The more images you select, the faster Bridge/Camera Raw will finish compared to Photoshop. The problem with a Photoshop action is it processes images serially (one by one). But Camera Raw can take advantage of both parallel processing and GPU acceleration, processing multiple images simultaneously.
Like D Fosse replied, I also prefer to do this in Lightroom Classic, but only because that’s where I manage everything. If you don’t want to deal with the Lightroom Classic catalog and its extra import step, the Bridge/Camera Raw combination can do basically the same raw-level presets and accelerated parallel bulk exporting. I would rather use either of these workflows than use a slow, serial Photoshop action.
The SET AUTO on RAW in bulk is great. I then created a batch to open those RAW image, then save as JPG, and close the RAW image after without saving that. Despite setting Starting Serial# 1
The job will only process ONE image, not the whole folder, what am I missing?
Thank you for the comprehensive reply. I will test this out. It is annoying though, as I previously managed to get a sequence running. I was happy with the Default AUTO setting in RAW as there were time constraints. Annoying when things work, then they don’t!
You could also do this more simply with Adobe Bridge and Camera Raw, without having to build an action, and possibly with higher image quality and faster performance:
In Adobe Bridge, select as many images as you want in the Content panel, even an entire folder. (If you’re looking at them on the desktop, you can drop the folder on the Bridge application icon to start Bridge with that folder in the Content panel, at least that works on macOS.)
Choose the command File > Open in Camera Raw, or press the command’s keyboard shortcut. Camera Raw loads all selected images. If the Camera Raw defaults are set the way you want (it sounds like you just use the Adobe defaults instead of improving the raw image), Auto will already be applied. (However, there may be a better way, see my notes below.)
Select all images in the filmstrip using the Select All command or keyboard shortcut.
Click Done, or Open (in Photoshop). If you click Done, notice that you got all this done without even having to open Photoshop.
That may sound like a lot, but in practice, if your defaults and presets are set up properly, you can reduce that to:
Open folder in Bridge, select all images in folder, press Open in Camera Raw keyboard shortcut, select all images in filmstrip, click Done or Open.
Some notes and suggestions about the workflow you’re asking about:
Why don’t I mention applying Auto? I left it out because you should customize your default Camera Raw preset to apply Auto on load (as in the picture below), so that you don’t have to apply it manually, it’s always already done for you.
Auto might not be the best default. Although Adobe did improve how Auto works, you might want to also test how your images look with the Adaptive Color profile instead, they might look better and could reduce the need for more edits in Photoshop. This is especially important because you’re converting straight out of raw without taking advantage of editing at the raw stage (like, why even shoot raw then?). Photoshop doesn’t have anything like the raw-level Adaptive profiles.
The more images you select, the faster Bridge/Camera Raw will finish compared to Photoshop. The problem with a Photoshop action is it processes images serially (one by one). But Camera Raw can take advantage of both parallel processing and GPU acceleration, processing multiple images simultaneously.
Like D Fosse replied, I also prefer to do this in Lightroom Classic, but only because that’s where I manage everything. If you don’t want to deal with the Lightroom Classic catalog and its extra import step, the Bridge/Camera Raw combination can do basically the same raw-level presets and accelerated parallel bulk exporting. I would rather use either of these workflows than use a slow, serial Photoshop action.
It works correctly in a test action here. All Camera Raw settings are applied when running the action.
However - this might be much simpler using Lightroom Classic. Select your files, make sure Auto-Sync is on, and make the settings you want. Then Export (ctrl+shift+E) to the file format, destination etc. that you choose. Export settings stick until you change them.




 AdChoices