Known Participant
December 14, 2016
Answered

Can PSE9 construct a printed image with irregular edges?

  • December 14, 2016
  • 4 replies
  • 1362 views

By that I do not mean a standard rectangular image with a transparent "background" that is workable only within the PSE environment; although printing an image onto thin glass or clear plastic would probably come close.  I do mean an image that resembles one that was cut out with a scissors from a magazine. 

I won't bother with the details about why I would need such an image unless somebody asks.

    This topic has been closed for replies.
    Correct answer Mark_Sand

    Again, good job!  Clever that you created home plate facing the right correction.

    As to the shadow, don't do the stroke. That just adds an unnecessary step and might even wipe out fine detail in the shadow.

    Here are 2 ways:

    1. Ctrl-click the object in the layers palette to select it. You will see "marching ants" around the object, indicating the selection. Fill the selection with black.

    2. On the layers palette there is a "lock" icon, which locks transparent pixels. Click this and fill the layer with black. There is no need to first select the object since the transparent portion will not be filled. In my ancient PSE2 the lock button is at the top of the palette. In PSE9 it might be somewhere else in he palette (maybe on each layer?).

    The Opacity slider is also on the palette.
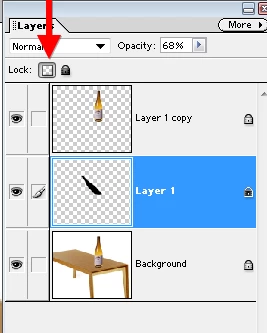
    While I'm at it, here is how you could add baseballs.

    Go a Google image search on "basebalI". This brings up a zillion hits, but we want a baseball with transparent background.

    Click the Options icon in the upper right corner and select Advanced search

    Choose an image size close to your picture's size.

    Choose type of image, Photo in this example.

    Choose file type PNG.  PNG files in Google images should (but not always) have the transparent background.
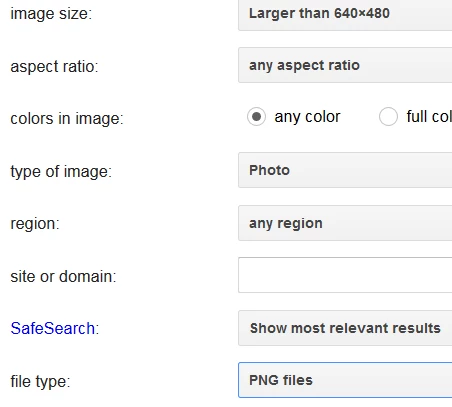
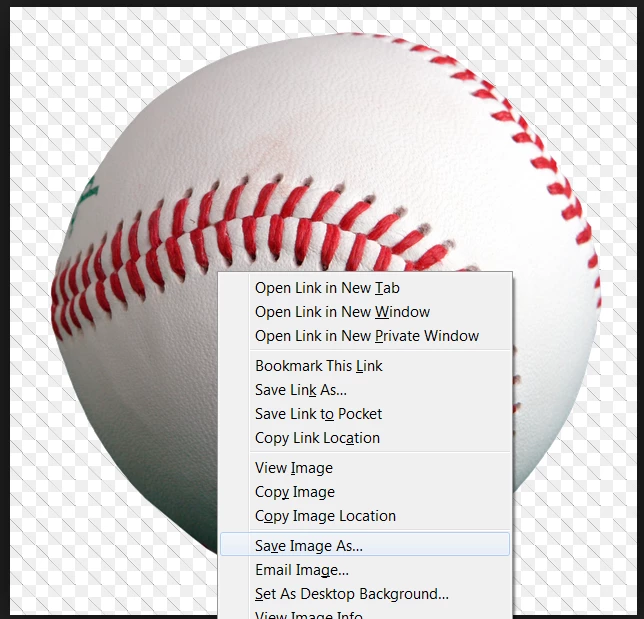
    Click on a baseball you like, to enlarge it. If it shows the transparent background, right-click the image to save it to your PC.
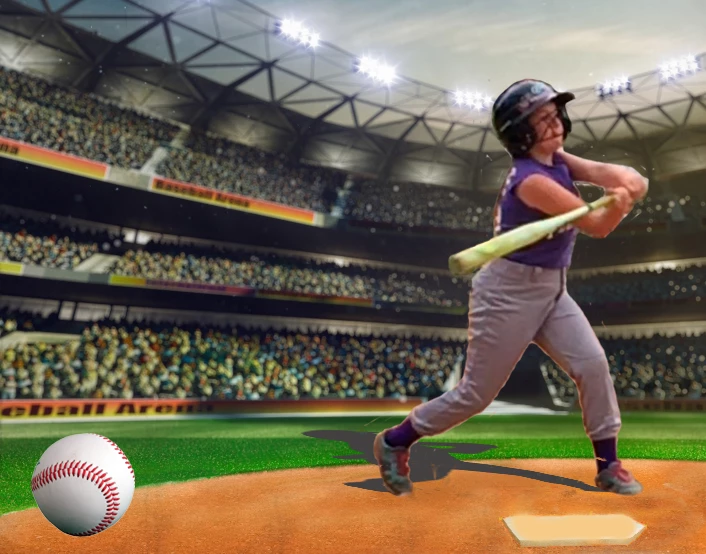
    Then add the baseball to your picture, resizing and re-positioning it as necessary.
    4 replies

    Mark_SandCorrect answer
    Inspiring
    December 20, 2016

    Again, good job!  Clever that you created home plate facing the right correction.

    As to the shadow, don't do the stroke. That just adds an unnecessary step and might even wipe out fine detail in the shadow.

    Here are 2 ways:

    1. Ctrl-click the object in the layers palette to select it. You will see "marching ants" around the object, indicating the selection. Fill the selection with black.

    2. On the layers palette there is a "lock" icon, which locks transparent pixels. Click this and fill the layer with black. There is no need to first select the object since the transparent portion will not be filled. In my ancient PSE2 the lock button is at the top of the palette. In PSE9 it might be somewhere else in he palette (maybe on each layer?).

    The Opacity slider is also on the palette.

    While I'm at it, here is how you could add baseballs.

    Go a Google image search on "basebalI". This brings up a zillion hits, but we want a baseball with transparent background.

    Click the Options icon in the upper right corner and select Advanced search

    Choose an image size close to your picture's size.

    Choose type of image, Photo in this example.

    Choose file type PNG.  PNG files in Google images should (but not always) have the transparent background.

    Click on a baseball you like, to enlarge it. If it shows the transparent background, right-click the image to save it to your PC.

    Then add the baseball to your picture, resizing and re-positioning it as necessary.

    BudVAuthor
    Known Participant
    December 20, 2016

    Mark,

    Well, about two minutes before I saw your email, I started from where I was last night, and applied the Gaussian Blur. To my inexperienced eye, it came out perfect, compared to the harsh solid black I had there. And because my grandson is now tying up the PC playing Minecraft, I’ll have to wait before I can experiment with your latest.

    No problem with the baseballs. Collage.com<http://collage.com> offers them, like an accessory to their stadium photo. Very nice people there. Do a chat with them and they bend over backwards to help.

    Thanks again,

    Bud

    Inspiring
    December 15, 2016

    If you want a shorter shadow (high noon!), activate the Move tool and drag the left handle inward:

    As to the right field problem, remove home plate altogether. No one will know

    BudVAuthor
    Known Participant
    December 16, 2016

    And you retouched the batter's box as well!  Good man!

    It's too bad that this whole thing might be an exercise in futility.  This photo is intended for a pillowcase, which means extensive enlargement.  Unfortunately, I only had access to the first go-around as a screen capture, so by the time it got to pillowcase size it would be quite blurry.  Her mom shoots an awful lot of stuff as .bmp files, and we're running out of disk space.  I keep telling her that unless she wants to make a 3' x 4' wall poster out of a photo, it's high-resolution going to waste.  Very soon now, I expect to start running files through Organizer specifying a resolution that will be just fine for 4" x 6" prints (which will never occur for probably 99.9%

    of her collection, anyway), but this time I wish I had the .bmp source.

    BudVAuthor
    Known Participant
    December 20, 2016

    Not futile after all!  The service company that will actually produce the pillowcase (Collage.com) downloaded their original photo of the stadium which gave me a fresh start.  I followed your procedure for creating the shadow, and had a bit of trouble.  You left out one step which is probably assumed by someone with your experience, but I don't qualify for that rating:  I finally determined that before filling the original layer with black, I had to "stroke (outline) selection".  Once I got past that, trying to figure out how to use the two different places for opacity percentages (I'm still not sure), and forgetting to apply the Gaussian Blur, I came up with the final product.  I would fix it now, but working remotely at 3:30 AM tends to be a sensitive endeavor, to say the least.  This is all we need to send to Collage.com.  We can add the four corner baseballs and the text (in a font not available to me in PSE9) at the website.

    You would have laughed yourself silly if you had been a fly on the wall, because my daughter evaluates stuff based on emotions and not on reality/quality.  (That's why her kids have a hard time getting the wi-fi router to perform at its best -- she thinks it's ugly if it's out in the open where its signals are less likely to get blocked.)  For simplicity, I removed all the batter box lines and created a new plate pointing to right field.  But she gave me trouble about the placement of the plate based on the original, where the kid was way too far in front of the plate and I had "corrected" for that.  She also thought the plate was distracting, and should be removed entirely (you went along with that), but I could not let myself produce a baseball photo without a home plate.  She gave in, but she wanted it to be a little dirtier, so I toned down the white plate with a little color, but not before reminding her that the umpire carries a whisk-broom to clean off the plate.

    Anyway, all's well that ends well.  Thank you for your patient assistance.  It's been fun.

    Inspiring
    December 15, 2016

    Good job!

    Since you added a shadow, I thought I'd give you this trick to create a realistic shadow of the subject.

    1. Duplicate the subject layer.

    2. Fill the original (bottom) layer with black.

    3. Image > Transform > Distort, and drag the top center handle to create the shadow.

    4. Apply a Gaussian Blur to the shadow.

    5. If there is excess shadow below the object you can remove this by moving the shadow layer and/or erasing the excess.

    6. To lighten the shadow, lower the layer's opacity.

    Using your example I came up with this:

    BudVAuthor
    Known Participant
    December 15, 2016

    Well, I just assumed that the sun was high in the sky, so she didn't throw a long shadow.  Yeah, that's it ...

    Thanks for the technique.  I'll keep it handy with my other how-to's.

    Now, is it too late to do something about the fact that she's facing right field instead of center field?   :-)

    Merry Christmas!

    mytaxsite
    Inspiring
    December 14, 2016

    Probably but why not post an image here to see what people come out with. 

    We can put your photo in front of something like this:

    BudVAuthor
    Known Participant
    December 14, 2016

    Well, your offer shows that I have to tell you all the details after all.

    It started out because my daughter was using a service that made it easy to construct a collage that could be put onto any surface; in this case, the surface was a pillow (yes, to be put onto a bed or couch).  The primary background image was a baseball stadium filled with people, and it was provided by the service.  What she wanted to add to the scene was my 11-year-old granddaughter at the plate, wearing a baseball uniform and with perfect form, taking a healthy swing at the ball coming her way. Unfortunately, the service dealt only with rectangular photos, so the tight border around the photo of the batter necessarily included some superfluous detail that didn't fit in with the primary background image:

    So with my experience with PSE9, I said that I could clean that up with a transparent background so that it would look very realistic. (Wait for it -- I'm smarter now.)  So I edited the pic, painstakingly changing everything extra into a transparent image, giving me this:

    Of course, this doesn't show the transparency because as I said in my first post, that magic is effective only within the PSE environment, so I was left with a bunch of white instead of a bunch of superfluous detail.

    This is why I'd like to cut the photo out with a scissors and paste it onto the stadium scene, electronically speaking, of course.  I'll worry about the hole showing between her arms later.

    Can you help?

    Inspiring
    December 14, 2016

    Unless I am misunderstanding your explanation, I believe you are already halfway there.

    You were able to remove the background, isolating the girl like this. Is that correct?

    If so, there are then several ways to add her to the stadium picture.

    Here is how I usually do it:

    1. Select the girl picture (Select > All).

    2. Copy the selection to the clipboard (Edit > Copy).

    3. Open the stadium picture and paste from the clipboard (Edit > Paste). This places the girl on a new layer with the transparent background.

    4. Resize/re-position her as necessary using the Free Transform and/or Move tools.

    If this is not what you were asking, please clarify.