Known Participant
September 4, 2022
Question

Canopus DV Codec import, what to export?

  • September 4, 2022
  • 1 reply
  • 1308 views

OK, I think I understand the forums now, it is just one big forum for Premiere and the tags are just to help finding things. Clearly I'm a newbie. 🙂

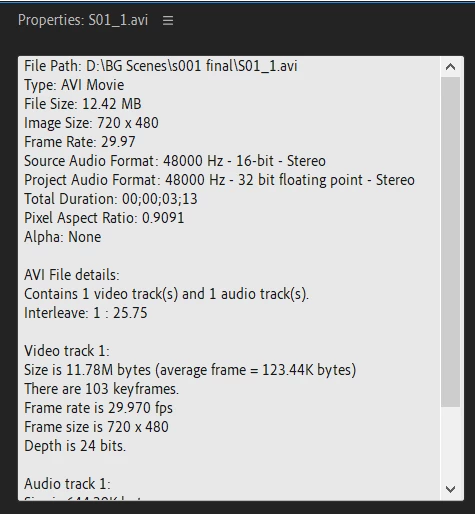
So, the current Premiere won't import any of my projects created in Premiere 6.5, but to my amazement, it imports all of the avi files I captured with a Canopus DV Rx card and plays them and exports them! However, when I look at the file properties, it doesn't mention the Canopus codec, weird, yes? Here's the imported file:

So, first question is, which format should I choose to export in? I tried them all but I can't see a difference between them. I use Quick Export because I don't know any other way just yet, and the options include Adaptive High Bitrate, High Quality 1080p, and High Quality 720p. Which one is best? I am exporting to a file which I will import and put into a new project.

No matter which format I choose, the output is always a 4:3 aspect ratio. The aspect ratio in the Source and Program windows is 1.5 (720x480 or 720p). I should be able to export to 1.5, yes?

Thanks, Rick

This topic has been closed for replies.

1 reply

Inspiring
September 5, 2022

Hi rick287, a couple of terminology explanations first that may help.

The 720 in '720p' refers to the vertical resolution in 1280x720 not the 720 horizontal resolution in a 720x480 video file.

So 1920x1080 = 1080p (we'll get to the 'p' part later)

1280x720 = 720p

720x480 = 480

The 'p' refers to 'progressive' frames. If it was 'i' instead, for example 480i or 1080i - this would mean the video was interlaced. In the case of your DV files, it is likely they are interlaced. DV is an old standard definition format and I think it was interlaced by design (someone please correct me if I'm wrong).


A complication with DV standard definition files (720x480) is they can also be 4x3 OR 16x9 aspect ratio. In your properties frame grab image you'll see Pixel Aspect Ratio is 0.9091 this means your files are 4x3. if that figure was (I think) 1.2021 this would indicate your DV files were 16x9 (widescreen).


Ideally you would be editing in Premiere Pro, in a sequence that matches the size and frame rate of the footage you are working with. One way to achieve this is to choose a sequence setting that matches your video files when you create a sequence or create any sequence and then immediately drop one of your DV clips into the timeline. A pop-up menu should then appear asking if you want to have your sequence settings match the video file - choose yes.


You don't mention what you are editing these DV files for and this may have an impact on your workflow. I get to work with standard definition files regularly ... but always as part of a new HD program. So when mixing Standard Definition (SD) with HD I'm always working in an HD timeline (1920x1080) and therefore scaling the SD footage up to fill the HD sequence AND either leaving it 4x3 and having black bars either side OR scaling it up even more so the SD image fills the frame. The downside to working with SD in an HD timeline is it won't look any better just because it's in an HD sequence - it's still just SD resolution but zoomed up to fill the HD frame and if I scale it to fill the frame (no black bars) I will lose parts of the image and make it look even lower resolution.


So with all the above in mind the question to ask yourself is what 'final' video to you have in mind. Do you just want to keep everything SD and output SD (4x3) or do you want to convert to HD and output HD (16x9).


By the way there are a whole ton of things to consider if you put interlaced SD footage into an HD progressive sequence but that's a whole other story. 


You mention 1.5 as your aspect ratio in you Source and Program windows ... not sure what you mean there. Video is generally 16x9 or 4x3 aspect ratio.


Hope some of this helps.


rick287Author
Known Participant
September 5, 2022

Hi Steve, this is well over 1,000 clips of a movie I shot on Sony DVCAM many moons ago and now I wish to create a trailer for marketing purposes. All the live action is shot but the animation/special effects are taking decades! My goal is to post the trailer on You Tube to try and generate the funds to finish the movie. (After my wife of 30 years died, I lost interest in the movie). So I have all the clips I need for the trailer but they are in Canopus DV format. I have to combine the clips for the trailer in Premiere and I would like to use the best possible output so it doesn't look so amateurish. My Win XP PC died and none of the software loads on my Win 10 PC.


Ok, I always thought the standalone number referred to the horizontal resolution, sorry about that. However, NTSC is 640x480 = 4:3 = 1.333. DV (at least my DV) is 720x480 = 1.5. I measured on the screen as 1.4 but I think there was a setting in the old Premiere to go to 1.5. I think it had to do with the 0.9 pixel ratio. I forget if I captured progressive or interlaced. I think it was interlaced because disk space was hard to come by back then and p takes more bytes. Is there some way to find out?


Yes, I will edit in Premeire Pro. I load a Canopus DV clip (typically 30 seconds in duration) and export it in a modern format. Then I will import that new format file into a Premiere Pro project for the trailer (trim the clip, edit the sound track, etc.). When done, I will export it in a format for You Tube, duration less than 2.5 minutes. I do not know how to find or set the size and frame rate for the project. I could easily do this in 6.5, but don't have a clue for Pro. I will have to research it. Do you have a recommendation?


Yes, this helps a lot! Many thanks!!! Rick


Inspiring
September 6, 2022

My advice is do not export to a different codec or frame size before you edit. Use what you have (Canopus DV 720x480) and edit with the clips as they are.

In my opinion there is no benefit to exporting DV to a modern codec until you have an edited program and want to export the final video. Then I would suggest you export the finished edit to Prores HQ from Premiere Pro.


In Premiere Pro, create a new sequence and choose the 'Standard 48khz' preset found in the DV-NTSC folder in the presets list. I'm going to assume you captured 'interlaced' in 4x3 aspect ratio. If you shot widescreen on your DVCam then you would choose the 'Widescreen 48khz' preset in the DV-NTSC sequence preset folder. 

Note that regardless if the footage is 4x3 OR 16x9 the actual pixels in the DV format are 720x480, only the displayed pixel aspect ratio is different ... and you need to ensure that Premiere Pro correctly interprets the Canopus clips when imported. So when you import a Canopus clip and play from your Premiere Pro bin in the 'source' window - does it look OK. i.e. not stretched or squashed. If it looks wrong then it's not being interpreted correctly. Right click the clip(s) in your bin and select > Modify>Interpret Footage and under 'Pixel Aspect Ratio' choose 'Conform to:' D1/DV NTSC (0.9091) if it looks horizontally stretched or D1/DV NTSC (Widescreen 16:9 (1.2121) if it looks squashed horizontally.


To get the best looking end product you are going to want color grade the project. Use Lumetri in Premiere Pro if you are going to do it yourself. If after completion you want to deinterlace and/or uprez the final program then I would use Topaz Video Enhance AI to potentially uprez to at least HD or maybe even 4K. Topaz Video Enhance is a paid app but it can improve SD to HD/4K conversions (sometimes amazingly so).

A lot to cover here, hope this helps.