Participant
October 27, 2024
Question

I tried replicating Camera Calibration in Premiere Pro Lumetri Color

  • October 27, 2024
  • 1 reply
  • 327 views

I wanted to color grade some footage I had similarly as a photo I took of the same shot that I had edited. And in that photo I had touched the Camera Calibration sliders and really enjoyed the result.


I looked online and realized that no one had really done anything explaining how to replicate it, just comments like: "Do it in lumetri color you have more freedom there". But the sliders in camera calibration is hard to replicate. But while I was trying to figure out what really happens when touching the sliders I think I found a solution that is close enough to it that I was happy with.


Step by step on how to do it (with pictures below)


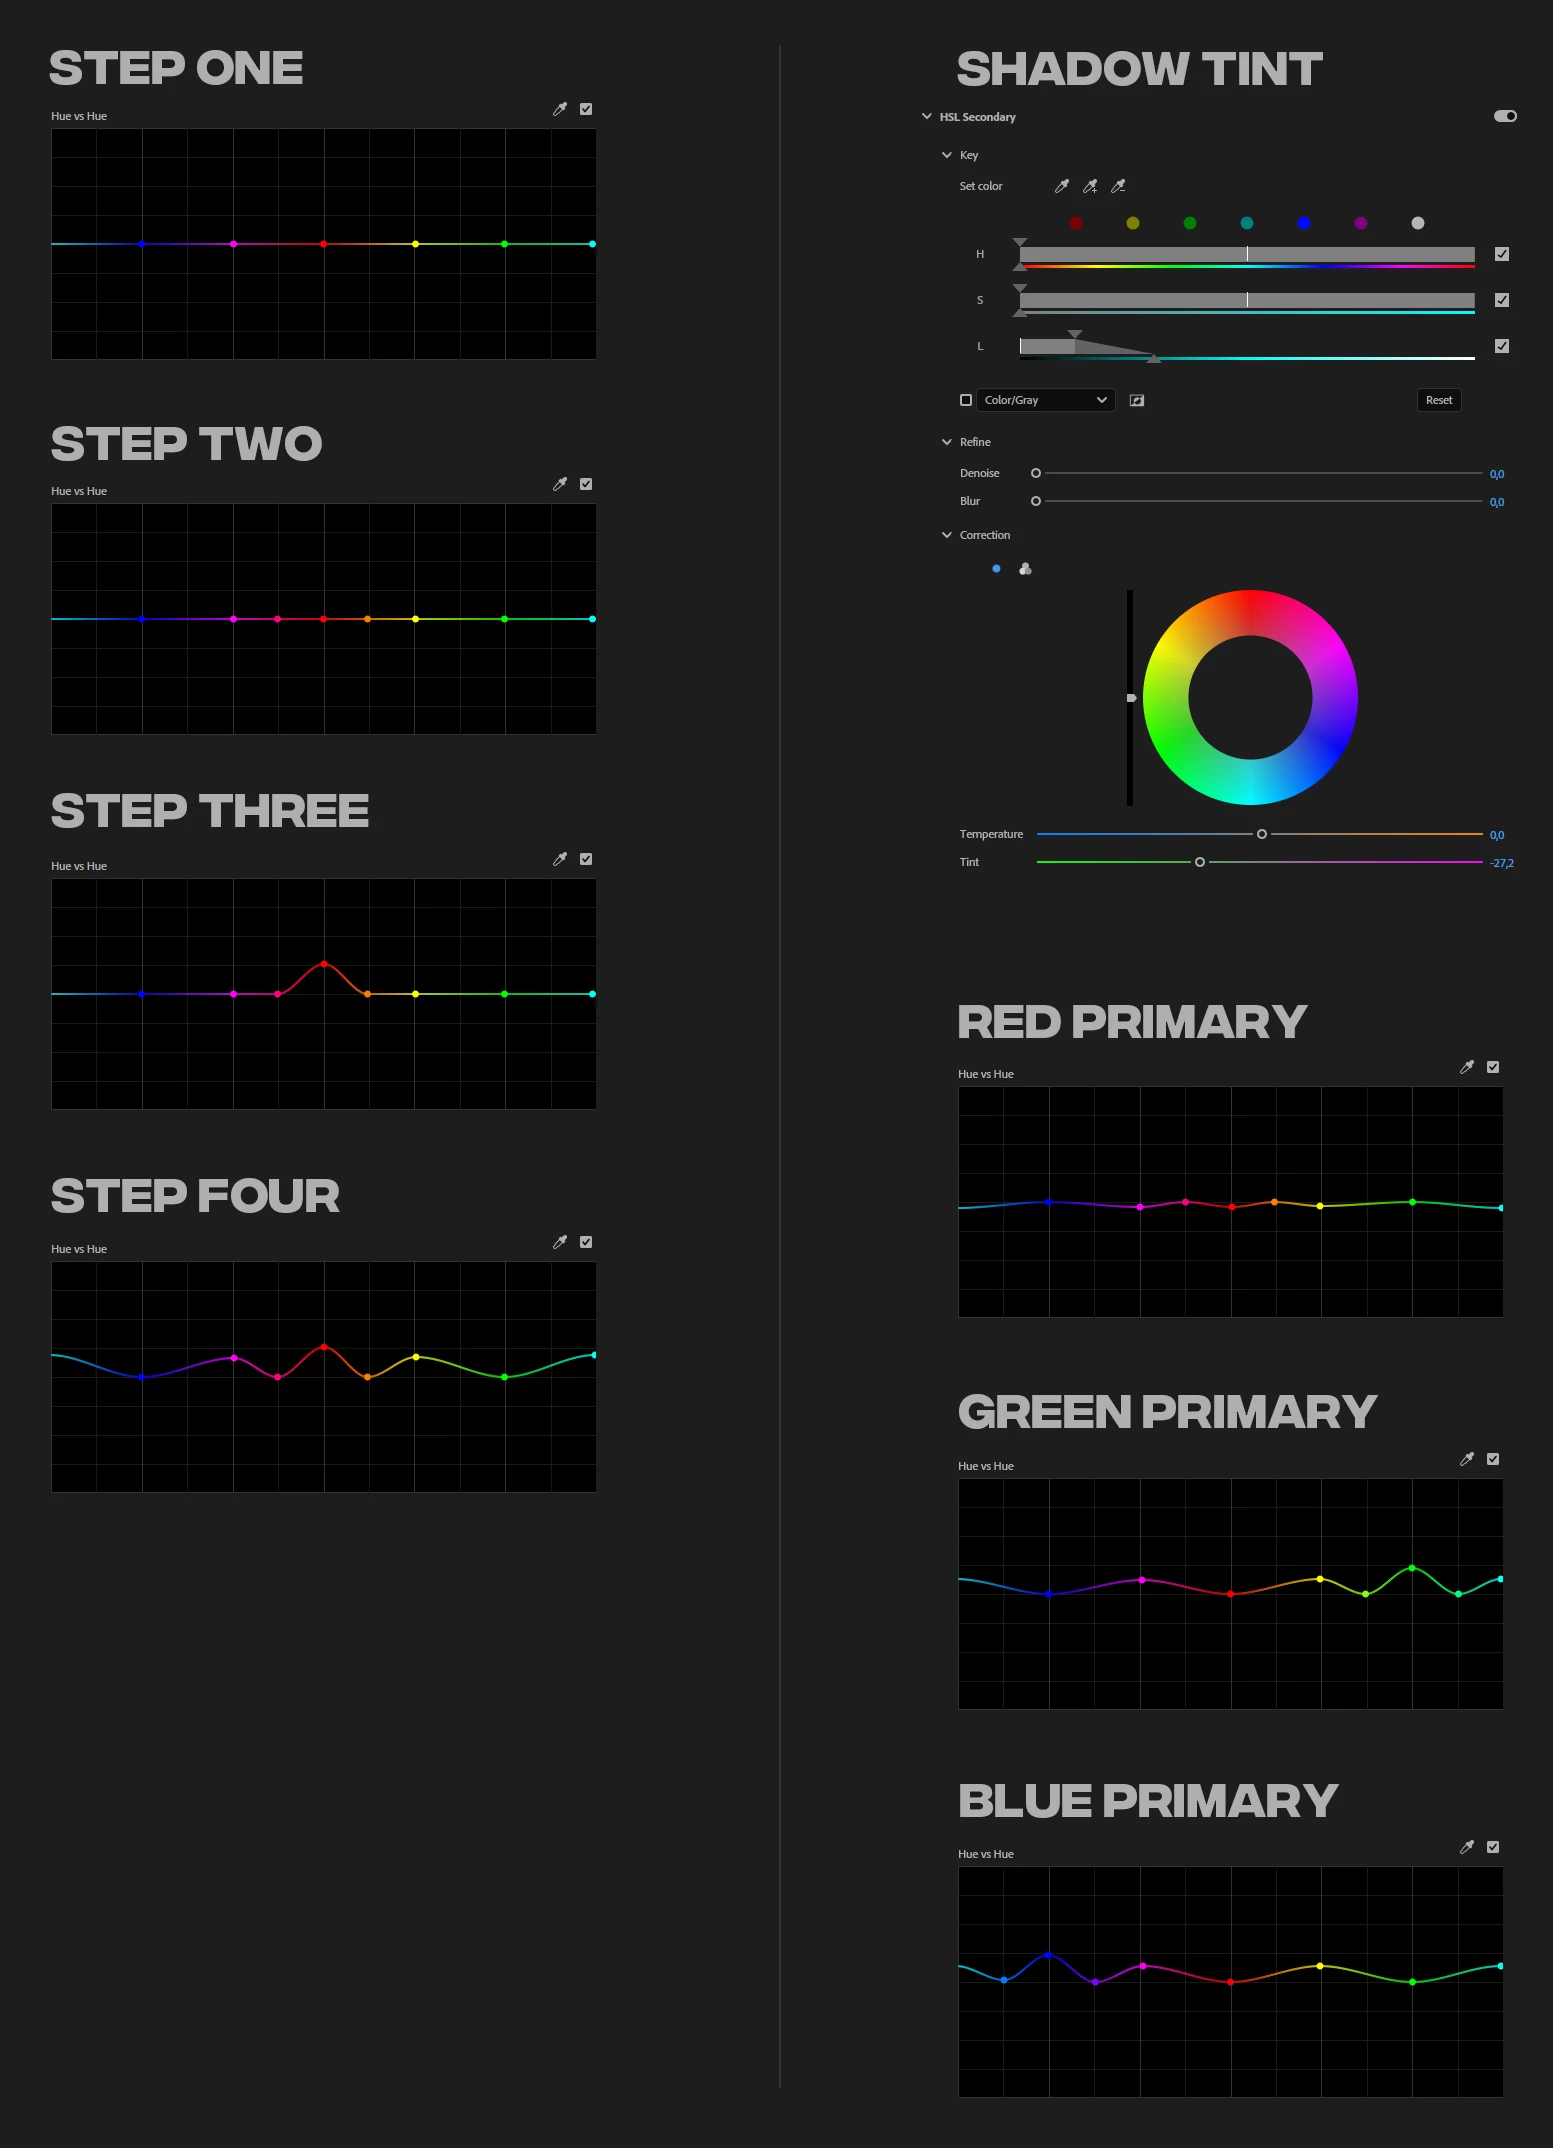
  • Step oneFind the Hue vs Hue (Or Hue vs Saturation for the Saturation Slider equivalent) Curve under Lumetri Color Effect > Curves > Hue Saturation Curves. Then make a point where each bright intersect with the curve.
  • Step twoDecide which Primary Color Slider you want to affect (in the example its red) and make two new points between the red point and the closest one on each side.
  • Step threeThat was the setup, now we can shift the hues. First move your primary hue point up or down to shift its hue (in Camera Raw you would only be able to shift it in this case one and a half rows up or down).
  • Step fourNow you want to continue to shift the other colors a bit as well. Every secondary color should also be shifted in the same direction as your primary color (cyan, magenta, and yellow). From my experience they shouldn't be moves as much as your primary but maybe around half as much, its up to you to experiment an fine tune it though.


After this you need to add another Lumetri Color effect and do the same for the other hues.


Lastly I left my edits I made for my project as an example (not a good one per se but something to wrap your head around). It includes a shadow tint, which you could probably do in a number of ways. I did not look into how Camera raw selects which luma ranges are selected to shift the shadow mid and highlight tones, but if you want to tint it you can select that range in HSL Secondary under L, and make sure the full range of H & S are selected. For my example though i selected the darkest tones and faded it out slightly, then you can shift the tint under the color wheel.


I tried my best to explain this, I don't know a lot about editing but this scratched an itch I had so I'm satisfied, enjoy 🙂


This topic has been closed for replies.

1 reply

R Neil Haugen
Legend
October 27, 2024

Double posted. I answered your other thread.


This is hopelessly over-thought without first understanding the capabilities ... and major differences ... between stills and video color. Speaking as someone with a 40+ year career as a pro stills portraitist, ran our own full color wetlab, and one of the earliest studios to go full-on digital image capture. Lightroom public beta 0.8.


And now over a decade in pro video color.


Video and still color processes are not, and cannot be the same.


I work for/with/teach pro colorists now. Plenty of experience and high-end training in both.

Everyone's mileage always varies ...
Participant
October 28, 2024

The other thread was just a reply I decided to make it its own thread.


Like I said in the other one, you're probably right in a lot of ways, like how you don't usually do this. Or affecting colors like this in video form is not going to work as well. And I know that, the purpose wasn't to give a proffesional grading tip. Or optimize someones workflow.


What I did here was a base for recreating the camera correction effect in Lumetri Color, just because it's not that simple. And it is made this way to give similar controls as in camera correction. Even though it's not perfect, let the person finding this experiment, they might realize that yeah if I shift hue too much I'll get clipping. Or maybe I can simplify this by doing this instead of that.


But I want to ask; if you would “professionally” grade footage to get a very stylized and limited color palette. With all the yellows pushed towards red, all the blue pushed towards cyan, and all the green pushed into yellow. Creating what looks like a very warm palette of red, yellow, and light blue. How'd you want to go around doing that?

R Neil Haugen
Legend
October 28, 2024

I can't tell from the wording if you mean the attempt is to 'warm' the image, or to keep it from being 'warmed'.


If you want to push two 'side by side' hues closer together, that's what the Hue v Hue curves tab was built to do. Isolote Yellow, with a center point and two or more limiting points out to the side a bit, then as you adjust the center point up or down, you see the color scale? Go where you want your Yellows to go.


And set the side-limiting points to where it all blends decently.


To desaturate a color, simply go to Hue v Sat, set a control point & limiters, drag the control point down.


To get really high-end work, you can do a track matte setup. Ctrl/Cmd-click drag the clip up a track, release, do again, so you've stacked the same clip three high.


Put a track matte effect on middle clip.


Go to the top clip, use Lumetri's HSL for the key creation ... use the sliders to set your key for the color/hue/brightness you want to change, then leave the key set to color/black.


Now go to the middle clip, and set the Track Matte to take the image data from V3, set the type to lumininance.


Now add a Lumetri on that clip, and anything you do in Lumetri on that V2 track matted clip will only affect the areas selected in the key on V3.


There's all kinds of things you can do.

Everyone's mileage always varies ...