FPS Media
Participant
December 12, 2017
Answered

Ingest preset not showing up in 'Create Proxies' option

  • December 12, 2017
  • 2 replies
  • 6843 views

Hi there,

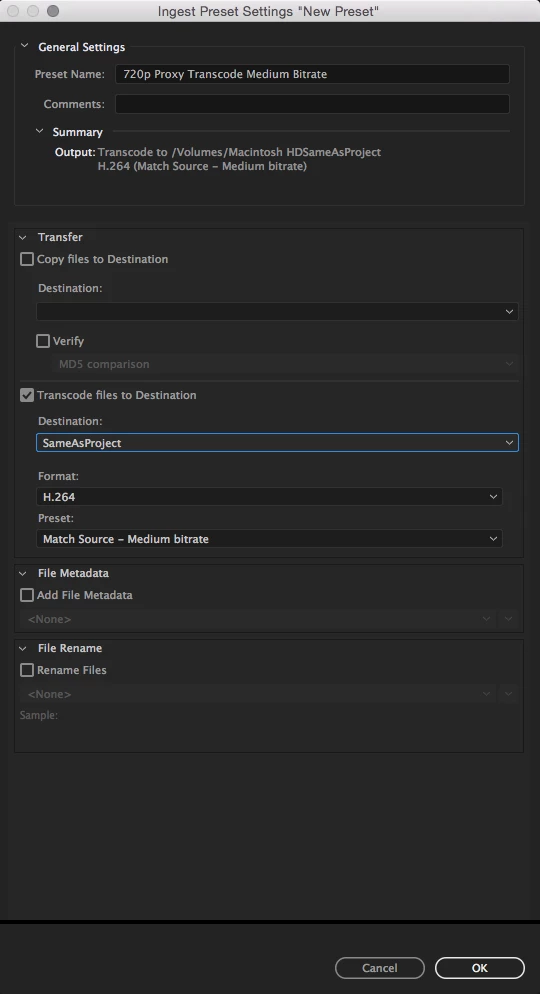
I was creating a new ingest preset in Media Encoder. According to Adobe's Knowledge Base, this is what should be happening:

NOTE:  If Transcode files to Destination is enabled in the ingest preset, the preset becomes available in Premiere Pro’s Ingest Settings dialog box under the Transcode and Create Proxies options, it is not available in the Copy and Copy and Create Proxies options.

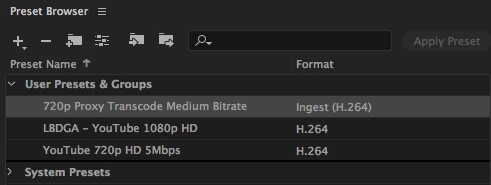
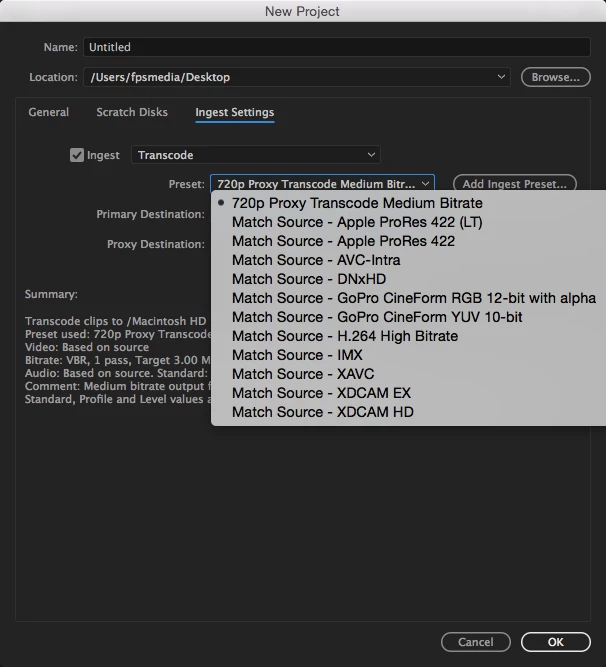
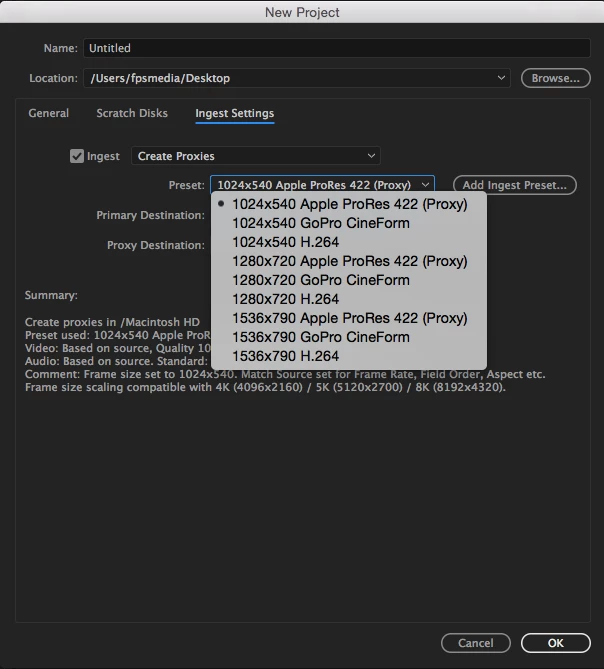
Now in reality, the preset only shows up in the Transcode option, but not the Create Proxies option (see images attached). If I manually select the preset by clicking on the ‘Add ingest preset’ button, then it goes back to the Transcode option again.

Does anyone have a solution for this? I’ve copied the preset manually into the ‘Ingest Preset’ folder in Documents and also within the application’s Settings folder where all the default presets are. No luck either.

This is so frustrating as I’m not able to use the preset I want to create proxies. I would be happy if I could change the default preset’s settings, but I can’t.

I'm using Premiere Pro & Media Encoder 2017 on Mac, but I had the same problem on my Windows machine using the 2018 versions.

Thank you for your help!

Laszlo

    This topic has been closed for replies.
    Correct answer Trent Happel

    I think I see two things that may help you to create a Copy and Create Proxies preset.

    1) You will need to create an Encoding Preset with either Frame Size (Width and Height) or Frame Rate that are not set to Match Source. One of the requirements for Create Proxy presets is that either Frame Size or Frame Rate must not be Match Source. If both are set to Match Source, then the preset will only be recognized as a Transcode preset.

    In AME, Create Encoding Preset, choose your Format and under Video tab > Basic Video Settings, click Match Source for all settings except either Frame Size or Frame Rate. For the one setting not set to Match Source, make sure that the Frame Rate matches or Frame Size is evenly divisible for the media that you intend yo use with the preset. If you have a wide variety of media with different Frame Sizes or Frame Rates, etc, you may need to create more than one preset in order to be compatible with all your clips.

    The supported workflow allows attachment of Proxies with other frame sizes & PAR (pixel aspect ratio) combinations that are divisible by the Full Res clip (for example, 1920x1080 1.0 PAR Full Res and 960x540 1.0 PAR Proxy or 1440x1080 1.33 PAR Proxy), but other parameters such as fielding, frame rate, duration, and audio channels must match.

    2) If you also want it to Copy (along with Create Proxy), you will also need to check Copy files to Destination checkbox (and add a destination) in Ingest Preset Settings. After you have created your Encoding Preset, Create Ingest Preset and in Ingest Preset Settings > Transfer, check Copy files to Destination (and set a destination) and also check Transcode files to Destination (and set a destination). Then select your Encoding Preset and Save your Ingest Preset.

    This preset should now import in Premiere as a Copy and Create Proxies preset.

    Some additional information can be found at:

    Adobe Premiere Pro Help | Ingest and Proxy Workflow in Premiere Pro CC 2015.3

    Hope this helps.

    2 replies

    Participant
    March 21, 2018

    I had the same issue (just not trying to copy to a new destination). I solved the problem by deleting the presets, restarting my computer, and then used a new naming convention.

    Hope this helps anyone else!

    Trent HappelCommunity ManagerCorrect answer
    Community Manager
    December 12, 2017

    I think I see two things that may help you to create a Copy and Create Proxies preset.

    1) You will need to create an Encoding Preset with either Frame Size (Width and Height) or Frame Rate that are not set to Match Source. One of the requirements for Create Proxy presets is that either Frame Size or Frame Rate must not be Match Source. If both are set to Match Source, then the preset will only be recognized as a Transcode preset.

    In AME, Create Encoding Preset, choose your Format and under Video tab > Basic Video Settings, click Match Source for all settings except either Frame Size or Frame Rate. For the one setting not set to Match Source, make sure that the Frame Rate matches or Frame Size is evenly divisible for the media that you intend yo use with the preset. If you have a wide variety of media with different Frame Sizes or Frame Rates, etc, you may need to create more than one preset in order to be compatible with all your clips.

    The supported workflow allows attachment of Proxies with other frame sizes & PAR (pixel aspect ratio) combinations that are divisible by the Full Res clip (for example, 1920x1080 1.0 PAR Full Res and 960x540 1.0 PAR Proxy or 1440x1080 1.33 PAR Proxy), but other parameters such as fielding, frame rate, duration, and audio channels must match.

    2) If you also want it to Copy (along with Create Proxy), you will also need to check Copy files to Destination checkbox (and add a destination) in Ingest Preset Settings. After you have created your Encoding Preset, Create Ingest Preset and in Ingest Preset Settings > Transfer, check Copy files to Destination (and set a destination) and also check Transcode files to Destination (and set a destination). Then select your Encoding Preset and Save your Ingest Preset.

    This preset should now import in Premiere as a Copy and Create Proxies preset.

    Some additional information can be found at:

    Adobe Premiere Pro Help | Ingest and Proxy Workflow in Premiere Pro CC 2015.3

    Hope this helps.

    FPS Media
    FPS MediaAuthor
    Participant
    December 12, 2017

    Thank you so much for your help! This solved the problem.

    All the best,

    Laszlo

    Community Manager
    December 12, 2017

    Glad to hear this worked for you.