Inspiring
April 27, 2021
Answered

Frameless Output Preset (Dark Skin)

  • April 27, 2021
  • 5 replies
  • 1189 views

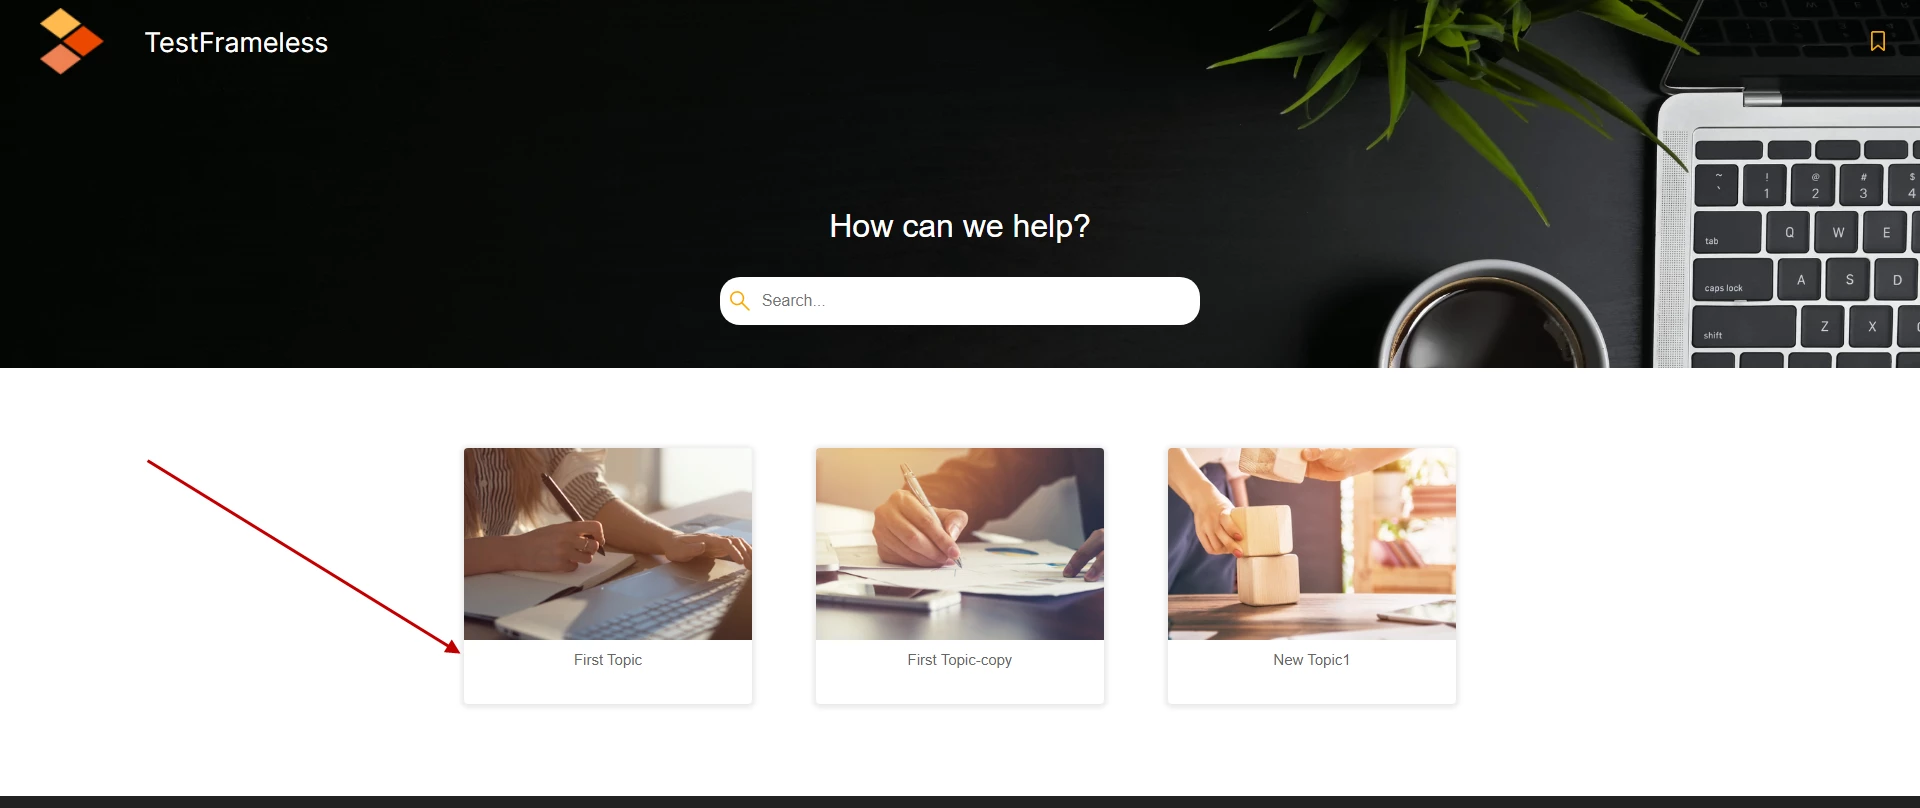
Is there any option to remove the shadow of TOC Tiles in homepage?
When I change the theme colors to dark, it is more prominent. I want to remove the effect.


    Correct answer Peter Grainge

    I just got this back from Adobe. The layoutdiff.css is in the publish>skins>yourskin folder in your project.


    I'm not sure but you may need to make that change whenever you customise the skin using the skin editor. Please check that.


    Option to edit shadow is not available from skin editor. It can only be removed by directly editing layoutDiff.css file by setting box-shadow to none for selector .RH-LAYOUT-HOMEPAGE-TOC-tile-box.


    .RH-LAYOUT-HOMEPAGE-TOC-tile-box {

            box-shadow: none;

    }

    ________________________________________________________
    See www.grainge.org for free Authoring and RoboHelp Information


    5 replies

    Peter Grainge
    Community Expert
    Community Expert
    June 10, 2024

    For the benefit of anyone coming across this thread, in Item 24 at RoboHelp Gems (grainge.org) I have added how to get rid of the grey border that will remain around the text part of the tile.

    ________________________________________________________

    My site www.grainge.org includes many free Authoring and RoboHelp resources that may be of help.


    Use menu (bottom right) to mark as Best Answer or to Highlight particularly useful replies. Found the answer elsewhere? Share it here.
    Peter Grainge
    Community Expert
    Community Expert
    April 28, 2021

    I have been advised that it will not be overwritten but you will not see it in the file.


    Don't ask me how that works! There's a special team of elves that Adobe must be using. 🙂


    The skin editor will include this option in an update. RH-9087 | Tracker (adobe.com)


    UPDATE 10 JUNE 2024

    Whilst looking into this I have found that some other changes to the layoutDiff.css can remove the box-shadow: none; line.

    I suggest you check each time you generate. I think but cannot be sure it is when you make other changes to the same selector.

    ________________________________________________________
    See www.grainge.org for free Authoring and RoboHelp Information

    Use menu (bottom right) to mark as Best Answer or to Highlight particularly useful replies. Found the answer elsewhere? Share it here.
    Community Manager
    April 28, 2021

    RoboHelp generates two stylesheets in your {OutputFolder}/template/{MySkinName}/ and appends them in the <head>:


    <link rel="StyleSheet" href="template/Dark/layout.css" type="text/css">
    <link rel="StyleSheet" href="template/Dark/userstyles.css" type="text/css">


    In your {MyProjectFolder}/publish/skins/{MySkinName}/ you can add a layoutdiff.css file and add your custom CSS to override what is in the layout.css and in the userstyles.css. The content of layoutdiff.css is appended at the end of the userstyles.css file and therefore overrides everything else.

    It's one of those "hidden" features in RoboHelp that are extremely powerful 😉

    Participant
    April 30, 2021

    Hi Stefan,


    I was trying out this option. Thanks for the solution. But I have a doubt here:


    Custom settings that aren't part of layoutdiff.css, and added manually, must be added everytime we publish the output? 


    Because, everytime I publish: I see the skin folder overridden with previous settings of layoutdiff.css( settings from GUI excluding additional properties manually added through back end).  

    Peter Grainge
    Community Expert
    Peter GraingeCommunity ExpertCorrect answer
    Community Expert
    April 28, 2021

    I just got this back from Adobe. The layoutdiff.css is in the publish>skins>yourskin folder in your project.


    I'm not sure but you may need to make that change whenever you customise the skin using the skin editor. Please check that.


    Option to edit shadow is not available from skin editor. It can only be removed by directly editing layoutDiff.css file by setting box-shadow to none for selector .RH-LAYOUT-HOMEPAGE-TOC-tile-box.


    .RH-LAYOUT-HOMEPAGE-TOC-tile-box {

            box-shadow: none;

    }

    ________________________________________________________
    See www.grainge.org for free Authoring and RoboHelp Information


    Use menu (bottom right) to mark as Best Answer or to Highlight particularly useful replies. Found the answer elsewhere? Share it here.
    Achal__Author
    Inspiring
    April 29, 2021

    Thanks Peter, it worked!!

    Peter Grainge
    Community Expert
    Community Expert
    April 28, 2021

    I had looked there and could not find anything about shadow so I tried border settings to no avail. I have reached out to Adobe and will post back when I hear from them.

    ________________________________________________________
    See www.grainge.org for free Authoring and RoboHelp Information

    Use menu (bottom right) to mark as Best Answer or to Highlight particularly useful replies. Found the answer elsewhere? Share it here.
    Community Expert
    April 28, 2021

    You don't mention which version of RH you have. Please include this information with every post, as the answer can vary depending on your version.


    I don't have access to RH2020 right now, but open the skin and look under Home Page > TOC Tiles > tile-box for something that mentions shadow. That would be where I would expect a setting, if one is available. Do note I'm working with RH2019 at the moment, so the relevant location in RH2020 might be slightly different. The editor should highlight the relevant part of the page, so poke around a bit if the section isn't correct.


    If you can't find a relevant setting, you should be able to open the output and use the browser developer tools to locate the correct style to modify. Add that to a custom css file and add  it in the skin under Layout > User Assets. 


    Let us know how you go.