
Known Participant
May 20, 2015
Answered

How to edit WebHelp TOC text

  • May 20, 2015
  • 10 replies
  • 667 views

I have a RoboHelp project that is complied in WebHelp. The current TOC has a very small font and each line of the TOC is crammed next to the line above and below--all else looks good.

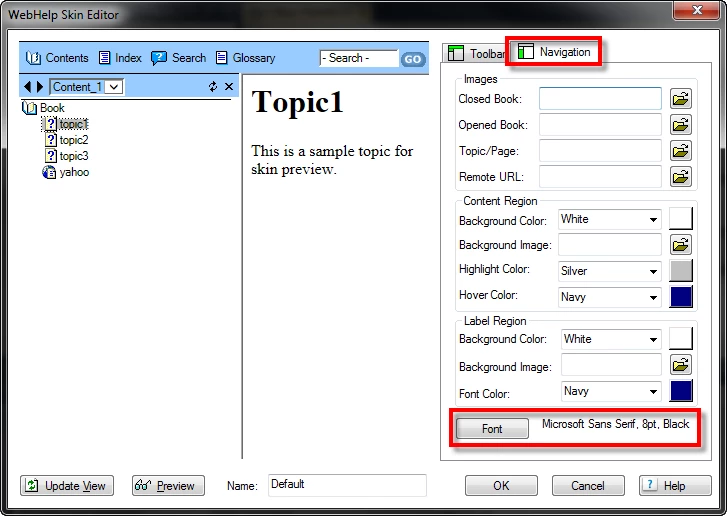
How can I edit the TOC font (make larger) and increase the line spacing between each TOC entry. I tried editing the CSS styles and this didn't work. Adobe support staff told me the TOC text was not initially intended to be edited.

I used to use Quadralay WebWorks Publisher Professional (during the early 2000's) and I used to edit the complied output. Is my issue something that I can resolve by editing the complied output? maybe using Dreamweaver or Notepad?

Please help.
This topic is closed to new replies. Start a new post to keep the conversation going.
Correct answer Captiv8r

Hi there

You do this by clicking View > Pods > Project Setup, then double-clicking the skin you are using.

Cheers... Rick

10 replies

Known Participant
May 21, 2015

Thank you so very, very much for explaining how I can increase the font size. And you suggestion works!! I was able to successfully increase the font size. However, can I increase the line height? each line of the TOC is still tightly packed.

Known Participant
May 21, 2015

To add to my previsou reply, thank you again for explaining how I can edit the font of the TOC. To more specifically answer your question, I am using the WebHelp XP Sliver skin. I am still hoping I can edit line height. T

Jeff_Coatsworth
Community Expert
Community Expert
May 21, 2015

Just did a quick test in RH11 using that SilverXP skin & if I bumped up the font to 18pt, it certainly increased the line height for me – post an example of yours (use the web interface for posting screenshots)

Jeff_Coatsworth
Community Expert
Community Expert
May 20, 2015

What sort of skin are you using? Maybe a screenshot of what you’re seeing would help us understand.

Captiv8r
Captiv8rCorrect answer
Legend
May 20, 2015

Hi there

You do this by clicking View > Pods > Project Setup, then double-clicking the skin you are using.

Cheers... Rick